Tutorials & Tips Archives - QC Makeup Academy
Category

Tutorials & Tips

Special effects makeup challenge article, Apr 28 2021, Feature Image

Makeup Challenge: Creating a Special Effects Makeup Look Using the WRONG Hand!

By From the Experts, Makeup Tutorial, Special Effects Makeup, Tutorials & Tips No Comments

Want to challenge yourself this upcoming weekend? Try creating a unique special effects makeup look using ONLY your non-dominant hand!

Gabrielle Rivera Attempts This Special Effects Makeup Challenge

Gabrielle Rivera is a graduate of QC Makeup Academy’s Master Makeup Artistry Course. Since one of her biggest niches is special effects makeup, she naturally jumped all over this challenge!

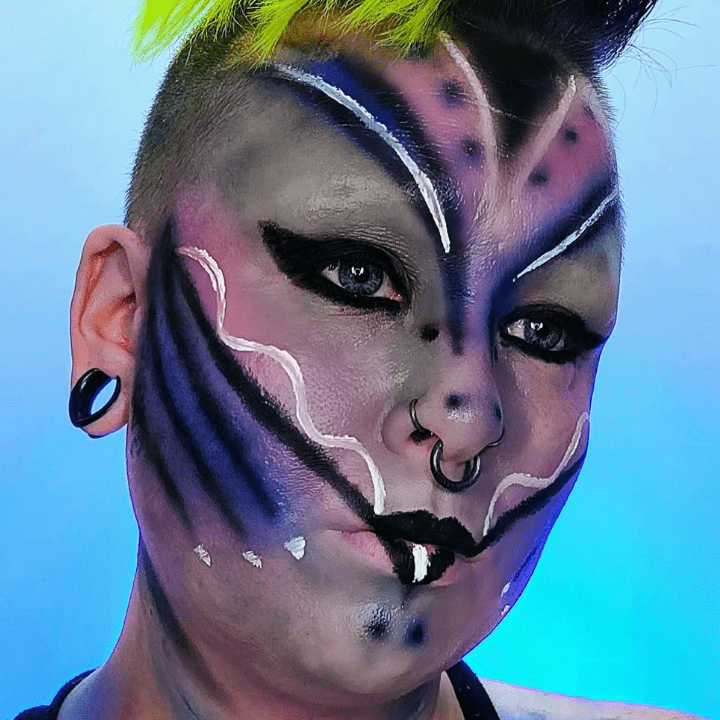
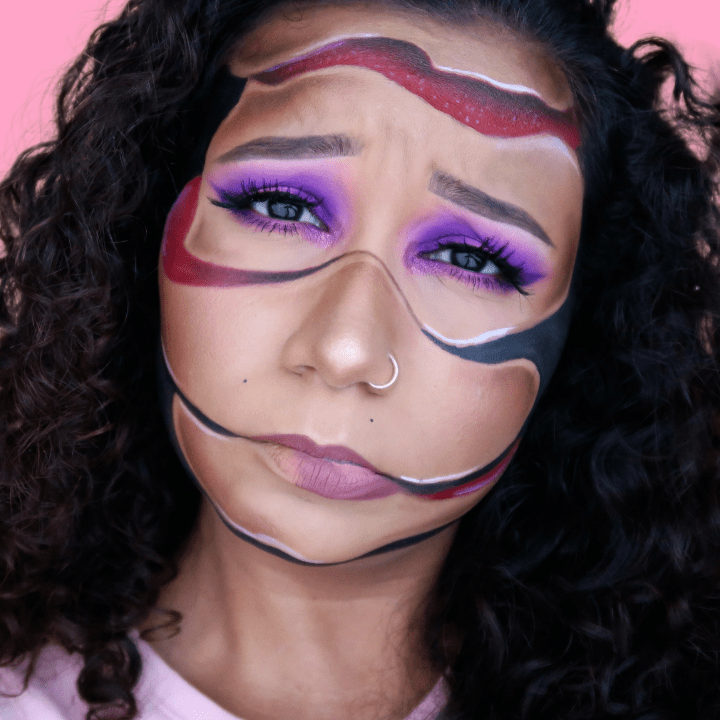
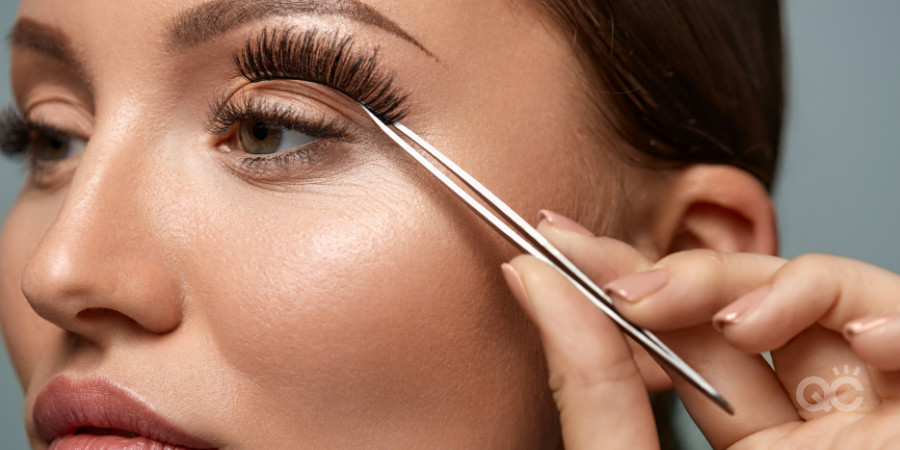
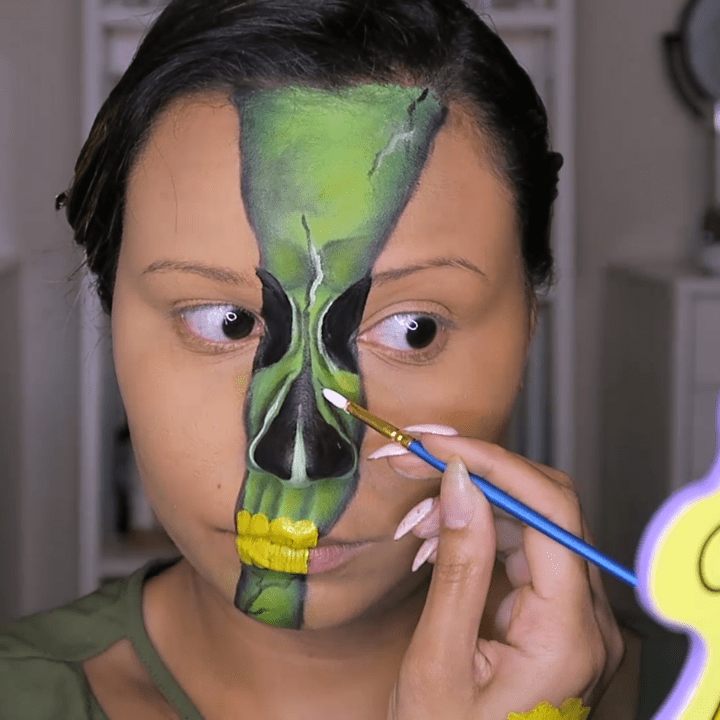
In the following video, Gabrielle attempts to recreate an SFX face chart originally created by Lauren Sullivan. However, she was tasked with completing this application only using her right hand. As a natural lefty, this would obviously prove to be quit the task!

So, how did Gabrielle do? You’ll have to watch the video below to find out!

Want to see more of Gabrielle’s makeup work? Check out her Instagram for some seriously awesome content!

Why Gabrielle Nailed This Makeup Challenge

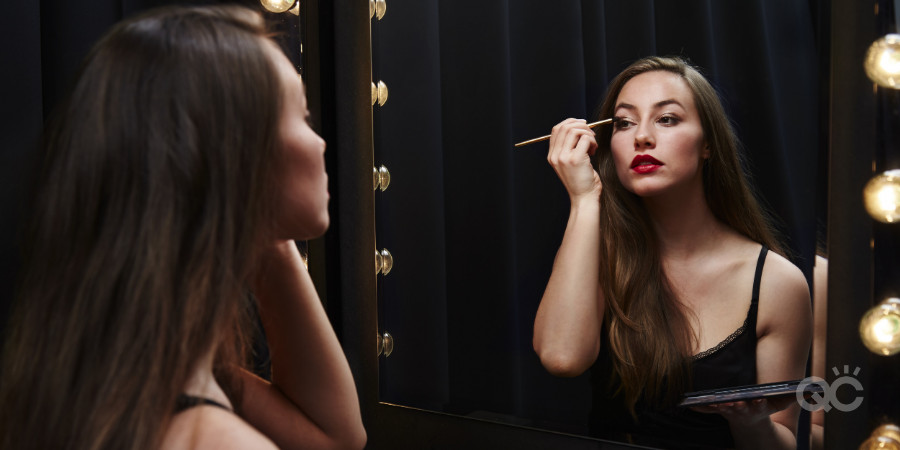
As you’ll see in the video, Gabrielle does a surprisingly great job at creating a full SFX makeup application using her non-dominant hand. If you’re wondering how this is possible, there’s actually a very simple answer.

(No, it’s not because she practiced a million times beforehand. We pinky promise!)

The truth is, it’s all due to the professional training Gabrielle already has under her belt. Although she wasn’t able to use her dominant hand, Gabrielle still knew exactly what she was supposed to be doing. You see, when you learn the fundamentals of makeup artistry, you’ll know how to apply them correctly – regardless of which hand you use.

Sure, the application might have looked a bit more polished and precise had Gabrielle used her left hand. But the fact that she didn’t and it still turned out as amazing as it did is a true testament to Gabrielle’s educational background and skill!

Special effects makeup, glass all over female model

Become a Special Effects Makeup Expert Through QC Makeup Academy

In QC’s 4-unit Special FX Makeup Course, you’ll discover:

  • Safe and sanitary application for special effects makeup;
  • How to identify and work with common skin disorders;
  • The art of applying aging makeup, bald caps, and working with fake hair;
  • How to work with prosthetics;
  • The steps to creating a unique SFX and/or fantasy character;
  • How to create realistic gore/wound effects;
  • The critical components of starting and marketing your own MUA business;
  • And so much more!

What are you waiting for? Become an internationally-certified special effects makeup artist in as little as 3-6 months by enrolling with QC today!

QC’s Airbrush Makeup Workshop: Creating a Fantasy Look [Tutorial]

By Airbrush Makeup, Student Ambassador, Tutorials & Tips 2 Comments

Want to expand your skills and add airbrushing services to your repertoire? QC Makeup Academy’s Airbrush Makeup Workshop will teach you everything you need to know AND give you a professional certification!

QC Ambassador, Amanda Ramey, Shows How She Created A Fantasy Character with Airbrush Makeup!

Amanda is a professional makeup artist and a graduate of QC Makeup Academy’s Master Makeup Artistry Course, Pro Makeup Workshop, and Special FX Course.

Recently, Amanda also completed her Airbrush Makeup Workshop and received her professional certification!

Today, she’s here to recreate the airbrush look she designed for the final assignment of her airbrush course. Check out her video to see how Amanda brought her character to life!

Want to connect with Amanda directly? Join QC Makeup Academy’s Virtual Classroom on Facebook today!

QC’s Airbrush Makeup Workshop

In this specialty workshop, you will work with celebrity makeup artist Nathan Johnson and Special FX expert Michele Mulkey. With over 35 years of combined experience, you will learn how to use airbrush makeup to create flawless complexions and special FX fantasy looks.

  • Safety and etiquette;
  • Pros and cons of airbrush makeup;
  • Airbrush makeup techniques;
  • Applying airbrush foundation;
  • Blush, contour, highlight applications
  • Airbrush corrections;
  • Stenciling;
  • Special FX for fantasy characters;
  • And more!

When you enroll, you’ll receive printed course books, over 200 minutes of instructional videos, and best of all, a FREE 9-piece Airbrush Makeup Kit! Your airbrush machine, along with a variety of airbrush makeup foundation and fantasy colors, will help you create a variety of looks.

QC’s Airbrush Workshop is entirely self-paced, so you can work on it on your own time with no deadlines. You have up to two years to complete your course, but if you dedicate a couple of hours each week to your course, you can graduate as quickly as 3 to 6 months!

Other QC Perks

Here are a few more reasons why you should enroll in the Airbrush Makeup Workshop and become a QC student:

  • You’ll get 50% off any additional courses you enroll in!
  • Take advantage of exclusive product discounts with QC’s preferred makeup partners
  • All of our courses include free business training to prepare you for a new career
  • You have lifetime access to all of your course materials
  • Our certifications are internationally-recognized
  • Join a community of makeup professionals in our free Virtual Classroom on Facebook

Expand your skills today and become a more competitive makeup artist. Enroll in QC’s Airbrush Makeup Workshop!

special effects makeup video gabrielle rivera feb 25 2021 feature image

Recreating My Very First Special Effects Makeup Look! [video]

By From the Experts, Special Effects Makeup, Tutorials & Tips No Comments

Want to work as a special effects makeup artist? QC Makeup Academy’s Special FX Makeup Course will teach you everything you need to know AND give you a professional certification – all within just 3-6 months!

QC Grad, Gabrielle Rivera, Recreates Her Very First Special Effects Makeup Look!

Gabrielle Rivera is a graduate of QC Makeup Academy’s Master Makeup Artistry Course. She now works as a professional MUA, with a specialization in special effects makeup. Check out more of Gabrielle’s work on Instagram!

Today, she’s here to recreate her first ever SFX look, done back in 2013. Let’s see what changes she makes now that she has reputable training and years of in-field experience under her belt!

Want to learn more about Gabrielle’s credentials? Check out this blog article wherein she discusses her experience working as a special effects makeup artist for a haunted house!

QC’s Special FX Makeup Course

In this 4-Unit program, you’ll learn all about:

  • Safe and sanitary makeup application;
  • Identifying and working with common skin disorders;
  • Aging makeup;
  • Bald cap and fake hair application;
  • Creating trauma makeup and special effects;
  • How to work with fake blood;
  • Handling SFX prosthetics;
  • How to work with clients;
  • Marketing your services;
  • How to start your very own business;
  • And MUCH more!

Once you enroll in this course, you’ll receive direct digital access to your textbooks, instructional videos, templates, quizzes, and assignments. You’ll also receive a physical copy of your course materials in the mail. Alongside these course materials, QC will also send you a FREE starter special effects makeup kit!

You’ll have a full 2 years to complete the course – although you can easily complete it in as little as 3-6 months, if you’re able to devote 1-2 hours per week on your studies. Upon graduation, you’ll receive an International Special FX Makeup Professional (ISMP) certification.

This means you’ll be able to show off your SFX training to all of your future clients and potential employers!

special effects makeup artist creating wound effect on client's hand

Additional Perks of Training with QC

Here are just a few more reasons why you should enroll in the Special Effects Makeup Course and become a QC student:

  • All of QC’s courses are offered online, so you can train from wherever works best for YOU!
  • Our self-paced learning environment allows you to work at your own pace – meaning NO deadlines or schedules to follow!
  • QC has been a pioneer of online learning since 1984 and holds an A+ ranking with the Better Business Bureau!
  • We have over 270 raving reviews on our Facebook page alone!
  • Your assignments will provide you with tons of real-world, hands-on training!
  • Our certifications are internationally-recognized!
  • QC’s competitive tuition rates and low monthly payment plans work for practically EVERY budget!
  • Plus, we offer a new promotional offer for both new and existing students every month!
  • There’s a full community of peers and tutors to connect and network with in our free Virtual Classroom on Facebook!
fantasy makeup design

Perfecting the “No Makeup” Look Tutorial [video]

By From the Experts, Tutorials & Tips No Comments

Devyn Gregorio is a QC Makeup Academy Student Ambassador and professional makeup artist. You can find her on her YouTube Channel, DevDevGregs, where she makes beauty videos. Today, Devyn walks us through the step-by-step process of her “no makeup” makeup look!

As you learn how to do makeup, know that there’s more to being a makeup artist than mastering the smoky eye, or a dramatic nighttime look.

Sometimes, less is more! Being able to create the perfect “no-makeup” demonstrates to your clients that you truly understand the makeup theory behind your work. By using makeup to bring out a person’s natural features, you’ll create a final result that gives the illusion of wearing little to no makeup at all.

This skill is especially useful if you’re looking to start a career in the TV and film industry! So, whether you wish to give YOURSELF a casual no-makeup look this summer, or you want to prepare yourself for future clients, this tutorial is for you.

Let’s get to it!

Watch Devyn’s video below!

Makeup Products Needed:

Luckily, because the entire purpose is to go for subtlety, you won’t require your entire makeup kit to create this look. Below is the list of specific products that Devyn uses throughout her tutorial. Feel free to use your own makeup products in replacement of hers.

Here’s what Devyn used:

1. Primer. Devyn uses e.l.f. Jelly Pop Dew Primer, but you can use whichever primer you most prefer!

2. Foundation. Use the product and shade of your choosing. Devyn selects NYX’s Bare With Me Tinted Skin Veil, and mixes the shade, True Beige Buff, with Cinnamon Mahogany.

3. Concealer.

4. Bronzer. Devyn selects the Wet n’ Wild MegaGlo Contour Makeup Stick, in the shade, Oaks On You. This product offers a creamy texture for her bronzer. In addition, she also uses a powdered bronzer (MAC’s Give Me Sun! bronzer).

5. Highlighter. In this tutorial, Devyn uses the highlighter product from the Alamar Cosmetics Brighten & Bronze Complexion Trio kit (in Medium/Tan). In addition, she also uses Maybelline’s Master Chrome Metallic Highlighter (in Molten Gold).

6. Brushes. In particular, you’ll want:

  • A large, fluffy brush for your bronzer
  • A contour blender brush
  • A powder brush
  • A highlighter brush
  • A brow brush

7. Loose setting powder. Devyn’s loose setting powder of choice is Juvia’s Place I Am Magic Setting Powder, in the shade, White Sands.

8. Blush. Devyn’s chosen blush is ColourPop’s Fresh n’ Peachy.

9. Brow pencil. Devyn uses NYX’s Micro Brow Pencil in the shade, Brunette.

10. Setting spray. As with the rest of this list of products, feel free to use whichever setting spray you want! Devyn selects Wet n’ Wild’s PhotoFocus 3-in-1 Primer Water.

11. Mascara. In this tutorial, Devyn uses Benefit Cosmetics’ BADgal BANG! Volumizing Mascara.

12. A lip product of your choosing, such as lip balm, a clear gloss, etc. Devyn chooses e.l.f.’s Sheer Slick Lipstick in the tone, Cherry Slush.

Let’s Recap!

Before diving into any of the steps, Devyn first reiterates the most important thing to remember when creating a natural makeup look: use a LIGHT hand!

After all, it’s always easier to build up a look’s intensity. It’s a lot harder to take away from a look if you go in with a heavy hand, right from the get-go. So long as you apply your makeup in thin, sheen layers, you’ll quickly discover that you can still use ALL of your regular products – even for this laid-back “no makeup” look!

Now, let’s move onto the look itself…

Step 1: Prime Your Skin.

Even though the name suggests no makeup, you know that you’re still going to be putting makeup on your face. As such, it’s important to properly prime your skin first. Not only will it make your skin feel its best, it’ll help protect your pores from getting clogged!

Step 2: Apply Foundation.

Next, Devyn applies a lightweight foundation to her skin. Because she currently has a bit of a tan, she chooses to mix two shades together, in order to match as closely as she can with her skin tone. Notice how she first uses her finger to apply the foundation to her skin, before blending it in afterwards with a blending sponge.

Because our hands have a natural tendency to warm up our makeup product, don’t hesitate to do the same when applying your foundation. Just make sure that your hands are cleaned and sanitized with soap first!

As you can see, Devyn’s skin looks a lot more evened out after applying her foundation. However, it’s not full coverage, as the aim of this look is still to appear natural.

Step 3: Apply Concealer.

Once again, you’re aiming for the “no makeup” illusion. So, here’s where keeping that light hand in mind is key! Here, Devyn applies a small dot of her concealer below each eye, before using her finger to pat it in and blend it out.

The final result should brighten and cover the skin beneath your eyes, while still looking breathable!

If you wish to take this a step further, you can add some brightness to your forehead and chin by applying the same small amount of concealer to these areas as well. Should any areas of your face require some spot concealing, feel free to tend to that, too.

Step 4: Time to Contour!

Rather than apply the bronzer directly to her face, Devyn instead uses her e.l.f. Precision Airbrush Stipple brush to apply the product. This allows for lighter coverage, in keeping with a more natural, organic look.

She applies her bronzer right onto her brush, before gently tapping it over the typical areas where she would bronze, such as her:

  • Cheekbones
  • Outer area of her forehead (near the hairline)
  • Around the jawline, blended downward into the neck

Next, Devyn moves onto powdered concealer and contour products. Using her Alamar Cosmetics trio palette, she takes a contour blender brush to first gather some of the highlight shade. She then gently presses it onto her under-eye areas.

Step 5: Set with Powder.

Now it’s time to set the rest of your face with some loose powder! Using a fluffy powder brush, press the powder throughout your face. This will help set both the liquid and cream products you’ve previously applied.

At this point, if you wish to go back over your bronzer with a powdered bronzer, you can do so for an added little POP!

Step 6: Additional Highlighting.

If you aren’t a fan of highlighting your skin, feel free to skip this step.

Here, Devyn relies on a highlighter she typically uses in her everyday makeup look. Once again, the secret here is to use a light hand! This can create a whole new affect on your skin.

After tapping a highlighter brush two times against her product, she swipes the brush head along her cheekbones and temples, using a feathery-light pressure. Keeping a loose grip on your brush handle will help you achieve these dainty strokes.

Since you’re trying to make it look as though you’re wearing little to no makeup, the goal with your highlighter is to make it appear as though you’re organically catching the light in certain angles. You DON’T want your highlights to be too obvious!

Step 7: Add Blush.

This is Devyn’s final step to finishing off your complexion. Lightly tap and press your blush into apples of your cheeks. This will bring a bit of a natural redness back to your skin, in the places you want it most!

Step 8: Define Your Eyebrows.

Time to move onto your brows! Taking her micro brow pencil, Devyn aims to perfect her existing brows – rather than completely fill them in or reshape them. Start by combing them up. This will allow you to see where their natural shape is. This is the shape you want to honor in this “no makeup” look!

Then, whenever you see spare areas, fill them in with fine, hair-like strokes. Start at the bottom of your eyebrows, and work your way up. Once finished, use your brow brush again to help blend everything together.

Step 9: Apply Eyeshadow…

…Just kidding! This is a “no makeup” look, after all!

Actual Step 9: Apply Setting Spray!

Devyn’s now ready to move onto her eyes. But before she does that, she prefers to apply her setting spray. Right before the spray is completely dried, Devyn takes a little more of her powdered highlighter and applies it to her eyelids.

Step 10: Put on Mascara.

If you wish to curl your eyelashes first, go ahead! If you don’t feel like doing this, though, that’s okay, too. Using your mascara of choice, apply it to your upper and lower lashes. Depending on how intense you want the final result to be, feel free to go back in and add another coat of mascara.

Step 11: Finish with Your Lips!

The final stage to Devyn’s process is to apply some sort of lip color/product. The beauty of the “no makeup” look is that there are a LOT of options for what you can choose to wear! The most important tip to remember is that dry lips will not complete any look.

Even though you’re going for a natural illusion, even just a thin layer of Chapstick can add a little extra shine to your beautiful pout!

If you’d prefer to add a bit of color, stick to soft, natural shades. Pink and peach colors are awesome choices! If you choose a product with a stronger pigment, gingerly tap it onto your lips so as not to get too bold of an application. You’ll be able to add some nice color and hydration, without overdoing it and ruining the “no makeup” mirage.

And with that, your “no makeup” look is complete!

Did you follow along with Devyn, and give this look a try? If so, let us know how it turned out in the comments below!

Want to learn how to do makeup professionally? Enroll today in QC’s internationally-leading Master Makeup Artistry Course, and become a professional makeup artist in as little as 3-6 months!

Special Effects Makeup: Sliced Face Tutorial [video]

By From the Experts, Tutorials & Tips No Comments

Gabrielle Rivera is a QC Makeup Academy graduate and professional makeup artist. To see more of her work, visit her Instagram here.

Part of being a special effects makeup artist – or even just an MUA in general – is about keeping up with popular trends! One such trend that’s been gaining more and more popularity is the sliced faced SFX look, originally created by the “Queen of Illusion Makeup”, Mimi Choi.

Want to learn how to master this look? Gabrielle’s here to break down each step, from start to finish!

Watch her video below!

Makeup Products Needed:

For such an elaborate special effects makeup look, there are surprisingly very few products you need when following along with Gabrielle’s special effects makeup tutorial! Keep in mind that you’re more than welcome to use any of your own products, in place of the ones Gabrielle is using.

Below is the list of makeup products she used to create the sliced face look on herself:

1) A brown eyeliner pencil.

Gabrielle recommends using a color that’s close to your complexion! Because you want the final product to appear realistic, don’t use a black eyeliner pencil. The color will be too harsh, and will give you trouble when trying to blend it into your natural skin tone.

2) Body paints.

Gabrielle uses some of the Paradise Paints by Mehron. Specifically, she chooses the white, black, and red colors. If you don’t have access to body paints, Gabrielle suggests using everyday makeup items in their place, such as:

  • Red lipstick
  • Eyeshadows
  • Eyeliners

Basically, use whatever you have at your disposal!

3) Brushes.

Because you’ll need to be precise in certain parts of this look, arm yourself with some smaller brushes! This will help you have the most control over your product, especially when coloring in between tighter lines. A reliable shader brush will also come in handy, too!

4) Eyeshadows.

Try to match the shades you use with the paint hues you select for this look. For example, Gabrielle sticks to red, black, and brown eyeshadows.

Let’s Recap!

Notice how Gabrielle has already created a bright, purple smoky eye before starting her tutorial. You can feel free to do this look with a bare face, if you’d prefer. However, if you’d like to spice it up with a bit of a glamorous twist, you can first create a smoky eye of your choosing.

Now, let’s start breaking down this special effects makeup look!

Step 1: Creating the Outline

Gabrielle begins by taking her brown eyeliner pencil and lightly outlining her face. From there, she begins creating additional lines and loops on the main parts of her face (i.e. nose, cheeks, jaw, forehead, etc.).

Many of her lines connect with each other, and add dimensional depth. This step is creating the overall design of your sliced face look.

Remember: As you follow along with Gabrielle, leave spaces between the lines, wherever she advises you to! These gaps will be filled in with a different color later.

Note: You can play around and have fun with the way you outline your face! You don’t need to follow the exact design that Gabrielle is doing. Just remember that asymmetry is key to this look! You don’t want everything to be perfectly balanced on both sides of your face. After all, you’re trying to create the illusion that your face has been slashed!

Step 2: Filling in With Red Paint

Now that Gabrielle has finished the initial outline, it’s time to go in with her red SFX paint! This is going to really help define each of the sections she’s drawn, and make them pop.

Since her paints are water-activated, she sprays a bit of water onto the lid, before wetting her brush and dipping it into the paint.

Then it’s time to apply the paint onto her face! Notice the way Gabrielle carefully follows the outline when filling in her desired sections. For those tighter sections between the lines, use a thin brush.

Step 3: Shading with Black Paint

Once Gabrielle has finished with the red paint, it’s time to fill in the larger sections with black. You’ll notice how these black sections are strategically placed around the outer part of Gabrielle’s face, such as her jawline, temples, and upper forehead. This is so that Gabrielle’s face is framed, and made to appear smaller.

Step 4: Adding Depth to the Red Paint

Using a flat shader brush, Gabrielle then uses a burgundy shade to add definition to the red paint from Step 2. Using a light hand, she pats on this darker red just along the upper lines, right below where her natural skin tone starts.

With a small, flat-headed brush, Gabrielle then grabs some black and adds it to all the high points of her red sections. Once you’ve created the initial outline, use your brush to lightly drag the black down into the red. This will help blend the black in, and add even more depth!

Step 5: Incorporating Some Shading

Gabrielle prefers using her flat shader brush (specifically, the Morphe m167) for this step. However, feel free to use your own blending brush of choice!

She then refers to her Morphe Dare to Create Palette, selecting the Stroke (matte warm tan) and Mass (matte chocolate mousse).  Don’t forget to tap off any excess product from your brush, before applying it to your face!

Following along all the lines and curves Gabrielle has already painted on her face, she makes sure to leave a bit of room between the paint and the eyeshadow she’s applying now. For this step, a lighter hand is your best friend! Apply thin, sheen layers, and blend them inward. If you need to add more intensity, do so by adding more of these sheer layers.

The finished result will look like natural shading across your face!

Step 6: Adding More Depth

Taking a slightly darker brown than what Gabrielle used in the previous step, she then goes back in and adds the tiniest bit of depth to the brown shading. To achieve this, she pays close attention to keeping her brush strokes contained to the very outer corners.

Step 7: Creating a Fake Bottom Lip

This step is a lot less dramatic than the subtitle implies, don’t worry. All Gabrielle does here is apply some soft pink liquid lipstick. (Again, feel free to use whichever lip color you want!) When applying this product to the left-hand side of her bottom lip, she extends the coverage a bit further downward.

This creates the appearance of that side of her bottom lip being larger than it actually is.

Step 8: Highlight with White Accents

Here, you can use white eyeliner, white paint, a lightly-toned concealer, or whatever you most prefer! Just ensure that it’s a light shade, in order to best create the highlighting effect.

With a thin, fine detail brush, Gabrielle uses white body paint to draw thin accent lines throughout her design. Lastly, Gabrielle stipples tiny white flecks into the red section, before blending them with her finger.

The purpose of this final step is to make all those red and black sections really stand out. It also gives the overall look an extra level of profundity!

And just like that, you’re done!

Did you enjoy this special effects makeup tutorial? If so, check out Gabrielle’s other tutorial, where she demonstrates how to create a bejeweled skull!

Tried this tutorial on yourself? Let us know how it turned out in the comments below!

Want to become an SFX pro? Enroll today in QC’s leading online Special FX Makeup Course, and earn your International Special FX Makeup Professional certificate within 3-6 months!

Makeup Looks to avoid on Valentines - Featured

5 Makeup Looks and Hairdos to Avoid on Your Valentine’s Day Date

By Makeup Trends, Tutorials & Tips No Comments

Whether you’ve got plans with your boo, you’re enjoying a girls’ night out, or you’re treating yourself to a fancy night of TLC, we want you to look and feel your best on Valentine’s Day. You’re fierce both inside and out – so the last thing we’d want is for a poor makeup choice or an unflattering hair-do to dull your shine!

We’re sure you know what you’re doing… But just in case, we thought we’d throw a few suggestions out there of things to avoid. Better safe than sorry, right?

Keep reading for 5 makeup looks and hair styles not to do on yourself…

1. Foundation that doesn’t match your skin tone

We’re all guilty of doing this at least once. Unfortunately, some of us are guilty of doing it still. Firstly, when it comes to foundation, you want to make sure that the product you’re using is good for your skin type. For example, if you have oily skin, you don’t want your foundation to clog your pores and make you break out even more.

But the other most important thing about your foundation is that it should match your natural skin color. Otherwise, your whole face is one shade, and then suddenly a different one from the neck down. The result is both comical and unnatural. It’s also 100% obvious when someone looks at you. We know these aren’t the impressions you’re trying to make with your makeup.

A lot of people mistakenly think you should use your inner wrist when trying to color match a foundation for your skin. This is incorrect. To best find your foundation color, test on both your neck and your jawline. When you find a shade that best matches both areas, you’ve found your perfect foundation!

Makeup Looks to avoid on Valentines - Lipstick on Table

2. Too much hairspray and too many bobby pins

Before I chopped off my hair into a pixie cut, I was the total worst when it came to this. I was awful at up-dos, and could only achieve the intended result with about 700 bobby pins and half a can of hairspray to hold everything in place. Even on the off chance that it looked decent enough, it felt disgusting.

Anyone with a sensitive scalp can tell you how bad of a headache bobby pins will give you after a while – especially if you have dozens of them trying to poke you in the brain. Not to mention the fact that your hair will also be as solid as a rock from all that hairspray! Good luck having anyone romantically run their fingers through your locks… They may just break right off in their hand.

Makeup Looks to avoid on Valentines - Woman Fixing Hair

Oh, and remember when I said that at least it might look decent enough? Yeah, that’s only ever from the very front. Eventually, when you use too many bobby pins, they have nowhere to hide. Your up-do turns into something that’s 50% hair and 50% pins. Messy, overcrowded pins. It’s not a good look.

Some people are born with a natural talent to style hair. Others (like myself) are not, and would require a hair styling class in order to properly learn. Once you do learn, however, you gain the ability to learn how to best manipulate hair with hair products, styling tools, and heating tools. What you once had to do with 700 bobby pins, you’d learn to do in 7 – and with only a few spritzes of hairspray!

3. Lashes for days, in all the wrong ways

When properly applied, fake lashes are absolutely gorgeous! They can accentuate the beauty already there, frame the eyes, and draw attention to them. With so many styles, falsies can be as subtle or as bold as you want. But it definitely takes practice to become a fake lash pro!

Until you’ve gained some experience, fake eyelashes can straight up suck. Ever got eyelash glue in your eye? Not fun! It’s messy, it’s uncomfortable, and it can very easily ruin that amazing eye makeup you just spent all that time putting on. Not to mention, if you don’t take the time to properly size and trim the falsies (if need be), they will NOT fit you properly, and it WILL be noticeable.

One other quick thing: when you do manage to apply them, take a moment to go over your upper lash line with some liquid eyeliner. It doesn’t need to be thick my any means; it just needs to be enough to cover up any glue peeking out from beneath the lashes. Again, we’re willing to be that you’re trying to create the appearance of the lashes being as organic as possible.

Otherwise, while you’re having dinner with Prince Charming and think to yourself, Oh my god, he can’t stop staring into my eyes… He must really like me! There’s a chance he may really just be confused by the random goopy stuff on your eyelids.

Makeup Looks to avoid on Valentines - Woman Applying False Lashes

4. Burnt hair everywhere

Another wonderful benefit to hair styling class is that you learn how to properly handle heating tools, such as a straightener and curling iron. There’s a whole section of YouTube full of people who probably would have benefited from such lessons. That’s right! I’m referring to those who have quite literally burnt their actual hair off when trying to style it with a heating tool.

Wrap it around a white hot curling iron too tightly and/or keep it there too long? You may very well lose that chunk right then and there. That’s just one example… Seriously, heating tools are not to be taken lightly. They can really mess up your hair, if not used properly! Sure, hair grows back, but in the meantime, you’re stuck with the damage that’s been done. Some incidents are so bad that a haircut by a trained hair dresser may be the only thing capable of salvaging it!

Not to mention, it really hurts when you accidentally burn yourself! Try having to explain on your Valentine’s Day date that no, that huge red mark is not a hickey – your straightener slipped, and yeah, it still hurts, and yes, you may need to take this date to the hospital. At least that would make for a pretty memorable meet-cute!

5. Raccoon Eyes

Who doesn’t love a good smoky eye! Well, I guess that depends on one question: has it been blended properly If yes, perfect! You’re on fire!

But if not, there’s a chance you may look like a sad raccoon. Let me explain: if the eyeshadow above the eye is not blended, it often times is too dark, too harsh, and too clunky. It definitely isn’t going to look natural, that’s for sure. (If that’s your thing though, then by all means, do you!) Below the eyes, applying too much product and/or not blending it properly can create the illusion that you’ve been crying, and that your makeup has now started to smudge down your face.

Hence, a sad raccoon.

Don’t get me wrong, I personally think raccoons are adorable! I just doubt that’s how you want to feel at a nice, fancy restaurant on Valentine’s Day.

Makeup Looks to avoid on Valentines - Woman Applying Eye Makeup

Of course, the best way to learn how to do your hair and makeup, so that it ALWAYS looks its best, is to study it from real-life experts! Whether you have a Valentine’s Day date this year or not, who cares? You can still treat yourself, and what better way to do that than by turning your passion into a lifelong career?

Use Valentine’s Day this year to love yourself. Enroll in hair styling class and makeup courses, and become the very best at what you do!

Thinking about adding hair styling services to your makeup business? Here are 4 of the top reasons why you should!

Spectacular long-haired woman laughing while posing on snow background. Outdoor close-up photo of caucasian female model with romantic smile chilling in park in winter day.

How to Keep Your Winter Skin Happy and Healthy

By Education, Tutorials & Tips No Comments

Winter can be a truly beautiful time. Unfortunately, depending on where you live, it can also be downright awful. All those cold winds, freezing temperatures, and snowy days are just the worst sometimes. If you live somewhere where the air hurts your face, you have to work extra hard to make sure your skin doesn’t suffer due to the weather!

Winter skin is often times unhappy skin: dry, irritated, raw, and itchy. But it doesn’t have to be! Here are 6 tips you can follow to bring the summer back to your skin, even in February!

1. Get rid of fragrance-filled beauty products

Whether it’s your soap, moisturizer, etc. if the product has a scent, it could be packed with irritating chemicals and ingredients. Fragrance ingredients in skincare and makeup products are one of the biggest reasons why people’s skin reacts negatively, such as with allergic reactions, redness, itchiness, rashes, etc. These are already problems that your skin has to face from the winter season alone… Your skincare products shouldn’t make it worse!

Instead, you should opt for natural, fragrance-free products – especially for whatever cleansers/soaps you use to wash your face. The ingredients are way safer for your skin, with far gentler cleansing effects. Just be careful that you read the label of your products carefully, and specifically choose “Fragrance-Free” instead of “Unscented”.

Remember:

  • Fragrance-Free = no fragrance materials or scent chemicals are in the product, while
  • Unscented = it doesn’t have a scent, but it still contains specific chemicals that are meant to neutralize odors
Smiling glad dark skinned young woman puts soap on face for cleansing, washes with cold water, wants to have healthy fresh skin., wears headband, looks positively at camera, stands naked indoor

2. Don’t neglect your sunscreen

Wait, sunscreen in winter? You betcha! Even though it’s overcast most of the time in winter, the sun still exists behind those clouds. While that could be used as some sort of inspirational, motivating catchphrase, when it comes to your skin, this spells danger. You see, there are 2 culprits behind those dreaded UV rays: UVB and UVA.

Girl blowing on the snow in the park in winter.

While it’s true that UVB is weaker during the winter (thanks to cloudy weather), UVA is just as prevalent in the winter as it is during the summer. UV rays are at their strongest in the summer, but they’re only just a little less strong during the colder months. Basically: we always should wear sunscreen.

Always use sunscreen with an SPF of 15 or higher. If you’re worried about it making your face extra chilly when you step outside, simply remember to put it on a few minutes before you leave the comfort of whatever warm room you’re in. Give it a few minutes to soak into your skin, and you should be fine!

3. Use the right moisturizing products

Remember: you live in an area where the wind hurts your face. Anytime you expose your skin to the winter weather, it’s getting dried out unless properly protected. Not to mention, we often combat the outside cold by keeping our homes super warm. The startling contrast between the two is going to cause your skin some confusion.

So don’t forget to moisturize! Doing so morning and night will help lock in your skin’s natural moisture, and keep it better shielded from the seasonal ailments. For your day moisturizer, it never hurts to use a product that – like your sunscreen – contains SPF. In the evening, apply a richer night cream. It’s thicker, will provide better coverage throughout the night.

Smiling pretty woman applying cream on her face in bathroom

4. Create the right environment at home

As the song goes, the weather outside if frightful… But is the fire at home so delightful? Sure, but what about when the heat is also cranked all winter long? In our attempts to stay warm, it’s easy to inadvertently turn the inside of our home into the Sahara desert for our skin. While you can use the right beauty products, as we discuss above, what about measures you can take in the home itself?

For starters, you can help keep your skin healthy and happy during the winter by increasing the moisture in the air. This can be done by using devices such as a humidifier. While you don’t need a humidifier in every part of your house, it would be worth it to at least place one in a room or two where you tend to spend the most time (such as your bedroom).

Bonus: Keeping a humidifier in your room during the winter will also help reduce your likelihood of getting a dry, sore, and scratchy throat. Double the win!

Other than that, the biggest piece of advice we can give is simple: turn down the heat in your home. No, we aren’t suggesting you shiver and suffer, just so your skin can be a little less dry. We’re saying that realistically, you’ll probably be okay if you lower your thermostat by just a few degrees, and supplement the heat by wearing layers, using blankets, etc.

5. Stay hydrated

As always, your overall health is always what comes first! So here’s a fun little fact: water is practically a superfood for your skin.

When you don’t drink enough water, your skin struggles to retain its natural moisture because you start to become dehydrated. The more dehydrated you are, the less elasticity your skin has. This can lead to things like wrinkles.

Young woman drinking pure glass of water

If you’re prone to oily skin, water is one of your best friends. Dehydration can also lead to even oilier skin than usual, because you don’t have the water needed in the body to flush out all those unwanted toxins. It’s also the culprit of pimples and breakouts! Water is essential for our body’s ability to generate new skin cells, which is part of how we heal. Without water to keep our skin hydrated, how can it fight off the bacteria that causes acne?

While the amount of water you should drink varies from person to person, medical professionals state that we should drink at least 8 glasses a day. If you’re not used to drinking that much water, it might be a little tricky at first. If you need help remembering, you can always set yourself an alarm to remind you to drink some water, because remember: hydrated skin is happy skin!

6. Become a skincare professional

What better way to learn the ins and outs of skincare than to study it and become a certified skincare expert? You don’t need to pay an arm and a leg to go to an Esthetics school, either. Some of the best makeup schools (both online and brick-and-mortar) offer outstanding skincare courses that can earn you accredited certification upon graduation.

Keep in mind that whatever career you’d want to pursue in the skincare industry might affect the type of certifications you’ll need. But for example, QC Makeup Academy offers a comprehensive Skincare Consultant course that can prepare you to be:

  • A freelanced, independent Skincare Consultant
  • A Consultant for companies like Sephora, and other makeup beauty counters
  • Bridal Beauty services
  • And much more!

It can also open the door to continued learning in makeup artistry and a professional career as an MUA, if such a thing interests you!

happy MUA doing makeup for young girl

The best part is, you can earn your Skincare Consultant certification in as little as 3 months. You could quite literally start your skincare course, work as hard as possible, and become a certified professional before 2020 is even over!

Then you could earn a living making sure everyone’s skin is happy and healthy – not just during the winter, but ALL year round!

Are YOU guilty of committing any of these 5 skincare sins? Keep reading to find out!

devyn gregorio holiday makeup look

Holiday Makeup Tutorial [video]

By From the Experts, Makeup Tips and Tricks, Makeup Tutorial, Tutorials & Tips No Comments

Devyn Gregorio is a QC Makeup Academy Student Ambassador. You can find her on her YouTube Channel, Gregorio Girls Makeup, where she makes beauty videos with her sister. Today, Devyn demonstrates how to create a gorgeous, holiday-inspired look you can rock right into the New Year!

Watch her video below!

Let’s Recap:

This look is what Devyn calls “classic glam” with “a good red lip”. As we’re in full holiday swing this time of the year, a red lip will always fit right in! The overall look is chic, yet subtle and elegant enough that you can wear for formal events (e.g. work parties, family get-togethers), casual events, or even just to do your Christmas shopping!

Keep reading to learn how to do this makeup look in time for the holiday season!

First Up: The Upper Eyes

Devyn begins by using her Chocolate Gold eyeshadow palette by Too Faced. Though released two holiday seasons ago, it’s still one of Devyn’s favorite Too Faced palettes to use. Most of the eyeshadows within it are shimmery, though there are a couple of matte pigments as well. This will be the palette used for this tutorial.

For this look, Devyn wants to do a natural halo eye. Her first color of choice is a rich brown, aptly named ‘Cocoa Truffle’. Using the back end of a smaller eyeshadow brush, Devyn starts by first applying the Cocoa Truffle to the inner corner of her eyelid, tapping more eyeshadow onto that spot to pack on the color. She then repeats this process on the outer corner of her eye.

Working on the crease

Next, Devyn uses her smaller sized blending brush, from the BH Cosmetics Marble Collection (#9), to apply and work the matte color, ‘So Boujee’, into her crease. This shade is a very soft peachy-brown. Since this is a halo eye, you want to pay extra attention in keeping the shape nice and round. Imagine when working on your crease that you’re creating a half-moon shape. Like Devyn, you may have a tendency to want to blend the eyeshadow outwards, for more of a cat-eye effect. Don’t do that for this look – in order to achieve a halo shape, the eyeshadows on the eyelid need to look round.

Devyn then uses an M139 Morphe Brush (which has a more pointed, tapered brush head) to allow for a more concentrated product application on her crease. She then uses ‘Cocoa Truffle’ again, this time applying it in the crease as well. Be careful not to blend upwards or outwards too much, you don’t want to cover the ‘So Boujee’ shade you just blended there!

The halo shade

From her palette, Devyn selects the color, ‘Gold Dipped’. Using a flat shader brush (#9 from the BH Marble Collection), she then swipes the golden eyeshadow right down the middle of her eyelid. Don’t worry about whether it looks pretty or not! You just need to get it on there. You’ll be able to do damage control shortly, we promise.

If you don’t want to use your brush for this step, you don’t have to! Just like Devyn chooses to do instead, you can always just use your finger to swipe it on. After all, as she says, “They’re the best brushes that you’ll ever have!” Just remember those downward strokes! Once applied, feel free to stipple on more product and tap it around your eyelid to blend it in, should you want that lovely, golden shimmer shade to pop even more.

Fun fact: Devyn is so used to wearing gel or acrylic nails that now that she’s NOT wearing them, she’s reminded of how much easier it is to apply makeup with her fingers!

Going back to her shader brush, Devyn then switches to rosy shade called ‘Classy & Sassy’, which she pats onto the edges of the halo shade she just laid down. She does this because this shimmery rose shade matches very close to the matte shade already used in the corners. This allows for a more natural-looking blend, instead of the appearance of an abrupt, rough line of color between the gold and the brown shades.  Once finished, Devyn goes back in one last time with more of the ‘Gold Dipped’ color, just to make sure it really stands out in the middle.

If you want to go a bit darker…

You can stop your upper eye makeup here, if you’d like. The result will be a bit more of a softer look. However, should you desire a little more dimension and depth in the inner and outer corners of this halo look, there is a black shade in the palette that Devyn recommends: ‘Decadent’. Take just the tiniest amount of this shade (just a tap or two) with a small, pointed brush. You don’t want the black to stand it, you just want to add a bit more depth to the inner and outer corners of your eyes.

You’ll probably notice, like with on Devyn, that immediately after applying this color, it will look black at first. Don’t worry! Take a mini blending brush with a bit of that ‘Cocoa Truffle’ shade again, blend it over the black. The brush that Devyn uses to complete this step is a Morphe M506.

Next Up: The Lower Lash Line

This step is relatively quick! First, using this same M506 small blender brush, Devyn dips back into the ‘Cocoa Truffle’, this time to blend along her lower lash line. She finishes off this part of the look by taking a little bit of the ‘Gold Dipped’ and patting it right in the middle, so it matches the gold shadow applied to the middle of the upper eyelid.

Highlighting the Brow Bone

For this next step, Devyn uses the same highlighter used on her cheeks: wet n wild’s ‘Precious Petals’. Since this is a halo eye you’re creating, Devyn reiterates that you don’t want to highlight the inner corner. You want to keep the shade nice and round, with the focus drawn to the center of the eye. That being said, the brow bone shouldn’t be neglected either. “It can still use some love!” Devyn insists, gently swiping on and creating that subtle glow.

In the Home Stretch: Adding Eyeliner

So long as the eyeliner is brown, any kind will do! (That being said, if you’re curious about the brand Devyn uses, it’s Butter London.) While you can use black eyeliner if this is your preference, Devyn has found brown to be an overall better choice for this holiday glam look! Apply to your lower and upper waterlines.

Note: Though Devyn does her eyelashes off-camera, any mascara and/or falsies will do! Devyn’s false lashes of choice are ‘Flirty’ by KISS Looks So Natural Lashes, because they’re dramatic – but not too dramatic. “Kind of like me,” Devyn adds with a giggle.

Last But Not Least: Lips

Because of the chosen colors used on your eyes, a red lip is the perfect way to tie everything together and bring more of that holiday vibe into the finished look! Devyn begins by taking her NYX lip pencil, in the bright, orange-red shade of ‘Summer Tease’, to outline and then color in her lips. If you’re thinking to yourself “this shade is way too bright!”, you’re not alone. Devyn agrees, but assures us that the actual lip color you’ll use next is a more blue-based red. The final result will be exactly what you want.

This next product is Lippie Stix’s ‘Bossy’ shade, by ColourPop. It’s a bit more of a cherry red, so if you don’t use this exact product, that’s alright. So long as it’s around this shade of red, it’ll do the trick.

Why Devyn Loves this Look

Admittedly one of her favorite looks to wear, Devyn feels the final product is super glam; a heavenly balance of the traditional red lip look, with the modern twist of the halo eye. Capable of dazzling others, while still delicate enough to be worn for every occasion. Truly the best of both worlds!

And there you go! Will you recreate this look for the holiday season? Let us know in the comments!

Interested in enrolling in QC Makeup Academy, but want to hear a real graduate’s opinion on the courses? Check out why Devyn chose QC, and how it’s helped her professional MUA career!

How to Start a Beauty Blog

By Tutorials & Tips, Your Makeup Career No Comments

With 2020 only a couple more weeks away, this is the time of year where your motivation rears its head and you suddenly find yourself wanting to take on the world. You’ve been putting in the time and effort to hone your makeup skills, and you feel like the next logical step to expand your MUA career and gain more of a following is to start a beauty blog.

What an excellent New Year’s Resolution! You feel good about it. In fact, you’re confident; you’re focused! You’re going to give this beauty blog maximum effort, and slay it without even smudging your lipstick!

Aaaaaaand then you’ll probably lose that drive and give up on your goal before January’s even over. Just like most of us are guilty of doing every year.

You’re not going to let that happen to you THIS year, right? You’ve been putting in way too much time and effort into your passion. You can’t give up that easily. The roaring 20s are back, baby, and this is going to be not just your year, but your decade!

So put on your best (and most glamorous) war paint, get ready and brace yourself for the life-changing journey you’re about to go on. We’re going to show you exactly how to get the ball rolling and start your very own beauty blog!

tattooed girl surrounded by cosmetics testing lipstick on hand

Step One: What’s Your Brand?

Before you can start building your blog, you need to have a clear idea of what sort of vibe you want it to give off:

  • Do you have any favorite colors that you’d always want to use as your aesthetic?
  • Are you a naturally sarcastic person and want that to show through?
  • Is there perhaps a particular angle you want to approach your beauty blog from? Etc.

In short: when people think of your beauty blog, how do you want them to perceive you? If they were to describe what you and your blog are all about to someone else, what would you want to say?

Figuring out the answers to all of these questions will help you discover what you want your brand to be and how you’ll achieve it. Even if you can’t think of a unique angle for your blog, that’s fine! Maybe the angle you’ll be known for is that your writing is always rock-star solid. Who knows!

Point is, don’t hesitate to think outside the box! Whether it’s beauty mogul, Huda Kattan, or the hilarious makeup tutorials done by the queen of weed, Brandi Fernandez, you’ll very rarely find a niche incapable of becoming popular.

If you do it well and do it persistently, any brand can have an audience.

Fun fact: Contrary to popular belief, you also won’t need millions of subscribers within that audience in order to make money off of your beauty blog, become an influencer, etc. You can just as easily achieve these goals with several hundred to several thousand fans, by becoming a micro-influencer. The more you know!

Step Two: What’s in a Name?

You’re also not going to be able to actually get started on your beauty blog until you decide what to call it. This step is obviously important since, for a lot of your audience, your name will be his or her first impression of you. A bad name can turn a potential follower away in seconds. It’s no surprise then that because this step is so crucial, it’s also the one that scares people away from starting a beauty blog the most.

scared woman hiding face with hands

While you absolutely need to give this step the proper time and consideration, it also doesn’t have to be as difficult as you’ll make it out to be. There are tons of popular cosmetic keywords you can choose to target in your name. You can get help from third-party generators, like the Business Name Generator. You can even get inspiration from the different trends of today’s generation (hint: millennials always go bananas over puns and memes).

If you already have a website for your makeup business, you should host your blog on that same site. It’ll help you with SEO! But if you’re starting a beauty blog from scratch, make sure that whatever name you pick is available to be purchased as a website domain name! If it’s not, time to go back to the drawing board.

Step 3: Building your blog

One of the most popular blog platforms in the world – and the one that we use – is WordPress. This is what we personally recommend. There are tons of reasons to choose WordPress, but its most attractive features are that:

  • It’s free
  • It has tons of templates to choose from (even beauty-inspired ones!)
  • It’s simple to customize, so even a beginner will have no trouble getting setup

Ultimately, though, it’s entirely up to you! Research into the different platforms and decide which one speaks most to you. Then you can get building from there!

Step 4: Post and share quality content

You don’t need an expensive camera or the writing skills of Shakespeare to create good content for your audience. So long as your knowledge of the beauty industry always shines through and your smartphone’s pictures aren’t the quality of a potato, you’re fine. What’s really important are two factors:

1. You post blog articles frequently

No one likes being ghosted, and this applies even to beauty blogging. How useful to her subscribers is a blogger who emerges once from her cave every other month, throws up an article, and then retreats back to the shadows? Gaining notoriety means staying relevant, so post regularly – even if you’re sleeping!

woman holding coffee but asleep at laptop

“Wait, what?”

Yeah, you heard me. For starters, not all of your audience will operate in the same time zone as you. Secondly, it’s only natural that there will be times where you’ll want to take a vacation and not be posting. Beauty bloggers are masters of time management; whenever you have more time to spare, you can write multiple articles at once. Blogging platforms like WordPress will even allow you to schedule them in advance, too.

“But I might start writing crappy blog articles in an attempt to always be posting something!”

Good point! Although posting blog content on a regular basis is part of any successful beauty blogger’s job description, quality is still more valuable than quantity. If there are times where your brain’s hit a creative wall, or nothing you write seems to be any better than wet garbage (it happens to all of us), the safest option is not to force it.

In situations like that, try going back through your blog archive and see if you have any articles you can repost, edit, or revamp. When you’re struggling to come up with a brand new, organic idea, sometimes editing is a far easier task. The general notion towards blog content is that there is wiggle room here. So long as you post as much evergreen material as you can (meaning, stuff that’ll stay relevant for a long time), you’ll set yourself up for success.

2. You have a social media presence to share your work

Facebook, Instagram, Snapchat, Pinterest, Twitter – these are all your best friends! For extra icing on the cake, you can also start using YouTube to post videos of your tutorials, AMAs, etc. All well-known beauty bloggers operate on all different sorts of media to produce their content and promote their business. You definitely should, too. Social media will be your greatest tool in helping your odds of promoting yourself to potential followers.

Just like with your blog articles, there are apps that you can use to bulk schedule your social media content in advance, and then share everything for you. Here at QC, we use Later and Hootsuite, but there are tons of options to choose from.

A strong social media presence shows your audience that you’re there, like an invisible friend. Everyone loves a hard worker that’s passionate about what they do, and who’s succeeding in life. The world sucks in a lot of ways lately, so as a beauty blogger, your job will not just be to provide informative content. It’ll also be to provide a positive escape for all those who will look up to you. You’ll be the comfort zone they turn to when they need a short break from their struggles.

That being said: every pro has its con. Likewise, it’s a fine line between staying relevant and shoving yourself too much into everyone’s faces. Just remember to listen to that little voice inside that warns you when you might be going over the top!

woman writing on laptop, surrounded by makeup and fashion products

Step 5: Knowledge is power!

Whether you’ve been doing this for years, or you’re just starting out and still learning how to do makeup, you’ll benefit from exploring different makeup schools and taking classes.

“Whoah, why do I need classes if I already know what I’m doing?”

Just because someone’s a beauty blogger doesn’t mean they know everything there is to know about the craft. The people who think they know everything are usually the ones who know nothing. You might as well call them Jon Snow and exit out of their page. But you? You’re a true artist, and true artists understand that they’ll never know everything there is to know about their passion – but that will never stop them from trying to learn!

Online makeup schools like QC Makeup Academy are the perfect solution! In addition to a variety of makeup courses, programs touching on other popular areas of beauty blogging are also offered, such as Fashion Styling and/or Hair Styling Essentials.

Especially in the world of beauty, fashion, makeup, etc. the trends are ever-changing. Something that’s popular yesterday could very well be replaced by the latest and hippest look today. There will be the invention of new techniques and applications you haven’t tried before. If you think you know everything? #SorryNotSorry, but you’re wrong.

If you really want to be successful and stand out from your competition, you need to be humble enough to accept that there will always be things you can learn and ways you can improve. You may just find that doing so will only continue to grow your beauty blogging business.

beauty vlogger filming makeup tutorial

So now that you’re basically an expert at getting a beauty blog started, what are you waiting for? 2020 won’t slow down for you, and we all know it’s not going to write itself! So go, vamoose, scoot! You’ve got this, and remember: we believe in you! Xo

Want to build on your cosmetic knowledge with expertly-taught classes? Enroll in one of QC’s leading online makeup courses today!