Gabrielle Rivera is a QC Makeup Academy graduate and professional makeup artist. To see more of her work, visit her Instagram here.
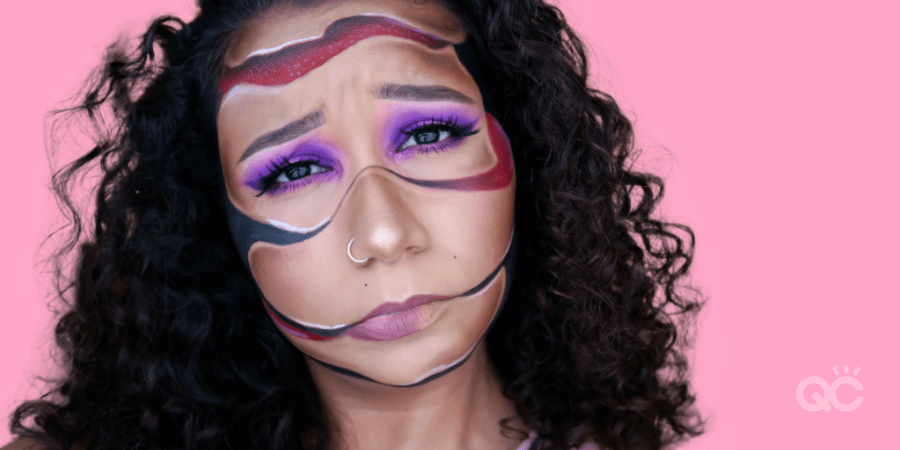
Part of being a special effects makeup artist – or even just an MUA in general – is about keeping up with popular trends! One such trend that’s been gaining more and more popularity is the sliced faced SFX look, originally created by the “Queen of Illusion Makeup”, Mimi Choi.
Want to learn how to master this look? Gabrielle’s here to break down each step, from start to finish!
Watch her video below!
Makeup Products Needed:
For such an elaborate special effects makeup look, there are surprisingly very few products you need when following along with Gabrielle’s special effects makeup tutorial! Keep in mind that you’re more than welcome to use any of your own products, in place of the ones Gabrielle is using.
Below is the list of makeup products she used to create the sliced face look on herself:
1) A brown eyeliner pencil.
Gabrielle recommends using a color that’s close to your complexion! Because you want the final product to appear realistic, don’t use a black eyeliner pencil. The color will be too harsh, and will give you trouble when trying to blend it into your natural skin tone.
2) Body paints.
Gabrielle uses some of the Paradise Paints by Mehron. Specifically, she chooses the white, black, and red colors. If you don’t have access to body paints, Gabrielle suggests using everyday makeup items in their place, such as:
- Red lipstick
- Eyeshadows
- Eyeliners
Basically, use whatever you have at your disposal!
3) Brushes.
Because you’ll need to be precise in certain parts of this look, arm yourself with some smaller brushes! This will help you have the most control over your product, especially when coloring in between tighter lines. A reliable shader brush will also come in handy, too!
4) Eyeshadows.
Try to match the shades you use with the paint hues you select for this look. For example, Gabrielle sticks to red, black, and brown eyeshadows.

Let’s Recap!
Notice how Gabrielle has already created a bright, purple smoky eye before starting her tutorial. You can feel free to do this look with a bare face, if you’d prefer. However, if you’d like to spice it up with a bit of a glamorous twist, you can first create a smoky eye of your choosing.
Now, let’s start breaking down this special effects makeup look!
Step 1: Creating the Outline
Gabrielle begins by taking her brown eyeliner pencil and lightly outlining her face. From there, she begins creating additional lines and loops on the main parts of her face (i.e. nose, cheeks, jaw, forehead, etc.).
Many of her lines connect with each other, and add dimensional depth. This step is creating the overall design of your sliced face look.
Remember: As you follow along with Gabrielle, leave spaces between the lines, wherever she advises you to! These gaps will be filled in with a different color later.
Note: You can play around and have fun with the way you outline your face! You don’t need to follow the exact design that Gabrielle is doing. Just remember that asymmetry is key to this look! You don’t want everything to be perfectly balanced on both sides of your face. After all, you’re trying to create the illusion that your face has been slashed!
Step 2: Filling in With Red Paint
Now that Gabrielle has finished the initial outline, it’s time to go in with her red SFX paint! This is going to really help define each of the sections she’s drawn, and make them pop.
Since her paints are water-activated, she sprays a bit of water onto the lid, before wetting her brush and dipping it into the paint.
Then it’s time to apply the paint onto her face! Notice the way Gabrielle carefully follows the outline when filling in her desired sections. For those tighter sections between the lines, use a thin brush.

Step 3: Shading with Black Paint
Once Gabrielle has finished with the red paint, it’s time to fill in the larger sections with black. You’ll notice how these black sections are strategically placed around the outer part of Gabrielle’s face, such as her jawline, temples, and upper forehead. This is so that Gabrielle’s face is framed, and made to appear smaller.
Step 4: Adding Depth to the Red Paint
Using a flat shader brush, Gabrielle then uses a burgundy shade to add definition to the red paint from Step 2. Using a light hand, she pats on this darker red just along the upper lines, right below where her natural skin tone starts.
With a small, flat-headed brush, Gabrielle then grabs some black and adds it to all the high points of her red sections. Once you’ve created the initial outline, use your brush to lightly drag the black down into the red. This will help blend the black in, and add even more depth!
Step 5: Incorporating Some Shading
Gabrielle prefers using her flat shader brush (specifically, the Morphe m167) for this step. However, feel free to use your own blending brush of choice!
She then refers to her Morphe Dare to Create Palette, selecting the Stroke (matte warm tan) and Mass (matte chocolate mousse). Don’t forget to tap off any excess product from your brush, before applying it to your face!
Following along all the lines and curves Gabrielle has already painted on her face, she makes sure to leave a bit of room between the paint and the eyeshadow she’s applying now. For this step, a lighter hand is your best friend! Apply thin, sheen layers, and blend them inward. If you need to add more intensity, do so by adding more of these sheer layers.
The finished result will look like natural shading across your face!

Step 6: Adding More Depth
Taking a slightly darker brown than what Gabrielle used in the previous step, she then goes back in and adds the tiniest bit of depth to the brown shading. To achieve this, she pays close attention to keeping her brush strokes contained to the very outer corners.
Step 7: Creating a Fake Bottom Lip
This step is a lot less dramatic than the subtitle implies, don’t worry. All Gabrielle does here is apply some soft pink liquid lipstick. (Again, feel free to use whichever lip color you want!) When applying this product to the left-hand side of her bottom lip, she extends the coverage a bit further downward.
This creates the appearance of that side of her bottom lip being larger than it actually is.
Step 8: Highlight with White Accents
Here, you can use white eyeliner, white paint, a lightly-toned concealer, or whatever you most prefer! Just ensure that it’s a light shade, in order to best create the highlighting effect.
With a thin, fine detail brush, Gabrielle uses white body paint to draw thin accent lines throughout her design. Lastly, Gabrielle stipples tiny white flecks into the red section, before blending them with her finger.
The purpose of this final step is to make all those red and black sections really stand out. It also gives the overall look an extra level of profundity!
And just like that, you’re done!

Did you enjoy this special effects makeup tutorial? If so, check out Gabrielle’s other tutorial, where she demonstrates how to create a bejeweled skull!
Tried this tutorial on yourself? Let us know how it turned out in the comments below!
![Special Effects Makeup: Sliced Face Tutorial [video]](https://www.qcmakeupacademy.com/wp-content/uploads/2020/06/Copy-of-Makeup-Header-Image-Black-Overlay-Template-34.png)