Makeup Tips and Tricks Archives - QC Makeup Academy Skip to main content
Category

Makeup Tips and Tricks

Smiling woman wearing pink shimmer eyeshadow, glossy lips, and gold jewelry, showcasing a fun and youthful look for makeup inspiration and creative artistry.

Makeup Inspiration: Creative Ideas for Makeup Artists

By , From the Experts, Makeup Tips and Tricks, Makeup Trends, Your Makeup Career No Comments

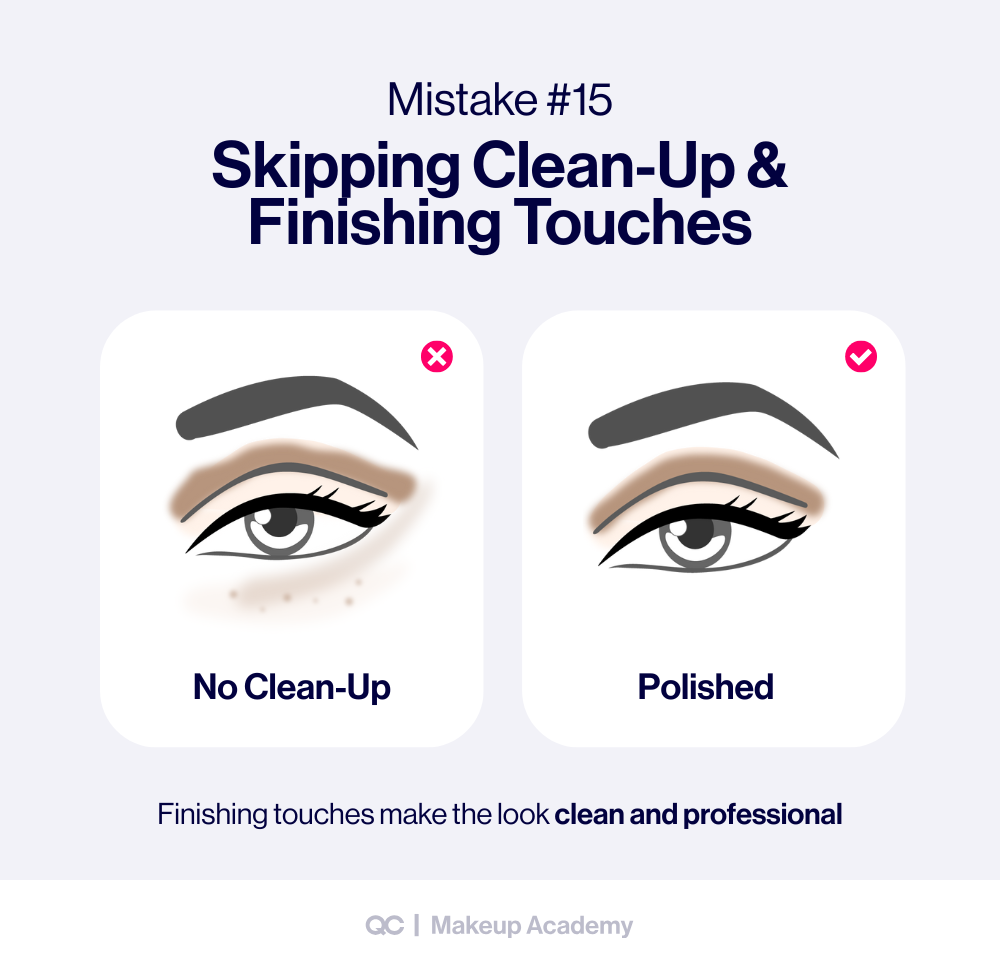
Makeup Inspiration: Key Points

  • Makeup inspiration fuels creativity and career growth.
  • Artists should explore diverse sources like art, film, and social media.
  • Wedding makeup inspiration blends timeless and trendy looks.
  • Building a strong makeup artist aesthetic sets you apart.
  • QC Makeup Academy helps turn inspiration into professional artistry.

Introduction

Makeup artistry is a creative profession built on ideas, vision, and originality. Whether it’s for a client’s wedding, a fashion shoot, or a red-carpet event, every look you design starts with one spark: makeup inspiration. Inspiration shapes how you see color, texture, and style. It pushes you to experiment with new techniques, embrace trends, and refine your personal artistry. 

Without it, makeup can feel routine. But with it, your work becomes expressive, professional, and unforgettable!

The beauty industry is constantly changing. Social media brings new styles every day, and fashion weeks launch bold trends each season. At the same time, timeless artistry—like natural skin, red lips, or smokey eyes—never goes out of style. For professional MUAs and students alike, learning how to find, adapt, and use inspiration is the key to staying creative and relevant.

So, keep reading to explore the ultimate guide to makeup inspiration and how it can transform your artistry!

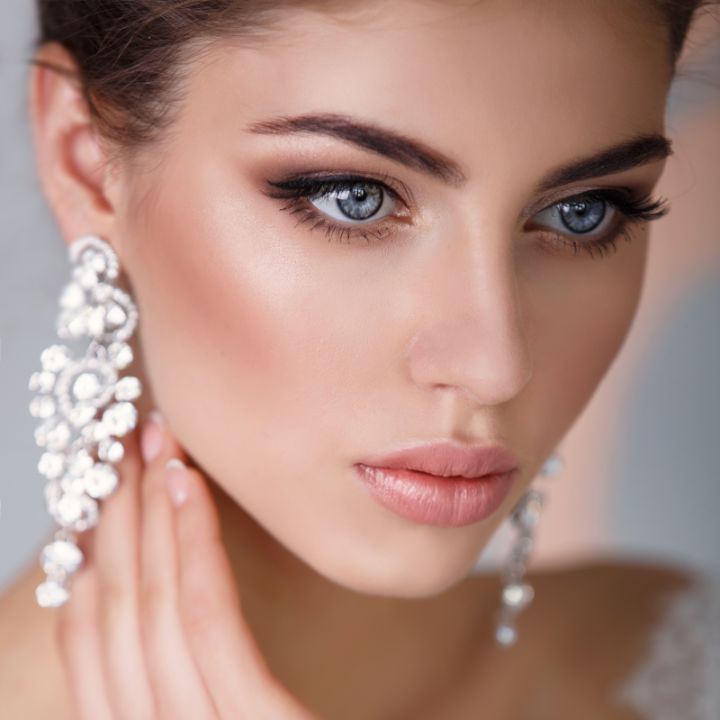
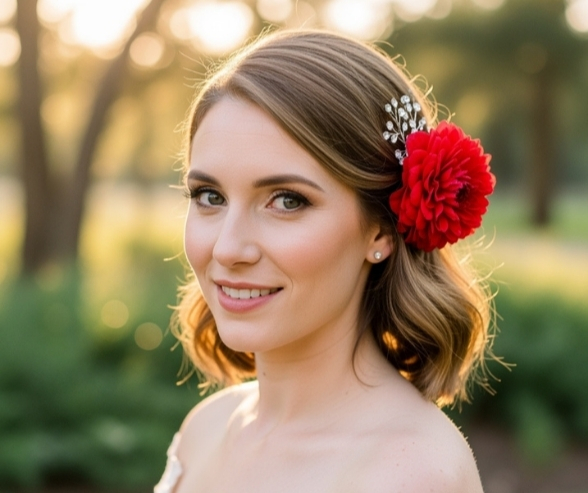
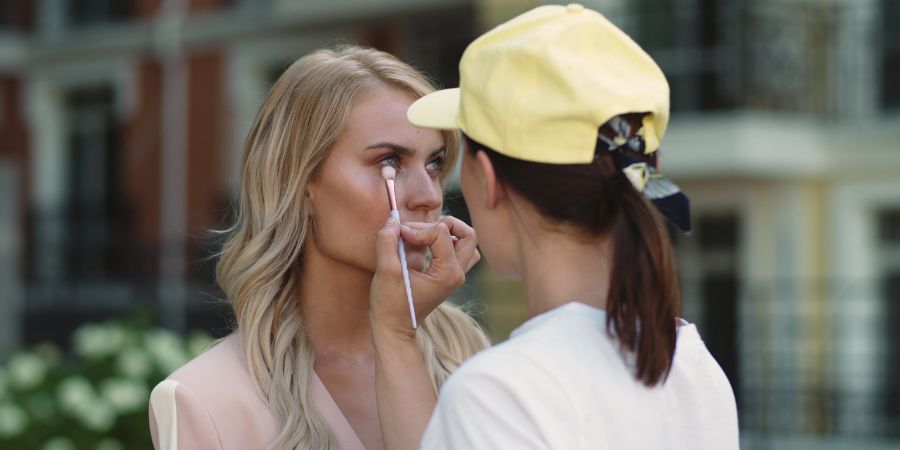
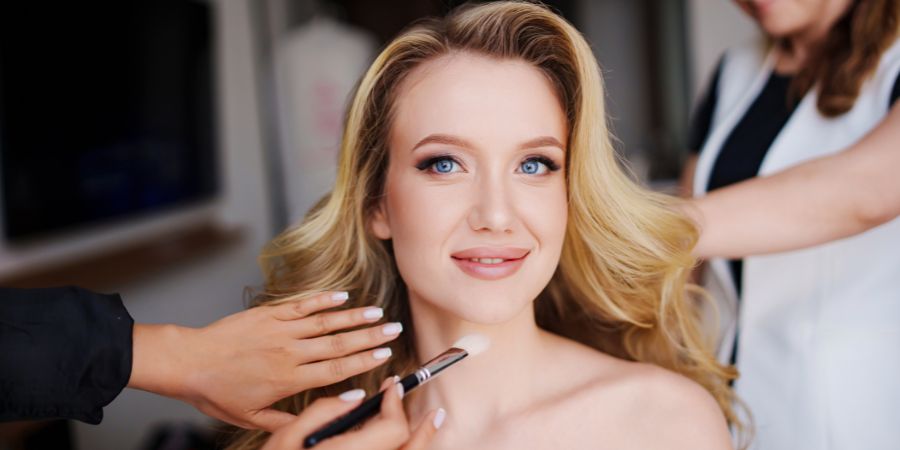
Meet Kate Loveland, QC Student & Award-Winning, Internationally Published MUA

Professional headshot of QC Makeup Academy student and certified MUA, Kate Loveland. Collaborator on QC article about makeup inspiration.
Photo by Jenn Woo Photography. Location: 43 Studios.

Kate’s passion for makeup began long before her professional career. Originally studying Clinical Laboratory Science, she followed her love of beauty and began working as a makeup artist in 2012. A QC Makeup Academy student, Kate has spent over 13 years building a versatile career spanning salons, fashion shows, pageants, film, and commercial campaigns.

She specializes in commercial makeup artistry, collaborating with brands to create everything from clean, natural looks to bold editorial styles. Owner of her own salon suite, Beauty By Kate Loveland, Kate offers full hair and beauty services while traveling nationwide for creative projects. Above all, she’s passionate about helping every client feel confident and seen—both in her chair and on set. 

That said, as a proud mother of five daughters, Kate says her favorite title will always be “Mom.” ❤️

NOTE: The stunning makeup looks featured throughout this article are the work of Kate Loveland, the talented artist highlighted here!

Why Makeup Inspiration Matters in Professional Makeup Artistry

Makeup inspiration is more than a mood boost—it’s the very foundation of professional makeup artistry. If you don’t have fresh ideas, it becomes easy to fall into repetitive looks. When you have the right inspiration, though, you can grow as an artist, build a unique style, and meet every client with confidence.

Kate says: I find my best makeup inspiration through collaboration. When I’m working with a director or fashion designer, there’s always a message or story behind the concept. By understanding that vision, I can translate it artistically—combining shapes, textures, finishes, colors, and embellishments to bring the entire idea to life. For me, it’s all about taking the abstract and making it tangible!

Creativity as the Core of a Makeup Artist Aesthetic

Your makeup artist aesthetic is what sets you apart. It’s the personal style that clients recognize and admire. Inspiration fuels this aesthetic and keeps it evolving by:

  • Helping you experiment with color, texture, and shape.
  • Sparking artistic makeup looks that feel fresh and modern.
  • Allowing you to push beyond trends and create signature work.
  • Preventing burnout and keeping your artistry exciting.
  • Building your reputation as a creative professional.

And when your aesthetic is clear and confident? Clients trust you because they see your artistry as both stylish and reliable.

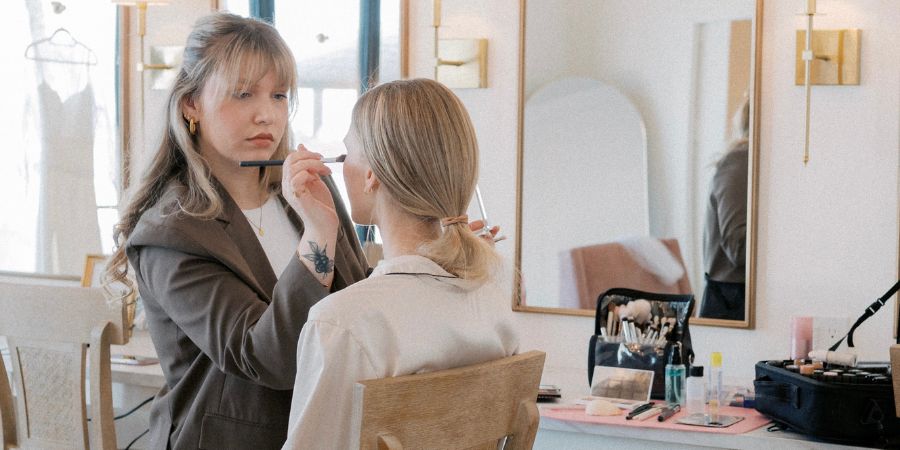
From Inspiration to Application: Turning Ideas into Looks

That said, finding ideas is only half the process. The real skill is turning inspiration into wearable makeup looks.

Here’s how makeup artists make it happen:

  • Start with a concept (a photo, a painting, or a trend).
  • Break it down into elements like colors, shapes, and textures.
  • Adapt those elements into makeup techniques (eyeshadow, contour, lip design).
  • Practice and refine until the look feels both artistic and functional.
  • Adjust for each client’s features, personality, and occasion.

This process transforms random concepts into legitimate, professional results. Moreover, it also keeps your portfolio full of unique and inspirational makeup designs.

Kate says: The BIGGEST trend I’m seeing right now with bridal and event makeup? Unrealistic expectations. Thanks to AI, filters, and heavy editing, many of the photos clients bring in just aren’t achievable on real skin (especially without a consistent skincare routine!). The key is to pinpoint what they actually love about the image and then use it as inspiration, rather than the template. From there, I customize the look to suit their features, skin type, and goals while setting honest, realistic expectations for their natural canvas.
Close-up of a model wearing bold red lipstick, dramatic eyeliner, and a vibrant green feathered coat, showcasing an artistic makeup look that embodies creative makeup inspiration. Makeup by QC Makeup Academy student, Kate Loveland.
Photo and shoot organized by Jenn Woo Photography. Model: Arach Aromi.

Top Sources of Makeup Inspiration Every Artist Should Explore

Makeup inspiration comes from EVERYWHERE! As a professional or aspiring artist, you need a wide pool of influences in order to keep your artistry fresh. The more you expose yourself to creative worlds, the more ideas you’ll bring back to your own work. 

Here are the most powerful sources to explore when you’re searching for makeup inspo:

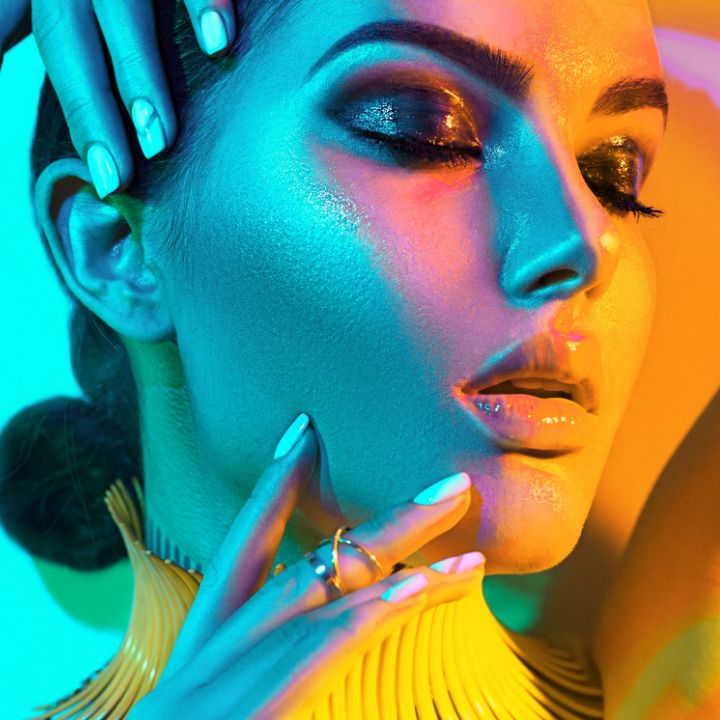
1. Art, Fashion, and History as Endless Inspiration

Art and fashion have always shaped beauty standards. From the dramatic eyeliner of Ancient Egypt to the bold colors of modern runways, makeup is constantly borrowing ideas from these worlds.

PRO TIP: Create a Pinterest or physical mood board mixing together pieces of art, fabric swatches, and runway looks. This will help you connect styles across industries and fuel your next artistic makeup look.

How To Use These Sources In Your Artistry:

  • Fine art teaches balance, symmetry, and color harmony. Study impressionist paintings to understand soft blending, or abstract works to practice bold contrasts.
  • Fashion design highlights how textures and fabrics pair with makeup. Sequins, lace, or leather can inspire matching eye looks or lip finishes.
  • Historical eras show you how trends evolve. Think about the flapper makeup of the 1920s, the glam of the 1980s, or the minimalism of the 1990s. Each offers lessons you can reinvent for modern clients.
  • Museums and galleries allow you to train your eye for detail. Observe how artists use light, shadows, and lines, as these are the same principles you apply in contouring and highlighting.
  • Fashion magazines and couture shows show how makeup interacts with clothing. This is especially valuable if you want to work in editorial or runway artistry.
Kate says: When we look at art, it makes us feel something. Each color, line, and texture creates a different emotion. When I design makeup looks, I do this in reverse. I start with the story or message, reflect on real experiences, and then translate those feelings into shapes, colors, and textures that bring the vision to life.

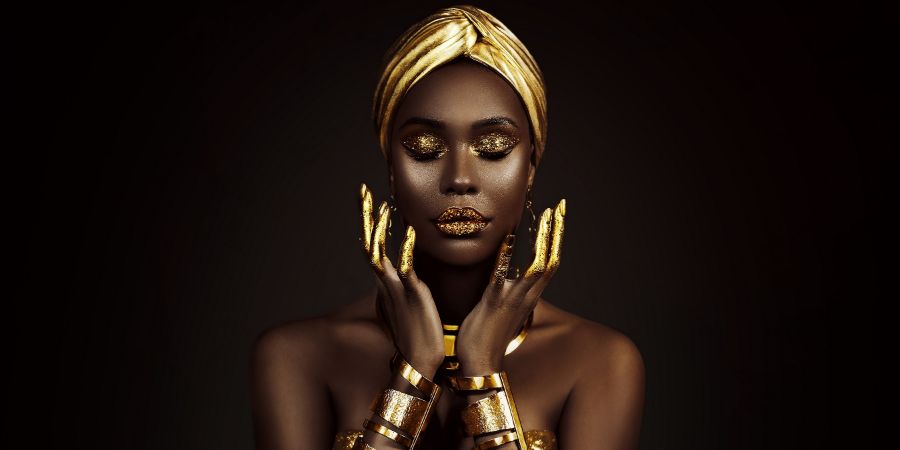
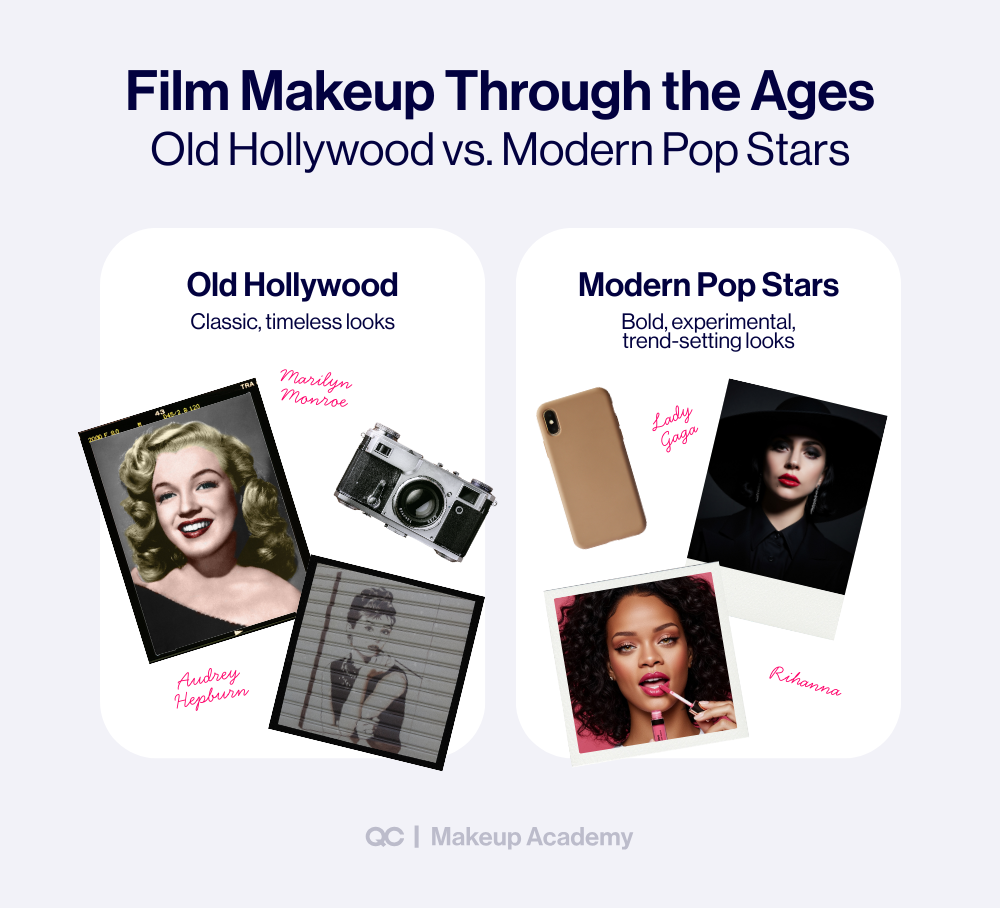
2. Film, Theater, and Pop Culture Trends

Cinema and pop culture are also goldmines for inspiration! Think about the impact of Marilyn Monroe’s red lip, Twiggy’s iconic lashes, and Lady Gaga’s avant-garde stage looks. Film and performance art show you how makeup can create characters, moods, and cultural moments.

Infographic comparing classic Old Hollywood makeup looks with bold modern pop star styles, highlighting evolving makeup inspiration across film history.

Ways To Draw Inspiration:

  • Cinematography: Pay attention to color palettes in films. Romantic comedies often use soft pinks and neutrals, while action movies lean on smoky, moody tones.
  • Theater: Stage makeup is exaggerated so it can be seen from a distance. Even if you’re not doing theater work, studying these techniques helps you learn about bold shapes, strong liners, and impactful designs.
  • Pop stars and celebrities: Music videos and award shows are full of experimental styles. These often trickle down into everyday beauty trends.
  • Fantasy and sci-fi films: These genres push boundaries with face paint, prosthetics, and SFX. Studying them improves your range as an artist.
  • Cultural icons: Think of how the Kardashians influenced contouring or how Euphoria inspired a wave of glitter and graphic eyeliner. Pop culture sets trends faster than almost any other medium.

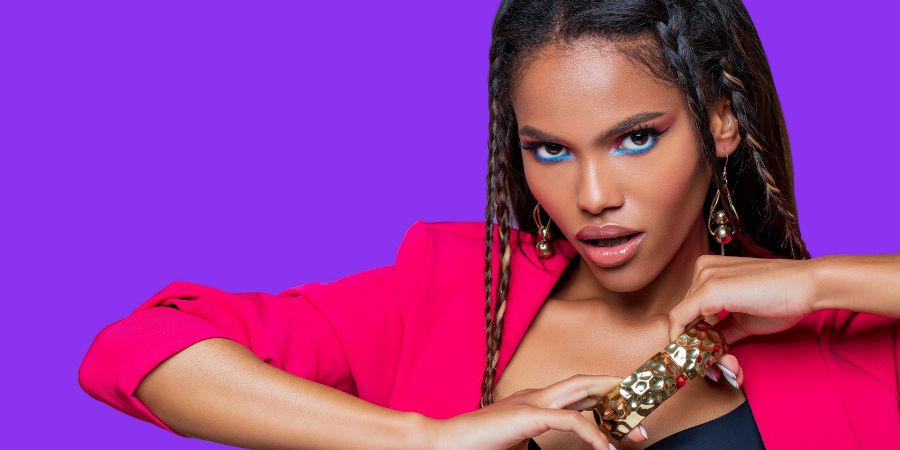
3. Social Media & Digital Platforms (Instagram, TikTok, Pinterest, etc.)

Social media is THE fastest-moving source of creative makeup inspo. But while it’s undoubtedly inspiring, it can also feel overwhelming at the same time. That’s why curation is key!

Kate says: Bridal looks usually follow whatever’s trending on social media. Sometimes it’s AI-generated, other times it’s inspired by celebrity styles. I’ll see the same three reference photos for months until a new season or influencer shifts the trend. Fashion and editorial looks work the same way, often reflecting seasons, current events, or celebrity influence. Social media makes it easy for ideas to spread—one artist shares a concept, others recreate it or add their own twist, and suddenly a whole new trend is born.

Based On The Social Media Platform:

  • Instagram: Follow real makeup artists, not just influencers. Look for accounts where MUAs post unfiltered, professional work. Avoid MUAs who filter themselves and/or their videos.
  • TikTok: Trends like “strawberry makeup” or “clean girl aesthetic” go viral here. TikTok is also where Gen Z is reshaping beauty standards.
  • Pinterest: While AI images have flooded the platform, it’s still valuable for building mood boards. The trick is to mix real-world MUAs with editorial inspiration.
  • YouTube: Long-form tutorials help you learn how looks are built step by step. This deepens your technical skills while giving you visual references.
  • Emerging tech: AI tools like MidJourney or makeup filter apps can spark creativity. Even if you don’t copy the exact image, they can give you a starting point.

Tips For Using Social Media Wisely:

  • Refresh your feed every few months to avoid repetitive looks.
  • Save only what feels unique to your makeup artist aesthetic.
  • Don’t fall into copying. Always use other people’s posts as springboards, not templates.
  • Balance viral trends with timeless artistry to avoid becoming dated.

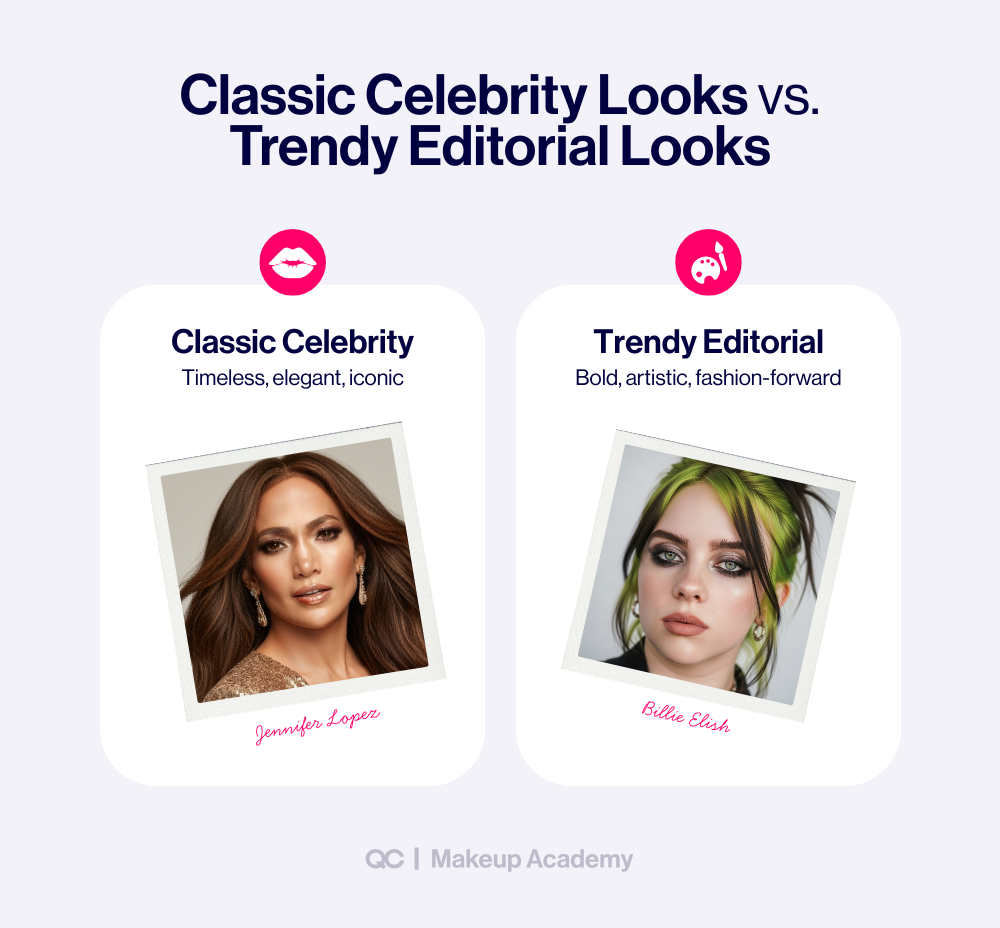
4. Celebrity Red Carpet and Editorial Looks

Celebrities drive trends across the globe. Their makeup is literally designed to be photographed, studied, and replicated. That makes celebrity beauty a perfect source for both everyday artists and pros working in fashion or bridal makeup.

Infographic comparing classic celebrity makeup looks with trendy editorial styles, showing timeless and artistic makeup inspiration for professional artists.

Where To Look For Inspiration:

  • Red carpet events: Think Oscars, Met Gala, Grammys, etc. Each one showcases polished and innovative artistry.
  • Editorial spreads: Fashion magazines like Vogue or Harper’s Bazaar feature artistic makeup looks paired with high-end styling.
  • Celebrity weddings: From Meghan Markle’s natural bridal makeup to Priyanka Chopra’s glam, celebrity brides influence thousands of wedding looks.
  • Interviews and BTS content: Many MUAs for celebrities now share product lists, techniques, and behind-the-scenes insights online.
  • Influencers and ambassadors: Stars who represent major beauty brands often showcase trend-forward looks.

Why This Matters:

  • Clients often bring celebrity photos to trials as references.
  • Studying these looks trains your eye for balance and proportion.
  • Celebrity makeup is where artistry meets mainstream demand.
Kate says: One of my favorite projects was a creative shoot that got published in Harper’s Bazaar. Organized by photographer Jenn Woo, the shoot brought together local artists in teams of a photographer, model, and HMUA, each creating a look based on a single color theme. My team—Jenn, model Maisie Mercer-Szady, and I—chose purple. Jenn secured an incredible La Adorna dress made from clear vinyl and acrylic beads that shifted from blue and purple to pink, red, orange, and yellow. The dress itself was a work of art, so our goal was to complement it, not compete with it.
Model posing in a rainbow beaded dress and bold purple hair against a pink background, showcasing vibrant artistic makeup inspiration and creative fashion design. Makeup by QC Makeup Academy student, Kate Loveland.
Close-up of a model wearing bold artistic makeup, yellow and red beaded fashion, and a sculpted purple hairstyle, representing vibrant makeup inspiration for creative artists. Makeup by QC Makeup Academy student, Kate Loveland.
Photos by Scott Gianchetta. Dress designed by La Adorna.
Kate says: We drew inspiration from the bubble-like beads of the dress. Jenn designed a backdrop of swooping purple fabrics and circular accents, while I focused on portraying “purple” and the joy of art through contrast. Using Haus Labs Hy-Power Pigment Paint in Citrine Matte, I applied vibrant yellow to the inner eyes in rounded shapes that echoed the beads, creating a splatter effect to represent the playfulness of art. For the headpiece, I built a cascading design from a purple wig and hair extensions, wrapping varying shades of purple around styrofoam spheres to mimic the acrylic bubbles. The result was a look that celebrated color, creativity, and collaboration!

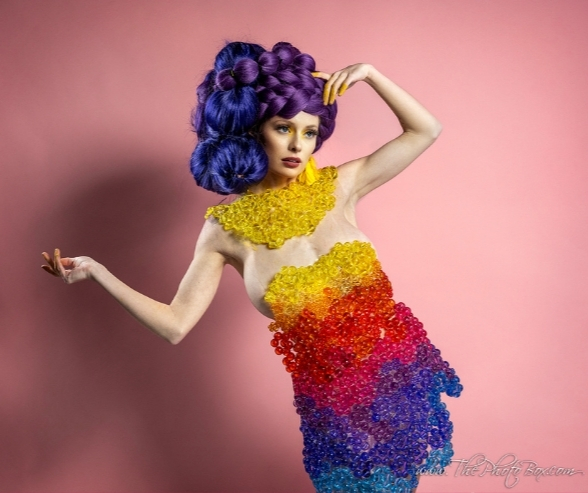
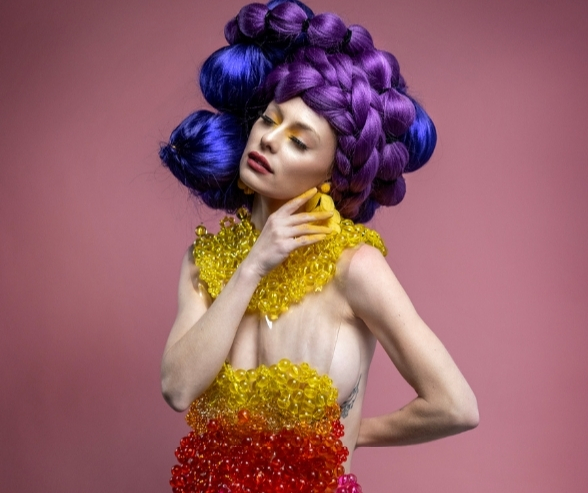
5. Runway & Global Fashion Weeks

If you want to see the future of makeup, simply look at the runway! Fashion weeks are where makeup artistry goes from idea to movement.

How Runway Shows Fuel Professional Makeup Artistry:

  • Bold experimentation: Makeup is often theatrical, with colors and shapes that wouldn’t appear in everyday life.
  • Trend forecasting: Techniques like glazed skin, neon liner, or bleached brows often appear here first BEFORE becoming mainstream.
  • Collaboration: Makeup is paired with clothing, hair, and staging to create a full aesthetic.
  • Global perspective: Paris, Milan, New York, Tokyo—each fashion capital has a different approach, offering fresh ideas.
  • Skill development: Watching runway makeup teaches you how to balance avant-garde creativity with technical precision.

Practical Ways To Learn From Runways:

  • Watch livestreams or photo galleries from each season.
  • Follow MUAs who work backstage for insights and tutorials.
  • Practice recreating runway looks, then adapt them into client-friendly versions.
  • Study how makeup enhances the overall show theme, not just the model’s face.
DID YOU KNOW? QC Makeup Academy executive instructor, Nathan Johnson, is also a celebrity MUA who’s done countless makeup work for New York Fashion Week over the years? It’s true—and he was even a makeup artist on seasons four and five of Project Runway!

Get Makeup Inspiration + The Skills To Go Pro

Receive hands-on training right from the comfort of home with QC Makeup Academy!

CHECK OUT OUR COURSES

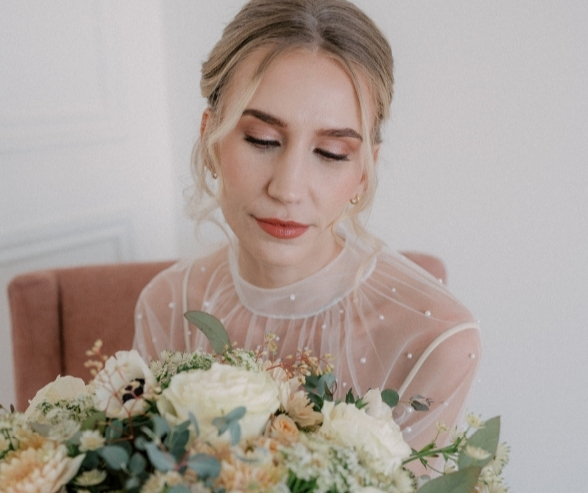
Wedding Makeup Inspiration and Client Work

Bridal beauty is one of the most important areas for makeup artists to master. Brides want to look like the best version of themselves on their wedding day, and they often come armed with photos of celebrities, Pinterest boards, or TikTok screenshots. That’s why every artist should understand wedding makeup inspiration, too—where it comes from, how to use it, and how to adapt it for each unique client.

Whether you specialize in weddings or just take bridal bookings occasionally, knowing how to balance classic and trendy inspiration can make the difference between a satisfied client and a lifelong fan!

Kate says: When clients bring in inspiration from Pinterest, Instagram, or celebrity looks, I first start with an in-depth consultation. I ask about their skincare routine, sensitivities, typical makeup habits, and what makes them feel confident. That helps me understand who they are before I even look at the inspo photo. If someone shows me a glam look with a bold lip but rarely wears makeup, I know they might love the idea more than the reality. Once I understand their lifestyle and comfort level, I then break down the inspiration image, pointing out what will complement their features and what might not. If their reference photo doesn’t match their skin tone or eye shape, I’ll find similar examples so they can better visualize how the look will translate to them.

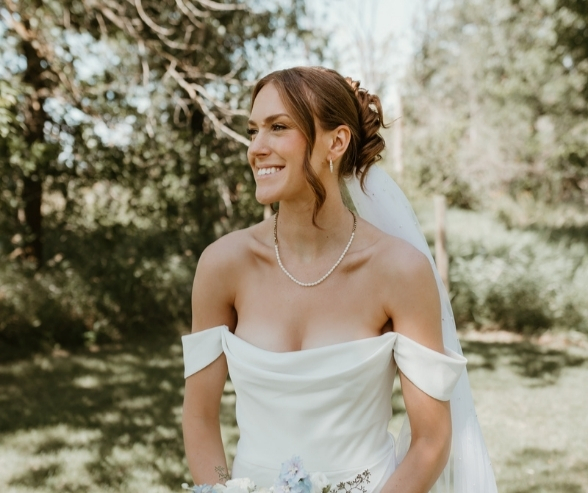
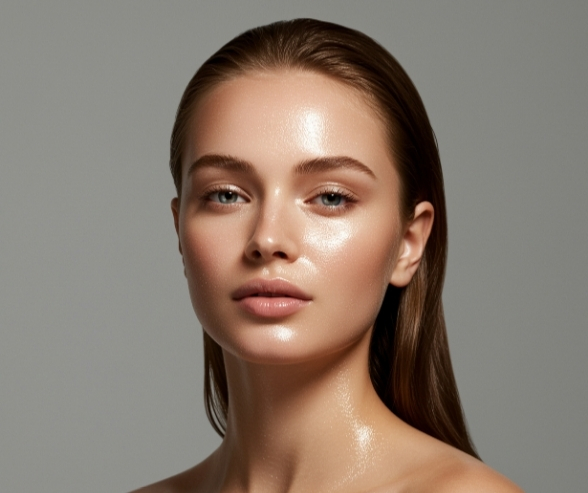
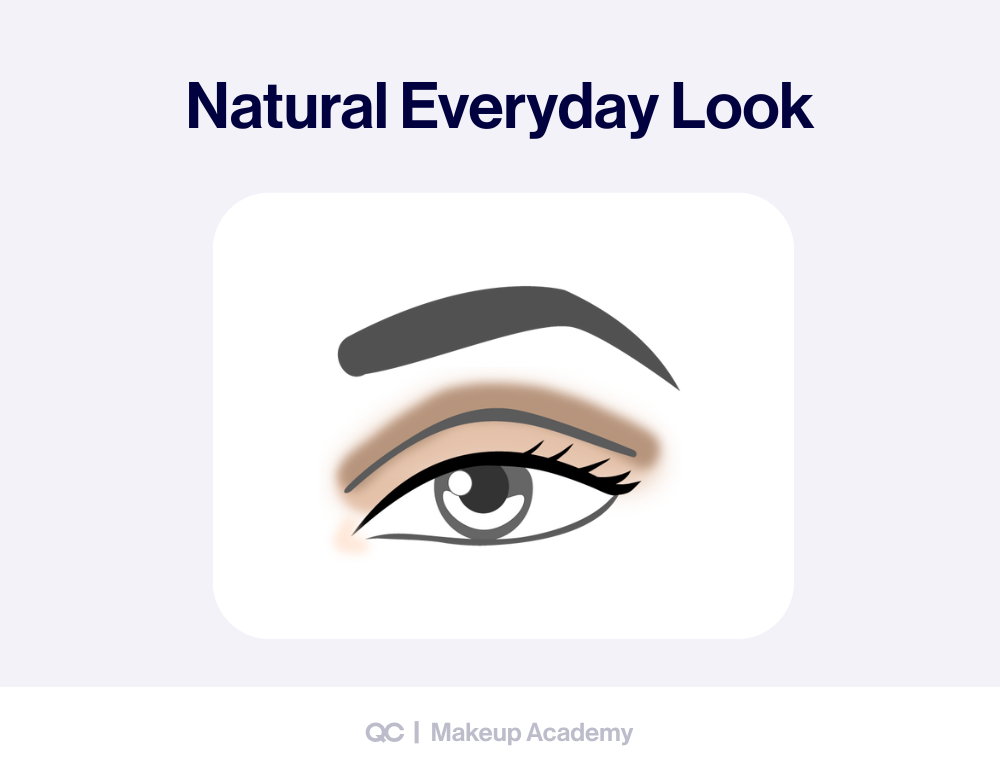
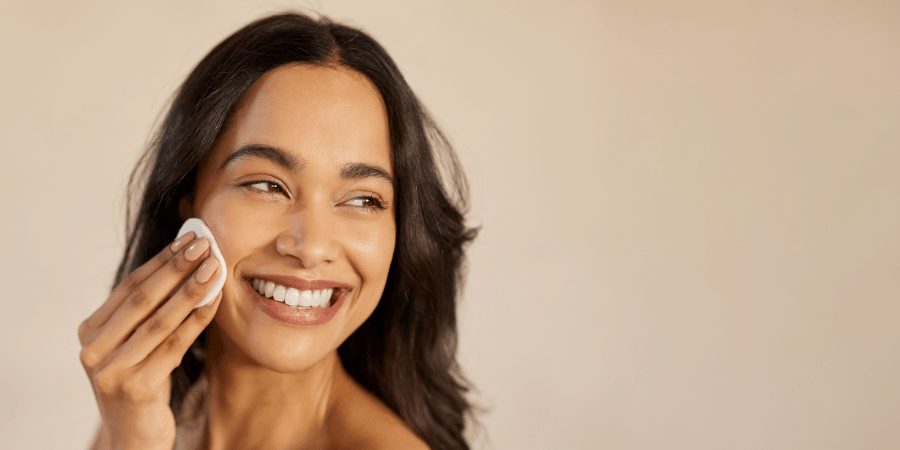
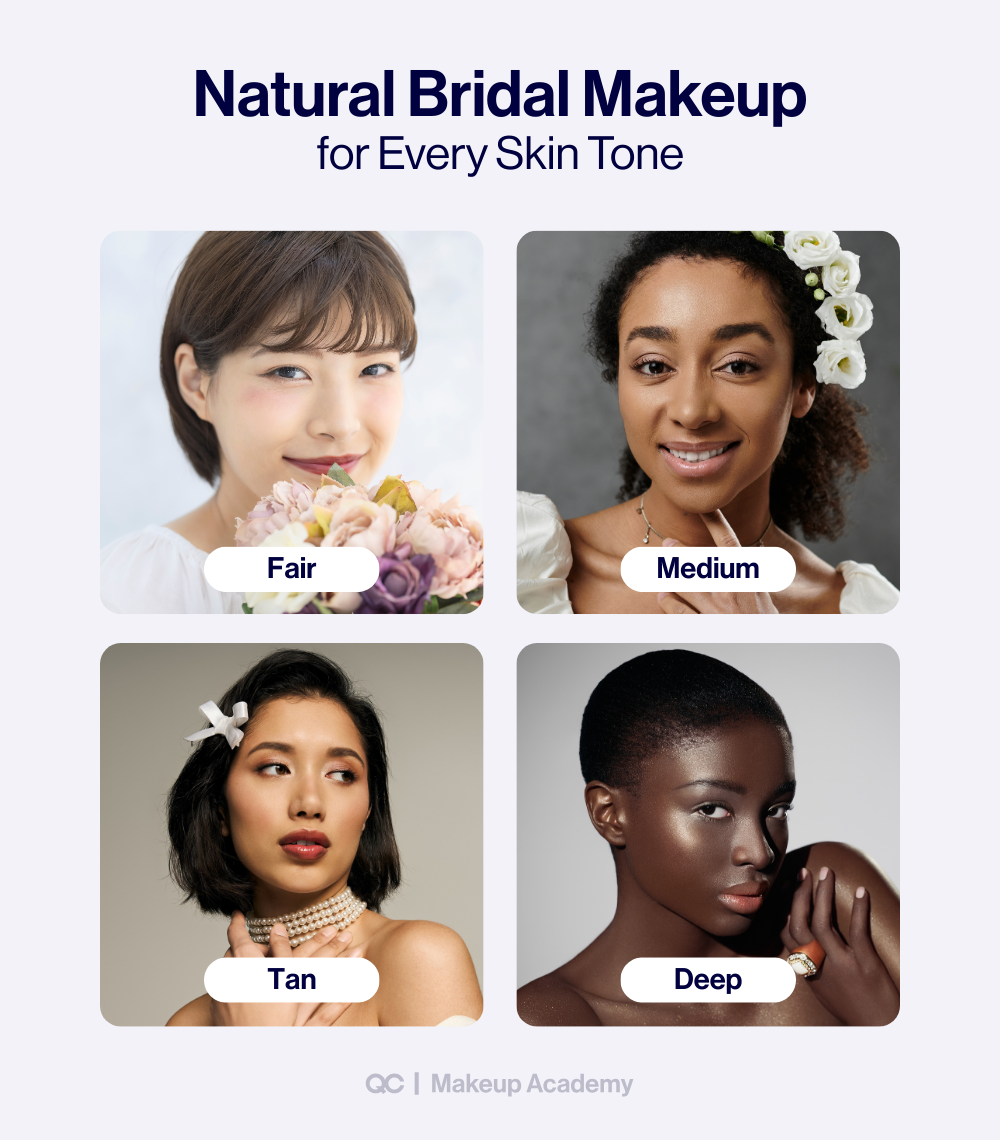
Natural, Glowy, and Timeless Looks

Many brides request a “natural but polished” style. This type of wedding makeup inspiration NEVER goes out of fashion!

Key Elements Of Natural Bridal Looks:

  • Skin: Lightweight foundation, sheer coverage, radiant finish.
  • Cheeks: Soft pink or peach blush for a healthy glow.
  • Eyes: Neutral shadows, subtle shimmer, softly blended liner.
  • Brows: Groomed but natural, brushed upward for definition.
  • Lips: Nude, rose, or sheer gloss to enhance natural tones.

Why It Matters:

  • Timeless makeup photographs beautifully across decades.
  • Brides often want to recognize themselves in their wedding photos.
  • Glowy skin reads fresh and elegant under different lighting conditions.
Infographic showing natural bridal makeup looks for fair, medium, tan, and deep skin tones, promoting inclusive wedding makeup inspiration for every bride.

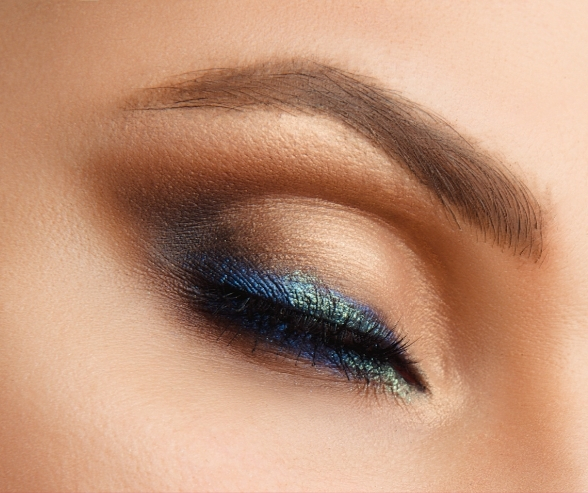
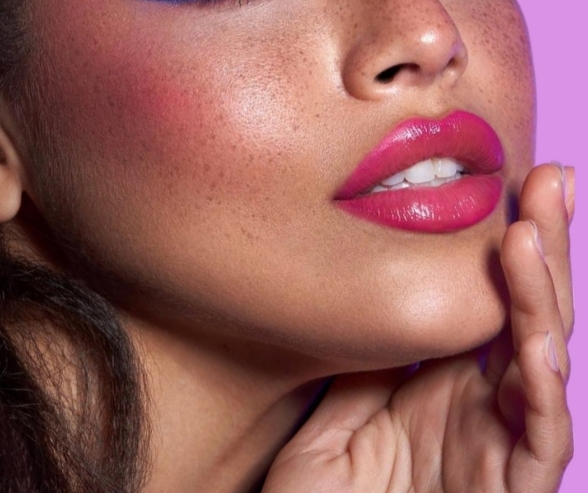
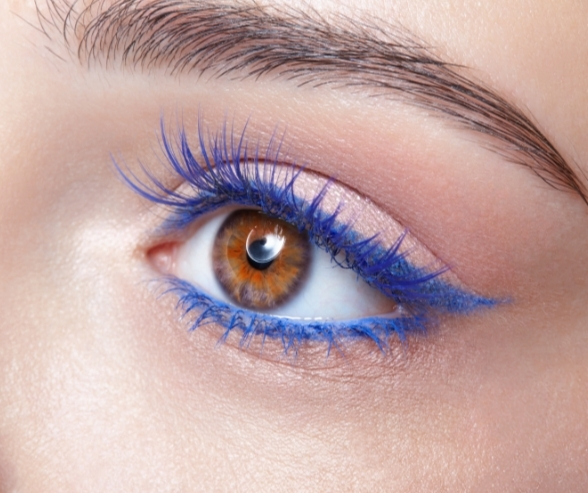
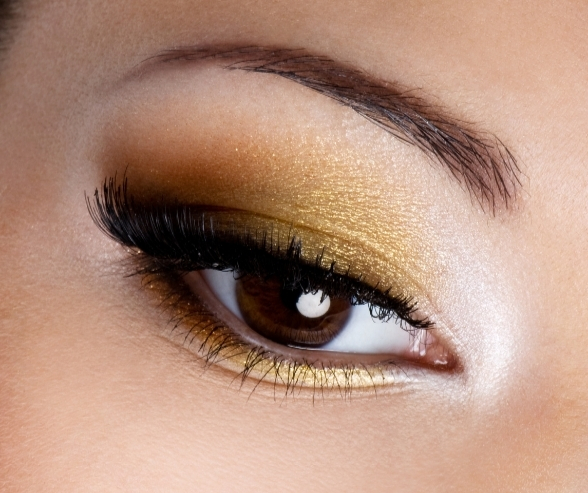
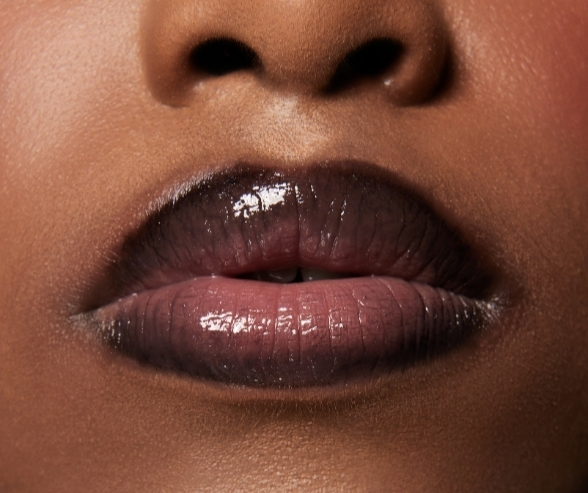
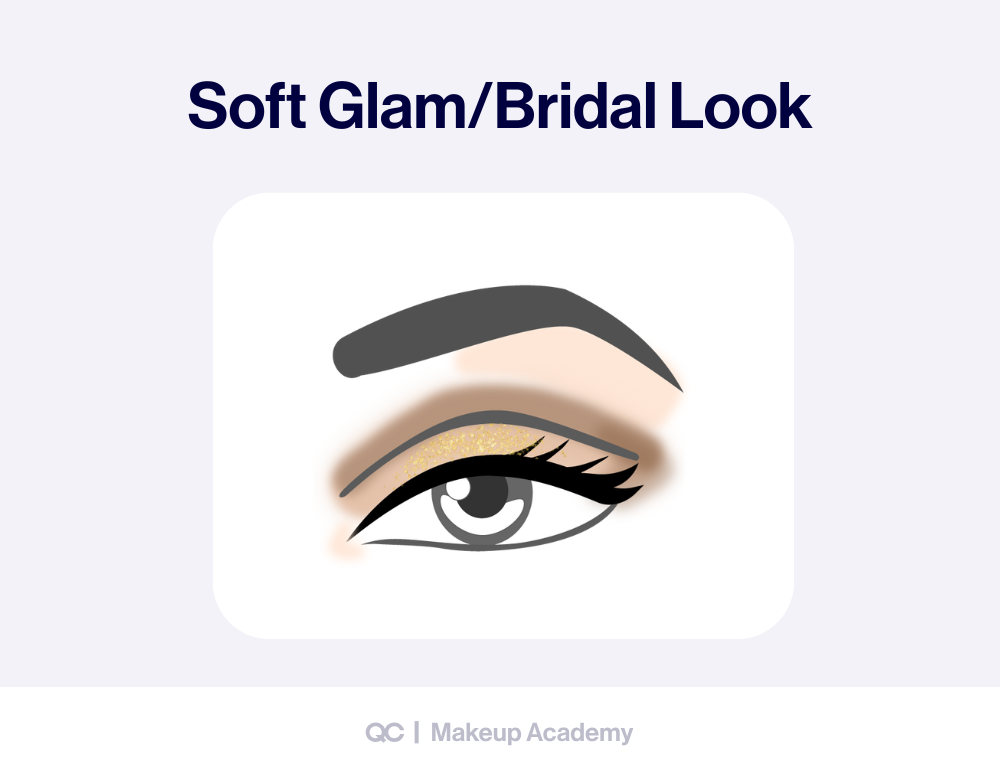
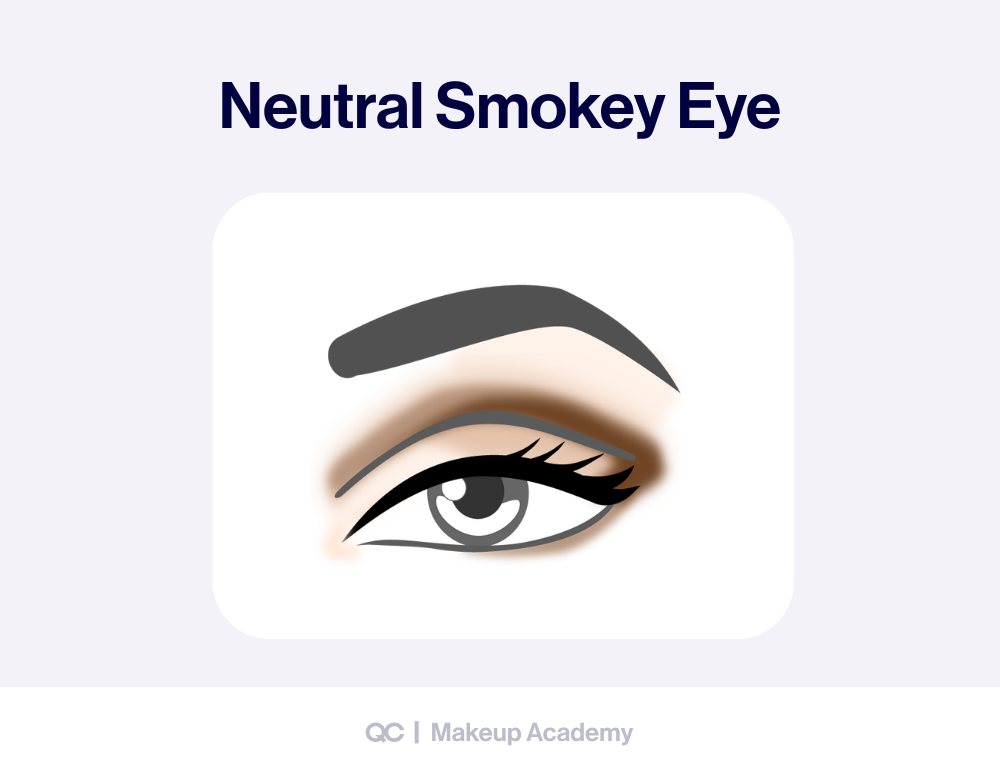
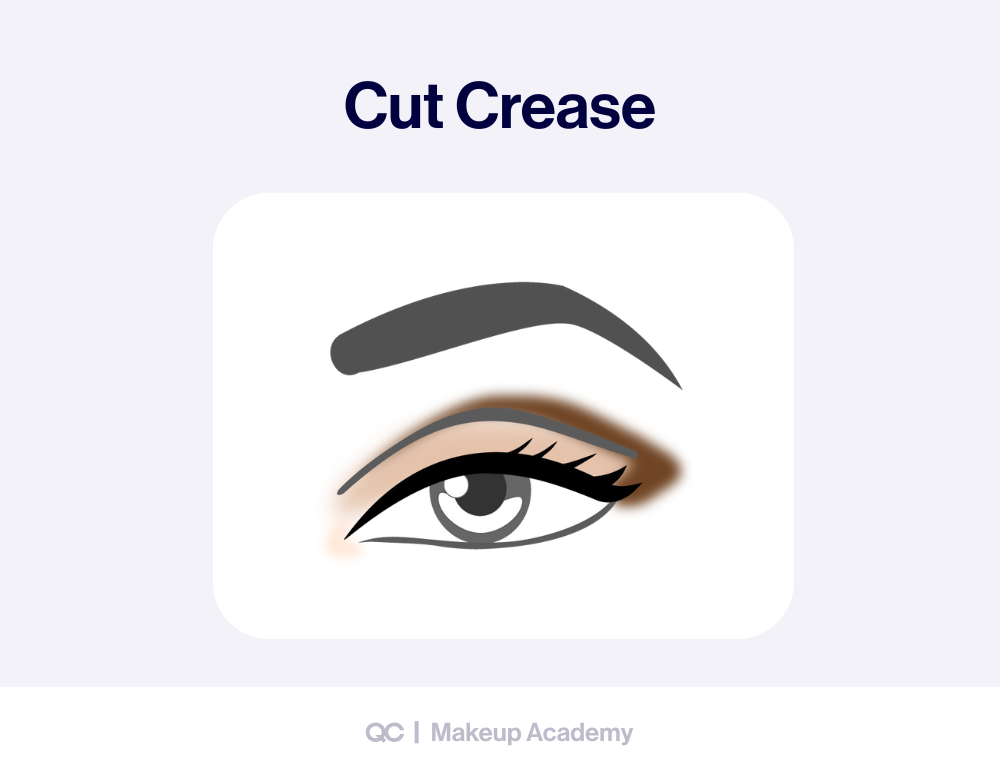
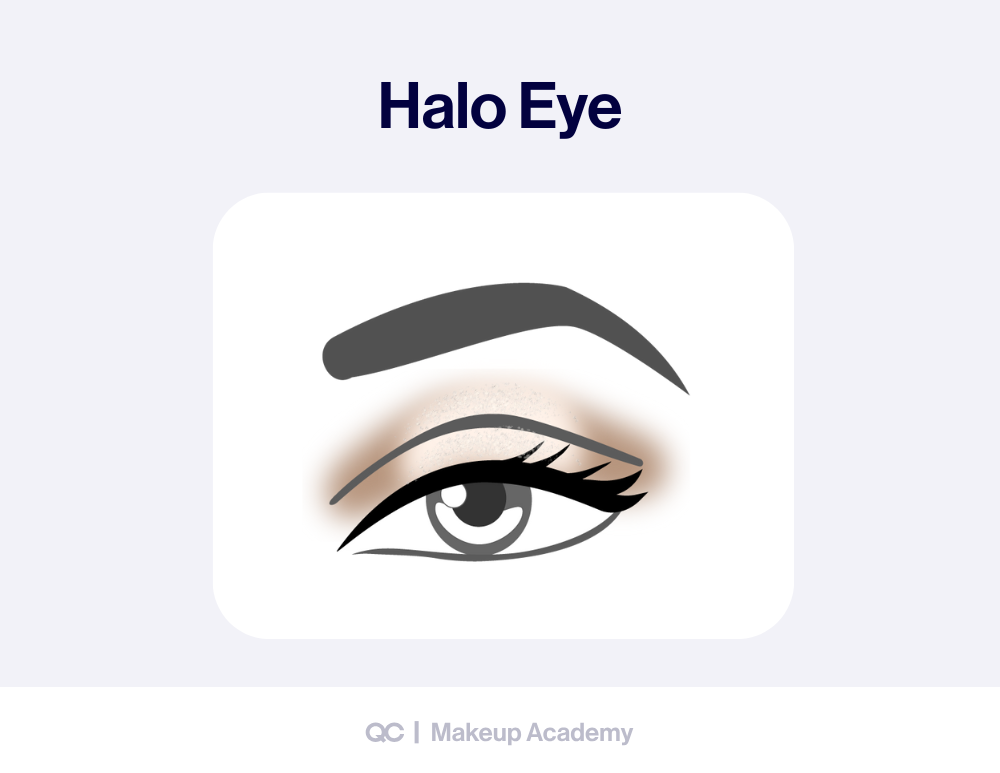
Bold Lips, Statement Eyes, and Modern Glam

With that said, not every bride wants soft glam. Some want to make a statement with color, shimmer, or bold definition! This is where artistic makeup looks meet bridal beauty.

Examples Of Bold Bridal Inspiration:

  • Bright or deep lipstick shades (red, berry, coral, or fuchsia).
  • Smokey eyes with brown, plum, or charcoal tones.
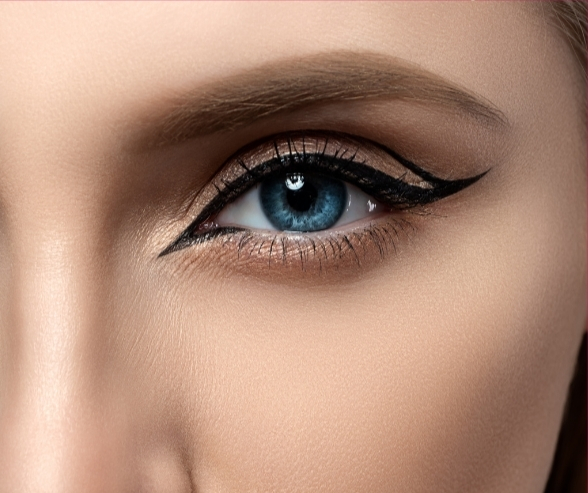
  • Graphic liner or winged eyeliner for extra drama.
  • Shimmering lids in gold, bronze, or metallic hues.
  • Full lashes (extensions or strip lashes) to frame the eyes.

Why It Matters:

  • Bold details personalize a bridal look and make it unforgettable.
  • Fashion-forward brides look for makeup inspo creative ideas that stand out on Instagram or in editorial-style wedding photography.
  • This approach lets MUAs demonstrate technical skill while still balancing wearability.
Kate says: In terms of the kind of inspiration photos brides bring me most often, it’s usually one of two looks lately. Right now, I’m seeing either the AI-generated “glassy skin” trend (dewy skin with no contour, light pink blush, soft lashes, and fluffy brows), or the “bronzed baby” vibe, which features glowing bronzed skin, peach-toned blush, a bronze smokey eye, and a crisp winged liner.

Adapting Inspiration to Client Preferences

This is the TRUE test of professional makeup artistry: taking inspiration and reshaping it for a real person. Think about it: brides often bring references that don’t exactly match their features, skin tone, or wedding vibe. Therefore, a skilled artist needs to know how to translate those ideas into something that’s still both flattering and personal.

Tips For Adapting Inspiration:

  • Ask guiding questions: What do they love about the inspiration photo (e.g., color, texture, or mood)?
  • Consider the setting: Outdoor weddings need long-wear, heat-resistant looks; indoor evening weddings can handle more drama.
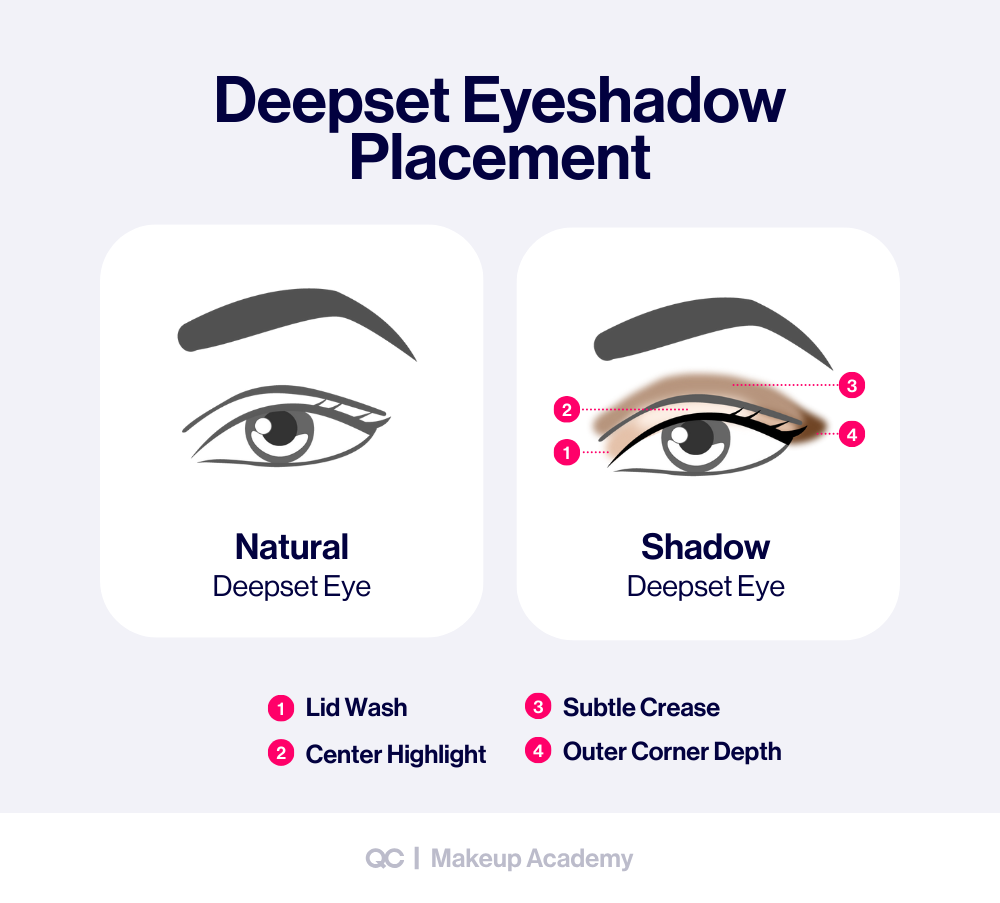
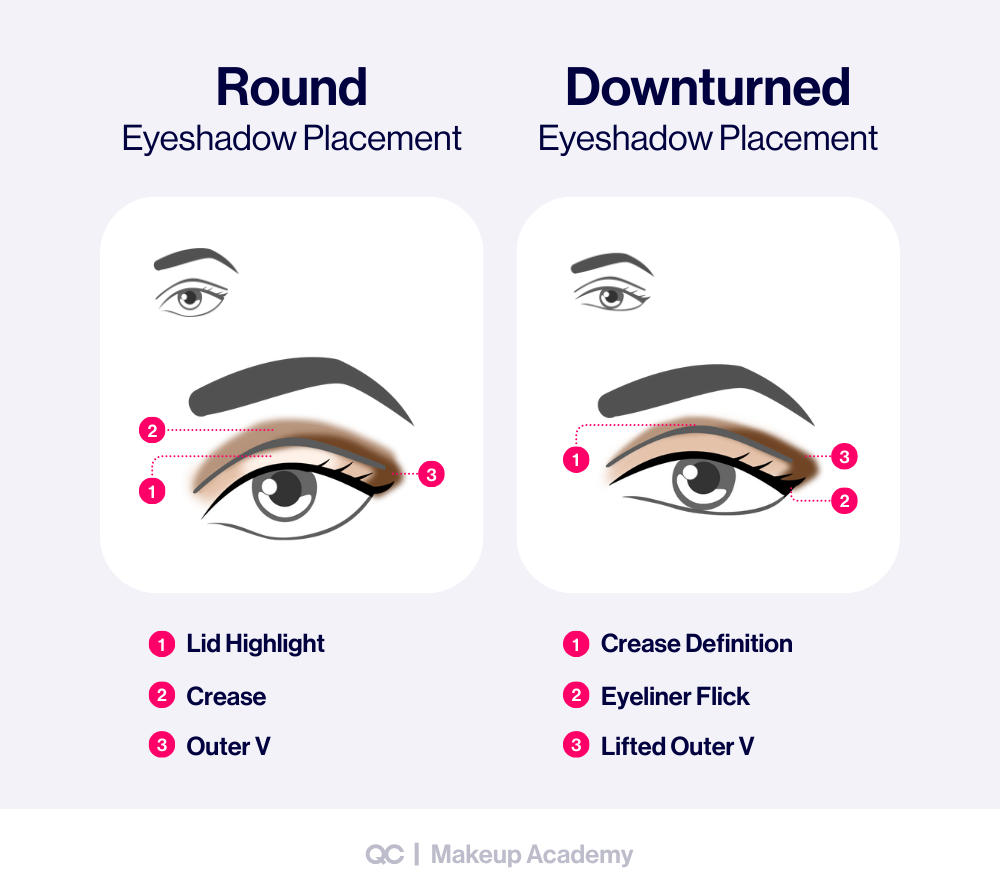
  • Adjust for features: A smokey eye for deep-set eyes won’t be the same as one for round eyes.
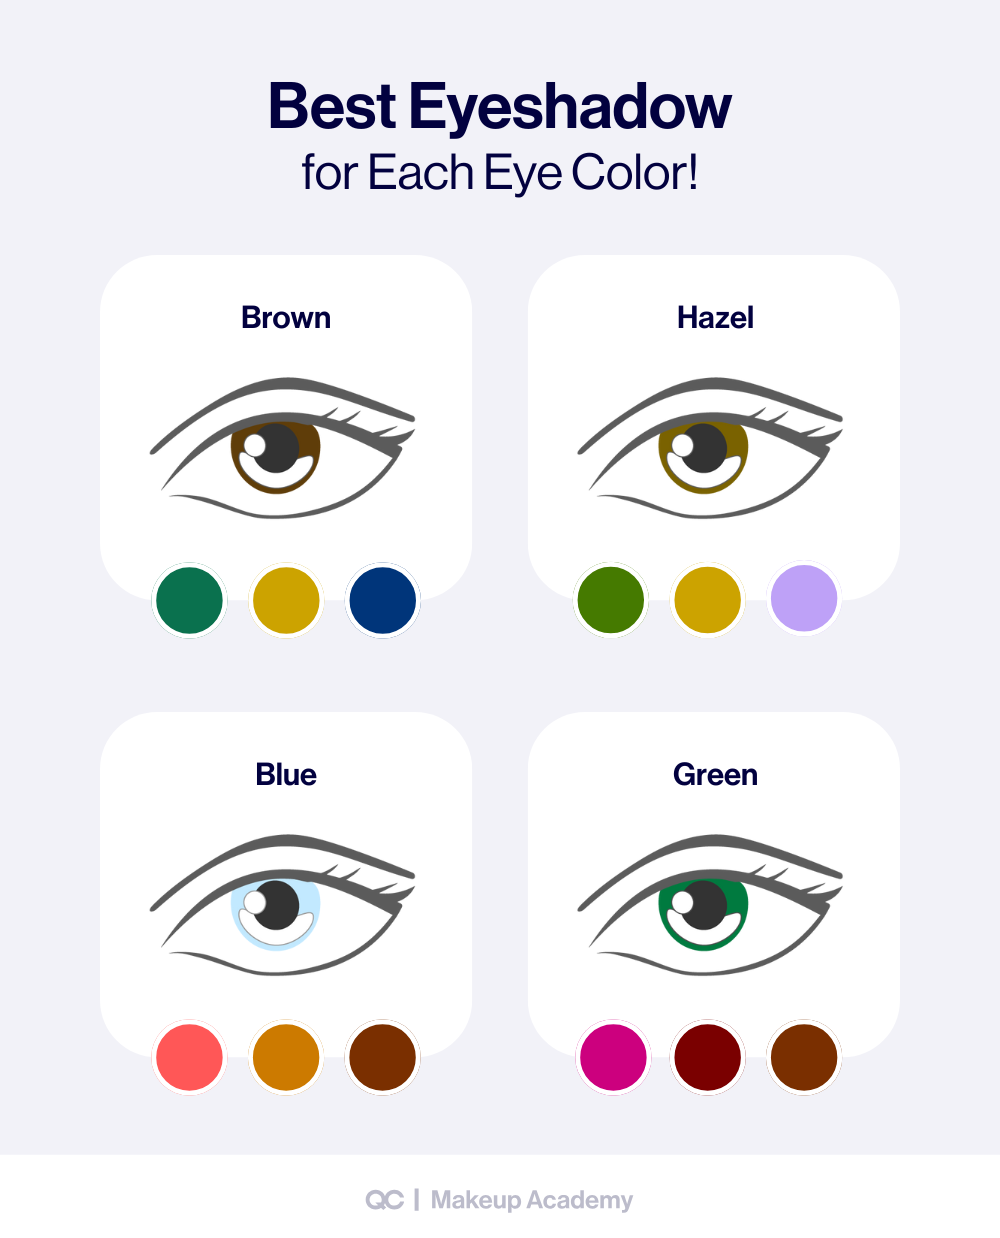
  • Customize shade ranges: Match inspiration colors to the bride’s undertones.
  • Balance with personality: A minimalist bride may love a bold lip on Instagram but regret it in her wedding album.
Kate says: Most of the time, clients trust my artistry and are open to adjustments that better suit their skin tone and features. If they can’t visualize changes, I’ll find photos that reflect their inspiration but feature models with similar coloring or structure. Communication is key here! On rare occasions, a client insists on replicating a look exactly. When that happens, I respect their wishes. Sometimes they love the result, and other times they realize something feels off. If they’re unsure, I’ll ask to make a few tweaks. Because of our earlier consultation, I already know which elements matter most to them. I keep the conversation positive, reassure them that their favorite parts will remain, and then make subtle changes—often showing the difference on one side first. By the end, they can see how those small adjustments made the look truly theirs!

It Matters Because It:

  • Shows professionalism and artistry beyond copying.
  • Builds client trust since they feel heard and understood.
  • Results in makeup that looks like them, not just a picture they found online.
PRO TIP: Keep a folder of real client before-and-after photos (with their permission, of course) for your professional portfolio. This demonstrates how you adapt wedding makeup inspiration into unique looks.
Model wearing dark red lipstick, smokey eye makeup, and black lace veil, showcasing dramatic artistic makeup looks with gothic elegance. Makeup by QC Makeup Academy student, Kate Loveland.
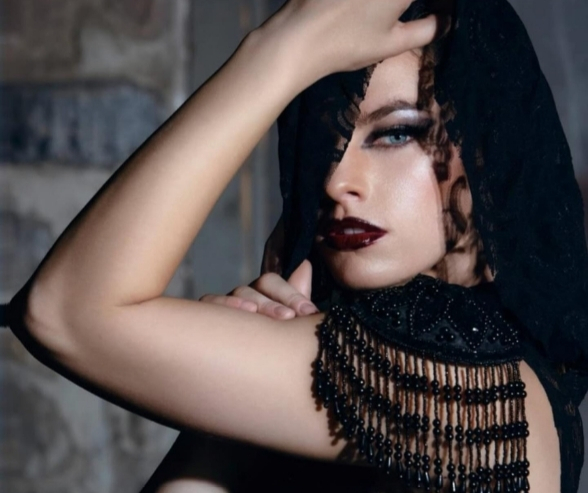
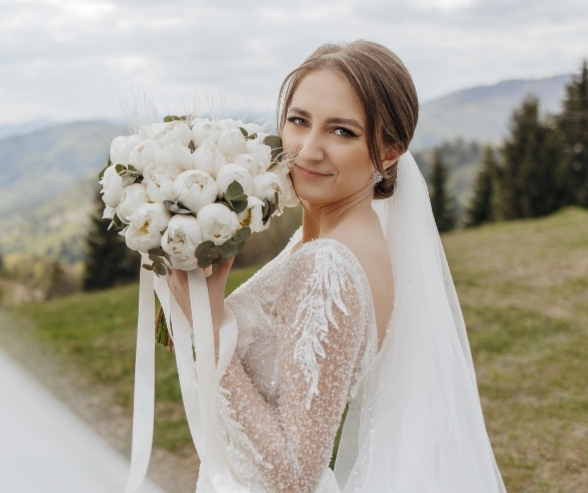
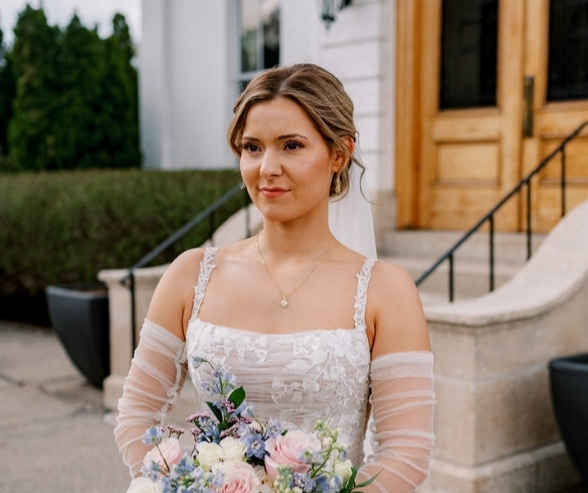
Photo by Tawny Horton. Model: Catherine Cornaby.

Why Wedding Makeup Inspiration Builds Careers

Bridal work is not just about one day—it’s about building your reputation as an artist. Happy brides recommend you to friends, family, and photographers. Plus, they often post photos that tag you on social media, giving you more visibility.

  • Brides search online for “wedding makeup inspiration” every day. Ranking high in this niche gives you an edge!
  • By showcasing both timeless and trendy looks, you appeal to a wide range of clients.
  • Wedding makeup work builds a strong portfolio that can also lead to editorial and commercial gigs.
  • It allows you to develop your makeup artist aesthetic by blending client needs with your own artistry.
PORTFOLIO IDEA: Create a “Wedding Inspiration” section with categories like Natural, Bold, and Trendy. This helps future clients instantly find a style they love.

Building Your Own Makeup Artist Aesthetic

Every great makeup artist has a recognizable style. This is your makeup artist aesthetic: the unique blend of colors, techniques, and creative touches that make your work stand out from everyone else. While inspiration comes from many sources, the way you use it builds your professional identity. Clients hire you not only for your skills, but also for your artistic voice.

Developing your aesthetic takes time, practice, and intention. So, here’s how you can shape it, step by step!

Step 1: Develop Your Signature Style

Your signature style is like your artistic fingerprint. Meaning, it shows up in every look you create, from bridal to editorial.

Tips For Developing Your Aesthetic:

  • Firstly, identify what excites you most. Do you gravitate toward soft glam, bold color, or high-fashion drama?
  • After that, notice your habits. What eyeliner shape do you naturally use? What lip finishes do you prefer? These patterns reveal your style.
  • From there, experiment widely. Try EVERYTHING—graphic liner, avant-garde SFX, natural skin. Over time, your favorite elements will blend into your aesthetic.
  • Next, get feedback. Ask mentors, peers, or clients what stands out in your artistry. Sometimes others notice your aesthetic before you do.
  • Finally, refine your portfolio. Choose photos that highlight your strengths, not just every look you’ve ever done.

Why This Matters:

  • For starters, clients trust artists with a clear style because they know what they’ll get.
  • Not to mention, a strong aesthetic sets you apart in a crowded market.
  • Furthermore, it also positions you as both creative and professional.
Kate says: Makeup-wise, I never skip mascara or brow definition. In terms of my personal signature style, I always joke that it’s tough having a job where I need to look like I know what I’m doing when all I really want is sweatpants. Honestly, my look totally depends on the job and call time. For fashion shows, pageants, or smaller weddings, you’ll usually find me in a short black dress and thigh-high glitter boots. On film sets, photoshoots, or with large bridal parties, it’s all about comfort; layers, sparkly sneakers, and clothes I can move in. My wavy, collarbone-length hair is kind of my signature; if it’s in a messy bun, you know the job’s intense. As a single mom, I’ll always pick a little extra sleep over full glam—but I’ll still show up polished and ready to work!
Makeup artist Kate Loveland styling a client’s hair with pearl accents, capturing behind-the-scenes makeup inspiration and professional artistry in action.
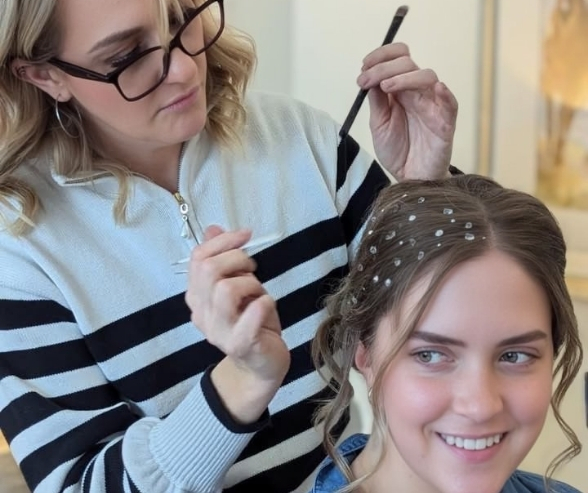
Client: Live watercolor artist, Kelsey Fisher.

Step 2: Put Together Inspiration Boards, Mood Boards, and Portfolios

Once you’ve identified your style, you then need tools to refine and showcase it. This is where makeup inspo creative boards and professional portfolios come in.

How To Use Boards and Portfolios Effectively:

  • Inspiration boards: Collect images that spark your creativity. Think artwork, landscapes, fabrics, editorials, even architecture. Not everything has to be makeup-specific.
  • Mood boards for clients: Create boards for bridal, editorial, and everyday beauty looks. Show clients how you adapt inspiration into real-life artistry.
  • Digital tools: Use Pinterest, Canva, or Milanote to organize visuals. For portfolios, platforms like Instagram or personal websites work best.
  • Update regularly: Your style evolves. Refresh your boards and portfolio at least every season.
  • Show range with cohesion: Your portfolio should prove you can adapt but still feel consistent.

Why This Matters:

  • It gives structure to your creativity.
  • Clients and employers see your vision at a glance.
  • It keeps you motivated and prevents creative blocks.
Infographic showing a corkboard filled with photos, fabrics, and textures, illustrating diverse makeup artist ideas and creative sources of inspiration.

Step 3: Evolve with Trends While Staying Authentic To Yourself

Here’s a little secret: every artist struggles with balancing originality and trends. For instance, clients may sometimes request viral TikTok looks or Pinterest styles that don’t align with your aesthetic. The key here is to adapt trends without losing your voice.

Tips For Balancing Trends and Authenticity:

  • Learn the trend thoroughly. Understand what makes it appealing (color scheme, technique, vibe).
  • Adapt it to your style. Keep the elements that align with your aesthetic, adjust the rest.
  • Practice trend translation. For example, if your style is natural, try a softer version of a bold graphic eyeliner trend.
  • Stay selective. Not every trend deserves a place in your artistry. Choose those that strengthen your brand.
  • Keep your roots. Your aesthetic is your anchor; it makes your artistry timeless even when trends fade.
PRO TIP: Document your process! Post side-by-side photos showing a trending look vs. your adapted version. This highlights your ability to evolve while staying authentic.

Why This Matters:

  • Keeps your work relevant and current.
  • Prevents you from becoming a “trend chaser” without a personal style.
  • Builds your reputation as an adaptable, innovative artist.
Kate says: Because my bridal portfolio focuses on glowy, natural looks, I usually attract brides who want to look like an enhanced version of themselves. That said, I do get some who prefer something bold or trendy. Early in my career, I heard a mentor tell a bride, “You’re going down the aisle, not the runway.” While I’d never say that directly to a client, I try to communicate that same idea during each bridal consultation. So, before each trial, I go through a form I created that covers everything—skin type, makeup routine, wedding vision, personality, and lifestyle. This helps me understand not just how they want to look, but how they want to feel. Sometimes, a dramatic look perfectly matches the bride’s aesthetic. But other times, once we walk through the details, they realize a softer, more authentic version of themselves is exactly what they wanted all along.

Why Aesthetic Development Builds Careers

Your makeup artist aesthetic is more than personal style; it’s a career-building tool. This is because it:

  • Makes your work recognizable in a crowded industry.
  • Attracts clients who share your taste and trust your expertise.
  • Strengthens your brand for social media, websites, and portfolios.
  • Positions you for opportunities like editorials, weddings, and collaborations.
  • Allows you to confidently market yourself as both a creative and a professional.

In short, developing your aesthetic is how you turn inspirational makeup into a lasting career identity.

Makeup Inspiration: Expert Tips To Help You Grow

Learning how to find and use inspiration is just as much about consistency and professionalism as it is about creativity. The most successful MUAs out there know how to take sparks of makeup inspo and turn them into polished looks that clients love!

At QC Makeup Academy, our instructors and experts guide students through every stage of their artistic journey. Here are some expert-backed tips to fuel your creativity and sharpen your professional makeup artistry.

Tip 1 – Look Beyond Makeup for Inspiration

The world around you is your best classroom! For instance:

  • Taking a walk through a city can inspire graphic liner shapes from architecture.
  • Perusing a flower market can spark new color combinations.
  • Reading a fashion magazine can highlight textures that translate beautifully into eyeshadow looks.
  • Even food styling, such as the sheen of chocolate or the shimmer of sugar, can inspire unique finishes.
Kate says: For the same color-themed shoot I mentioned earlier, I was also part of a second team with Tara Smith (model) and Ryan Houston, and our theme was black. It evolved into a crow-inspired concept with a spooky backdrop and witchy wardrobe. I drew inspiration from the texture and movement of feathers for Tara’s look, spending over 20 hours preparing. For her hair, I created 55-inch textured curls by wet-setting synthetic extensions and her natural hair on straws, then braiding them together to blend seamlessly. The result was floor-length, feather-like waves topped with a gothic crown. For her makeup, I crafted a one-sided feather mask by cutting and shaping tiny pieces of black feathers with spirit gum, layering them from her temple across her nose to form a three-dimensional, masquerade-style design. A smokey eye, crisp liner, and small black gems added depth and glamour while keeping the organic, splayed-feather effect intact.
Model wearing dramatic black lace dress, voluminous textured hair, and intricate eye makeup, showcasing bold artistic makeup looks and high-fashion creativity. Makeup by QC Makeup Academy student, Kate Loveland.
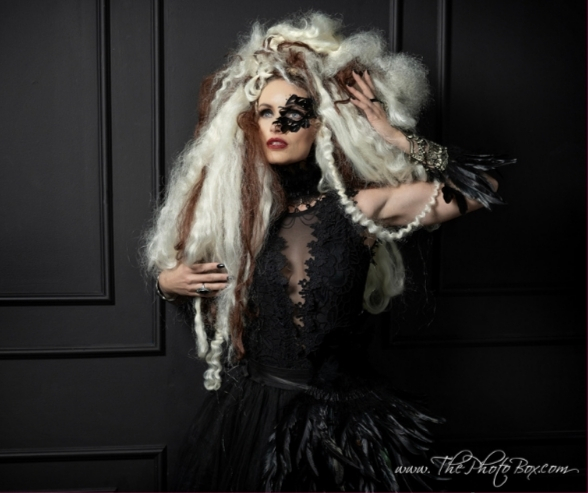
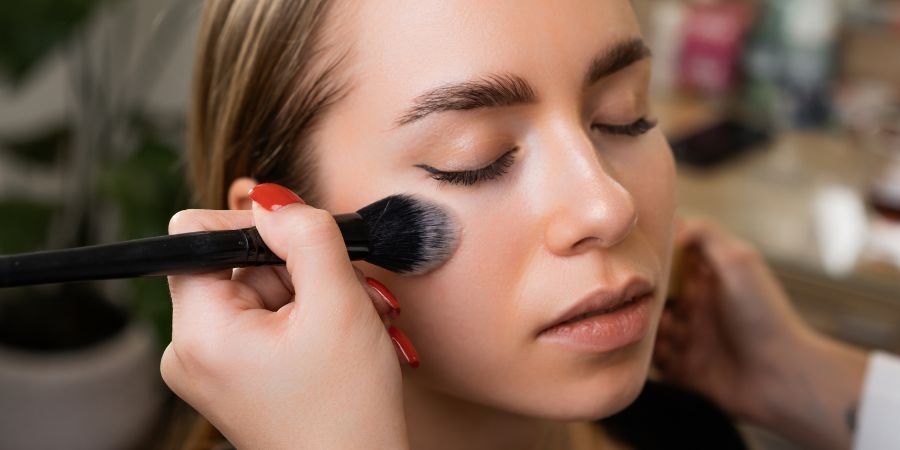
Photo by Scott Gianchetta. Shoot organized by Jennifer Woo.

Tip 2 – Build a Habit of Observation

Professional makeup artists train their eyes daily. The more you notice, the easier it becomes to spot new ideas. So, here are a few things you can to build a habit of observation:

  • Carry a small notebook or use your phone to snap inspiration photos.
  • Ask yourself: Why do I like this look? Is it the color, the shape, or the emotion it gives?
  • Challenge yourself to find one new inspiration every day, no matter how small.
  • Practice replicating looks, then adapt them into your own makeup artist aesthetic.
PRO TIP: Try a weekly “inspiration challenge” where you pick one object (a painting, a song, even a mood) and design a full makeup look around it.

Tip 3 – Stay Grounded in Technique

Creativity is essential, but execution matters just as much. Professional MUAs know that inspirational makeup is only successful when the technique is flawless—and here are some core techniques we encourage you to remember:

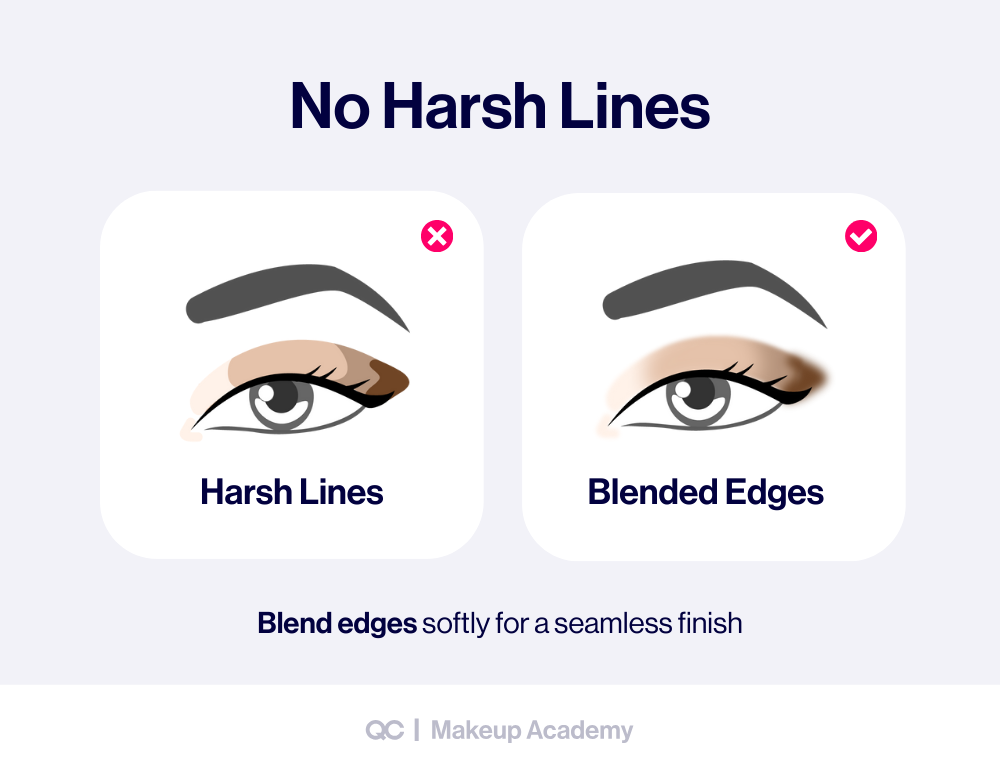
  • Blend thoroughly, as harsh lines can distract from the artistry.
  • Choose colors that work for your client’s undertones, even if inspired by bold palettes.
  • Use products that are long-wear and photo-friendly for bridal or event work.
  • Pay attention to skin prep. Glowing skin is the canvas for most artistic makeup looks.
  • Always test new techniques before applying them on clients.

Think of it this way: foundational makeup techniques create the canvas, and your inspiration + execution is the actual creation of the art upon it. Without the canvas, however, you can’t physically bring your art to life… And this is why learning professional makeup and taking a certification course is SO important for your skill-set!

Tip 4 – Keep Your Portfolio Fresh and Relevant

Contrary to what you might think, inspiration doesn’t stop once a look is created. Rather, it continues through how you present your work. This is why professionals constantly update their portfolios to reflect their current skills and aesthetic.

  • Swap out outdated styles for your newest looks.
  • Organize your portfolio by themes (bridal, editorial, bold, natural).
  • Include both classic and trend-driven examples to show range.
  • Add behind-the-scenes photos or inspiration boards to show your creative process.
  • Share your work consistently on platforms like Instagram and TikTok.

Tip 5 – Expert Guidance Matters

On top of arming you with the foundation you need to express yourself, grow, and succeed, learning directly from experienced professionals also gives you confidence. Certification training ensures that your artistry evolves in a way that’s creative, ethical, and client-focused. At QC Makeup Academy, students not only gain technical skills; they also receive detailed, personalized feedback from mentors who’ve worked at the highest levels of the industry.

This is what sets apart a hobbyist from a true professional makeup artist: the ability to transform inspiration into artistry with precision, originality, and confidence.

Model posing in the ocean wearing a red dress and gold accessories, featuring bold eye makeup and glowing skin that reflect creative makeup inspiration and artistry. Makeup by QC Makeup Academy student, Kate Loveland.
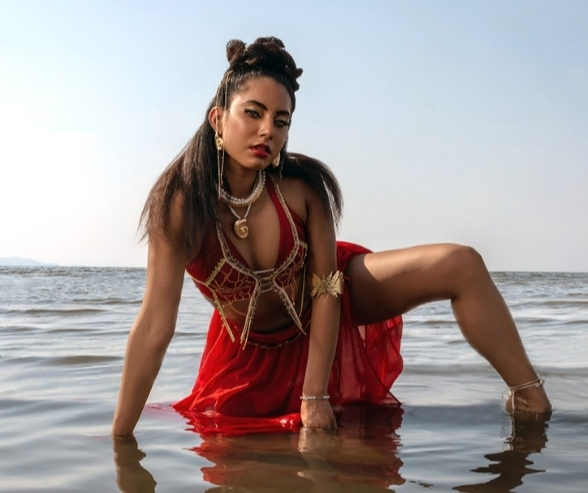
Photo by Tré Nelson Photo. Model: Nella Zepeda. Shoot organized by Utah Creative Collaborations.

Food for Thought: Take Your Makeup Inspiration Further with Training

Kate says: No idea is a bad idea. Inspiration can come from anywhere and anyone. Try it, and if you love it, great. But if it doesn’t work, either way you learned something and listened to yourself. The more you follow through and trust your intuition, the more you trust and get to know yourself!

Inspiration is the lifeblood of artistry. It pushes you to try new colors, explore new textures, and imagine looks that no one else has thought of yet. From natural bridal styles to bold editorial creations, every masterpiece begins with a single spark of makeup inspiration.

That Said, Inspiration Alone Often Isn’t Enough…

To turn those ideas into polished, professional results, you need the right training and support. That’s where QC Makeup Academy comes in!

Our online courses are designed to help you:

  • Master the fundamentals of professional makeup artistry.
  • Refine your techniques so your creative ideas shine through.
  • Build a portfolio that showcases your unique makeup artist aesthetic.
  • Gain confidence through feedback from seasoned instructors.
  • Know the ins and outs of launching (and running) a successful makeup artistry business.
  • Transform passion and inspiration into a successful, lasting career.

So, whether your dream is to work in weddings, fashion, film, or everyday beauty, QC will give you the tools and mentorship to make it happen!

Studying with QC Makeup Academy has been an amazing journey. I've wanted to study makeup for over 20 years—and now I've finally done it! After two decades working backstage in TV, fashion weeks, bridal and education doing hair, I'm so excited to now offer my other big passion: makeup!

Grethe SagmoenAward Winning Stylist & Educator

Ready to elevate your artistry? Enroll in QC Makeup Academy’s self-paced online makeup courses today, and turn your inspiration into a professional career!

FAQs About Makeup Inspiration

Bringing your creativity to life starts with knowing where to look for ideas and how to use them. Here are answers to the most common questions about finding and applying makeup inspiration.

What's the best way for makeup artists to find inspiration?

Look both inside and outside the beauty world. Art, fashion, film, and nature can inspire as much as social media. Build inspiration boards with textures, colors, and moods to translate into looks. The more you explore, the stronger your makeup artist aesthetic becomes.

Where do professionals look for wedding makeup inspiration?

Pros find wedding makeup inspiration from bridal magazines, celebrity weddings, and real MUA portfolios online. Pinterest is great, but always adapt ideas to the bride’s skin tone, venue, and personality. Blend timeless classics with modern touches for unique results.

How do I develop my personal makeup artist aesthetic?

Your makeup artist aesthetic grows through practice and self-awareness. So, identify what excites you—bridal, editorial, or glam—and build inspiration boards that match. From there, keep refining your work until a signature style naturally emerges!

What are the top sources of inspirational makeup ideas today?

Social media, fashion weeks, art, celebrity looks, and film are top sources of inspirational makeup ideas. Explore them all to stay current while building originality.

Book Your First Makeup Client In Just 8 Weeks

Become a certified makeup artist—on your schedule, from wherever you are!

GET STARTED TODAY
Elegant bride with flawless makeup featuring soft contouring, nude lips, and shimmering eyeshadow — perfect inspiration for bride makeup ideas and modern glitter bridal makeup looks.

13 Bridal Makeup Looks for 2026

By , Graduate Feature, Guest Articles, Makeup Tips and Tricks, Makeup Trends No Comments

Bridal Makeup Ideas: Key Points

  • Bridal makeup must balance beauty, comfort, and longevity.
  • Consultations and trials are essential for success.
  • Contracts protect both artists and clients.
  • Natural, classic, and dramatic are the core bridal styles.
  • Professional training builds skill, confidence, and career growth.

Introduction

Bridal makeup is more than just eyeliner and lipstick. It’s about creating a look that feels timeless in photos, yet true to the bride’s style in the moment. On such an important day, the right makeup enhances natural beauty, builds confidence, and creates memories that last forever.

Whether your clients prefer subtle elegance or bold drama, the best makeup artists stay ahead of trends while mastering timeless skills. That’s where these 13 bride makeup ideas come in!

Keep reading to explore 13 inspiring bride makeup looks that will give you fresh ideas, boost your artistry, and help you create unforgettable wedding-day beauty.

Meet Elena Franklin, Professional Makeup Artist

Headshot of QC Makeup Academy graduate, certified/professional makeup artist, and guest collaborator, Elena Franklin of Makeup By Len.
Photo by Sarah Hunter.

Elena Franklin’s love for makeup began in high school through dance and musical theatre. Since 2021, she has trained with QC Makeup Academy, earning certifications as a Master International Makeup Professional (MIMP)™, International Skincare Consulting Professional (ISCP)™, International Special FX Makeup Professional (ISMP)™, Pro Makeup Workshop Graduate (PMW), and Portfolio Development Graduate (PDW).

After her first certification in December 2021, Elena launched her business, Makeup By Len, focusing on bridal and event makeup, one-on-one lessons, and other beauty services. She continues to grow her brand and social media presence while helping clients feel confident and beautiful. 

Elena’s advice to new makeup artists is to practice as much as you can and make connections with other artists and vendors in the industry. In her experience, word of mouth is everything when it comes to building a brand.

13 Bride Makeup Looks Every Artist Should Know

Every bride is unique, and so are her makeup choices. From bold lips to natural lashes, these looks cover classic, trendy, and creative approaches. Use them as inspiration for client consultations and trials.

1. Bold Lipstick for Bridal Glam

Soft and romantic traditional bridal makeup look featuring warm eyeshadow, peach lipstick, and a sheer pearl-detailed gown.

A bold lip is one of the most classic bride makeup ideas. While many brides choose soft neutrals, a strong lipstick shade makes a powerful statement. It highlights the smile, photographs beautifully, and instantly adds glamour to the overall bridal look.

Popular bold lipstick shades include:

  • Classic red: Timeless and elegant, perfect for both day and evening weddings.
  • Berry tones: Romantic and flattering, especially for fall or winter weddings.
  • Deep plum or burgundy: A dramatic wedding makeup option that feels rich and sophisticated.
  • Bright pinks: Fun and playful for brides with a modern or bold style.

To make bold lipstick wedding-ready, prep the lips well. Exfoliate, hydrate, and use liner to prevent smudging. Layer color and choose long-wear formulas so the shade lasts through the ceremony and reception.

Balance is key with bold bridal makeup! Pair strong lips with neutral eye makeup, soft eyeliner, and a flawless complexion. This ensures the look stays elegant and bridal, not overwhelming.

Bold lipstick is best for confident brides who want their personality to shine. It works especially well for black-tie weddings, vintage-inspired themes, or any bride who loves making a statement.

Elena says: It’s rare that I’ll get a bride that requests a bold lip, but when she does, it’s usually bright red! I line and fill in the lips with liner before applying lipstick for longevity. Then I give clients a sample for touch-ups. When working with bold elements, I recommend balancing them with softer features. Choose one or two areas to emphasize so the look complements rather than clashes.

Pro lipstick picks for brides:

  1. MAC Retro Matte Lipstick in Ruby Woo – the ultimate long-lasting red.
  2. Charlotte Tilbury Matte Revolution in Walk of No Shame – a berry shade that flatters many skin tones.
  3. Fenty Beauty Stunna Lip Paint in Uncensored – bold, smudge-proof red perfect for long wear.
  4. Maybelline SuperStay Matte Ink in Lover – affordable, comfortable pink that won’t budge.

2. Elegant Luxe Bridal Makeup

Radiant bride with natural glow and soft glam look, showcasing a timeless bold bridal makeup style paired with an off-the-shoulder wedding gown.

This look is all about subtle sophistication. Brides who choose this style want to look polished and timeless rather than trendy. Think satin-finish skin, softly defined eyes, and muted lips. It’s perfect for brides who want traditional bridal makeup that will still look elegant in 20 years.

Key features of this style include:

  • Soft brown or taupe eyeshadow with minimal shimmer.
  • Light contouring to enhance bone structure without harsh lines.
  • Perfectly groomed brows that frame the face naturally.
  • Nude or muted rose lips with a satin finish.

The result is a clean, refined look that enhances features instead of transforming them. It’s one of the most versatile unique bridal makeup ideas because it flatters every skin tone and works with almost any wedding theme.

Pro product picks for brides:

  1. Laura Mercier Tinted Moisturizer – lightweight, natural-looking base.
  2. Anastasia Beverly Hills Brow Wiz – precise brow shaping.
  3. Urban Decay Naked2 Basics Palette – soft matte neutrals for the eyes.
  4. Charlotte Tilbury K.I.S.S.I.N.G Lipstick in Bitch Perfect – a muted rose-nude satin finish.

3. Glitter Eyeliner for a Touch of Sparkle

Close-up of shimmering blue and gold eyeshadow with defined eyeliner, creating a captivating glitter bridal makeup look for modern brides.

Glitter bridal makeup is perfect for brides who want just a hint of sparkle without going over the top. Glitter eyeliner adds glamour while keeping the look chic and sophisticated.

Ways to wear glitter liner:

  • Subtle sparkle over black liner for a glowing accent.
  • A full glitter wing for a bolder statement.
  • Shimmer along the lower lash line for fun, youthful energy.

To keep glitter wedding-appropriate, pair it with neutral shadow and natural lips. Choose long-wear glitter formulas so the sparkle lasts through the vows, reception, and first dance.

Pro product picks for brides:

  1. Stila Glitter & Glow Liquid Eyeshadow in Kitten Karma – easy-to-use liquid glitter.
  2. Urban Decay Heavy Metal Glitter Eyeliner – iconic long-wear liner.
  3. NYX Professional Makeup Glitter Goals Liquid Eyeliner – affordable and versatile.
  4. Too Faced Better Than Sex Mascara – pairs perfectly with glitter for defined lashes.

4. Dewy, Radiant Skin That Lasts

Minimalist glowing skin with soft blush and nude lips, showcasing a fresh and radiant unique bridal makeup look for modern brides.

Every bride wants glowing skin. The challenge is creating a dewy finish that looks fresh all day without turning shiny. This dramatic wedding makeup look focuses on skin prep and balance.

How to create long-lasting dewy skin:

  • Prep with hydrating skincare weeks in advance.
  • Use lightweight, luminous foundations that enhance natural radiance.
  • Apply cream highlighters for glow, then set oily zones with powder.
  • Keep blotting papers on hand for quick touch-ups.

This look is all about health and vitality. It works beautifully for daytime weddings, outdoor venues, or brides who prefer a natural glow.

Pro product picks for brides:

  1. Armani Luminous Silk Foundation – lightweight with a radiant finish.
  2. Charlotte Tilbury Hollywood Flawless Filter – soft-focus glow booster.
  3. Hourglass Ambient Lighting Powder – locks in glow without shine.
  4. Maybelline Fit Me Dewy + Smooth Foundation – an affordable radiant finish option.

5. Vibrant Blush Pops

Close-up of vibrant pink lipstick and rosy blush highlighting a radiant complexion, perfect for a confident bold wedding makeup look.

Blush is having a moment in bridal beauty. Instead of a subtle wash, brides are embracing bold bridal makeup with noticeable pops of color on the cheeks.

Popular blush shades for brides include:

  • Coral tones for warm, sun-kissed vibes.
  • Peach shades for a natural, soft flush.
  • Pink tones for romantic, youthful charm.

The trick here is placement! Apply blush higher on the cheekbones and blend upward toward the temples. This “lifted blush” look creates dimension and keeps the face radiant in photos.

Pro product picks for brides:

  1. NARS Blush in Orgasm – a cult classic peach-pink with shimmer.
  2. Rare Beauty Soft Pinch Liquid Blush in Joy – long-lasting coral.
  3. MAC Powder Blush in Peaches – buildable warm peach.
  4. Milani Baked Blush in Luminoso – affordable, glowing peach.

6. Soft Shadow Liner

Smiling bride holding a white bouquet in a mountain setting, wearing soft glam dramatic bridal makeup with defined eyes and nude lips.

Some brides love the idea of eyeliner but don’t want the intensity of a liquid wing. That’s where shadow liner comes in. It defines the eyes in a soft, romantic way.

Why shadow liner works well:

  • Blends easily for a softer finish.
  • Flatters every eye shape, especially mature brides.
  • Creates depth without harshness.

For a bridal look, use neutral brown or bronze shadows to create definition along the lash line. Add a slight wing for a subtle, lifted effect.

Pro product picks for brides:

  1. MAC Eye Shadow in Espresso – the perfect deep matte brown.
  2. Sigma E30 Pencil Brush – ideal for precise shadow liner.
  3. Urban Decay 24/7 Glide-On Pencil in Whiskey – creamy liner for smudging.
  4. NYX Jumbo Eye Pencil in Iced Mocha – easy, blendable option.

7. Graphic Eyeliner Statements

Close-up of elegant winged eyeliner and soft shimmer eyeshadow, showcasing modern bride makeup ideas for a chic wedding look.

For brides who love a daring, fashion-forward look, graphic eyeliner is the way to go! Unlike traditional wings, this unique bridal makeup style uses bold shapes and lines to create artistry around the eyes.

Popular graphic eyeliner styles for weddings include:

  • Double wings for a dramatic twist on the cat-eye.
  • Floating crease liner for a modern, editorial vibe.
  • Geometric shapes for adventurous brides.

This style pairs best with a neutral base and subtle lips to keep the eyes the star. It’s perfect for brides who want their wedding photos to show personality and edge.

Pro product picks for brides:

  1. KVD Beauty Tattoo Liner in Trooper Black – ultra-precise liquid liner.
  2. NYX Epic Ink Liner – affordable, waterproof precision.
  3. Fenty Beauty Flyliner Longwear Liquid Eyeliner – bold pigment, long wear.
  4. SUVA Beauty Hydra Liner – colorful graphic liner options.

8. Romantic Rosy Glow (Flushed Cheeks)

Elegant bride with natural glam makeup and soft pink tones holding a floral bouquet, showcasing timeless bride makeup ideas for a classic wedding look.

This soft cheek look gives brides a fresh, radiant appearance. Unlike bold blush, the rosy glow is more diffused, romantic, and natural. It enhances the skin while keeping the overall bridal style light and timeless.

How to achieve the look:

  • Choose shades like dusty rose or soft mauve.
  • Apply blush across the apples of the cheeks and slightly onto the nose bridge for a natural flush.
  • Blend carefully for a seamless finish.

This approach works for both traditional bridal makeup and more modern looks, adding warmth without overpowering.

Pro product picks for brides:

  1. Clinique Cheek Pop in Rosy Pop – fresh, natural rosy shade.
  2. Rare Beauty Soft Pinch Liquid Blush in Bliss – long-lasting rosy tone.
  3. Tarte Amazonian Clay Blush in Exposed – soft, muted rose.
  4. Milani Rose Powder Blush in Romantic Rose – budget-friendly classic.

9. Colorful Eyelashes for Whimsy

Close-up of creative blue eyeliner and soft pink eyeshadow, offering bold and modern bride makeup ideas for a unique wedding look.

Colorful lashes are a fun twist for brides who want something playful in their look. This bold bridal makeup idea adds unexpected pops of color, from blue to green or even purple.

Ways to wear colorful lashes:

  • Bright mascara for a subtle touch.
  • Colored falsies for a stronger impact.
  • Mixing a hint of color into natural lashes for balance.

Keep the rest of the makeup simple so the lashes stand out without overwhelming the bride’s face. This look works especially well for modern weddings or themed celebrations.

Pro product picks for brides:

  1. Dior Diorshow Mascara in Blue – luxury pop of color.
  2. Maybelline Great Lash Mascara in Royal Blue – affordable and fun.
  3. Colored Faux Lashes via Amazon – colorful falsies for drama.
  4. ColourPop BFF Mascara in Purple Prose – playful, affordable option.

10. Golden-Bronze Eyeshadow Looks

Close-up of gold shimmer eyeshadow and voluminous lashes, creating a radiant glitter bridal makeup look perfect for glamorous weddings.

Bronze and gold eyeshadow is a wedding classic. It flatters almost every skin tone and adds warmth, making it one of the most versatile dramatic wedding makeup ideas.

Why it’s a must-have look:

  • Adds depth without overpowering.
  • Works for daytime and evening weddings.
  • Pairs beautifully with both nude and bold lips.

To modernize this style, blend metallic bronze with matte transition shades. Add shimmer to the inner corners to brighten the eyes in photos.

Pro product picks for brides:

  1. Urban Decay Naked Honey Palette – golden, warm shades.
  2. Natasha Denona Bronze Palette – high-quality bronze tones.
  3. ColourPop Yes, Please! Palette – affordable warm neutrals.
  4. MAC Pigment in Melon – shimmery gold-peach loose pigment.

11. Ombre Lips with Dimension

Close-up of glossy nude lips with soft ombré shading, capturing a chic and modern bold bridal makeup look for contemporary brides.

Ombre lips create depth and make lips look fuller. This unique bridal makeup idea adds artistry while remaining wearable for a wedding.

How to create ombre lips:

  • Start with a darker liner or lipstick around the edges.
  • Blend into a lighter or brighter shade in the center.
  • Add gloss in the middle for extra dimension.

This style works with subtle nudes or bold berry shades, depending on the bride’s personality. It’s versatile enough to suit many bridal themes.

Pro product picks for brides:

  1. Huda Beauty Power Bullet Lipstick Duo – designed for ombre blending.
  2. MAC Lip Pencil in Whirl + MAC Lipstick in Velvet Teddy – nude ombre combo.
  3. Fenty Beauty Gloss Bomb in Fenty Glow – adds shine to ombre lips.
  4. NYX Ombre Lip Duo – affordable, easy-to-use option.

12. Signature Red Accents

Bride with soft glam makeup, glowing skin, and a red floral hair accessory, highlighting a romantic traditional bridal makeup style.

Red is timeless. Brides can wear it as a bold lip, a rosy flush, or even nail polish. This bold wedding makeup idea is perfect for brides who want a classic yet impactful statement.

Ways to incorporate red:

  • Scarlet lips paired with glowing skin.
  • Cherry blush for a youthful pop.
  • Matching red manicure or accessories for a cohesive look.

Red works beautifully in photography, especially black-and-white shots, where it provides striking contrast.

Pro product picks for brides:

  1. MAC Lipstick in Russian Red – deep matte red.
  2. NARS Lipstick in Jungle Red – bright classic red.
  3. Essie Nail Polish in Forever Yummy – timeless red polish.
  4. Rare Beauty Stay Vulnerable Blush in Nearly Rose – rosy red flush.

13. Natural-Looking Lashes

Smiling bride with natural makeup and flowing blonde hair in a garden setting, showcasing effortless makeup ideas for bride with a fresh, radiant glow.

Not all brides want over-the-top falsies. Many prefer traditional bridal makeup with natural-looking lashes that enhance without overpowering.

How to achieve natural lashes:

  • Use individual or cluster lashes instead of strips.
  • Opt for lengthening mascara instead of volumizing for subtle definition.
  • Curl lashes before mascara for an open-eyed look.

This style is perfect for brides who want to feel comfortable and elegant without heavy makeup.

Pro product picks for brides:

  1. Ardell Individual Lashes – customizable, natural finish.
  2. Lancôme Définicils Mascara – lengthening without clumping.
  3. Glossier Lash Slick – lightweight everyday mascara.
  4. Kiss Looks So Natural Lashes – affordable and soft.

Become a Bride Makeup Expert In Just 2 Months

Get hands-on training right from home with QC Makeup Academy!

EXPLORE OUR COURSES

3 Bridal Makeup Styles Every Makeup Artist Must Master

Every makeup artist should be fluent in three core bridal styles: 

  1. Natural;
  2. Classic;
  3. Dramatic

These categories form the foundation of bridal artistry and help MUAs adapt to each client’s vision.

Natural Bridal Makeup

This style enhances the bride’s features without making her feel heavily made up. It’s one of the most requested traditional bridal makeup looks because it feels comfortable and authentic.

Key features of natural bridal makeup:

  • Lightweight foundation or tinted moisturizer that lets skin shine through.
  • Neutral eyeshadows in beige, taupe, or soft brown.
  • Minimal eyeliner or tightlining along the lash line.
  • A nude or soft pink lip for subtle polish.

Natural makeup is ideal for brides who don’t normally wear much makeup or want to look fresh and effortless on their wedding day.

Classic Bridal Makeup

Classic makeup is timeless. It’s the style most people imagine when they think of a “bridal look.” Balanced, photo-ready, and flattering in every era, it’s a staple for MUAs.

Classic bridal makeup includes:

  • Medium-coverage foundation for a flawless base.
  • Defined brows that frame the eyes.
  • Neutral shadows with a hint of shimmer on the lids.
  • A soft eyeliner wing or smudged pencil liner.
  • Lips in shades of soft rose, mauve, or nude.

This style is adaptable to any bride and any theme. It’s reliable, elegant, and always photographs beautifully.

Elena says: In order to create a timeless and classic look, you need to consider what’s trending in the makeup world at the time. For example, blush on the nose or soap brows are trends and may not age well in the future (similar to how we look back at most 2016 makeup and cringe). To me, a timeless look is a polished, hydrated and neutral look that enhances the beauty of the client.  Some products I use without fail to create this include: Embryolisse Moisturizer, MAC Studio Fix Radiant Foundation, and Rare Beauty Liquid Touch Blush. I had a bride who’s whole wedding style was very classic and timeless, so the way we made her makeup POP was doing a neutral eye with a full lash. It really extenuated her eyes and suited her so beautifully!

Dramatic Bridal Makeup

Some brides want to go bold. Dramatic wedding makeup can mean smoky eyes, cut creases, bold lips, or sharp contouring. It’s perfect for evening weddings or fashion-forward brides who want to make a statement.

Elements of dramatic bridal makeup:

  • Smoky or metallic eyes with false lashes.
  • Winged liner for extra definition.
  • Contoured cheeks with vibrant blush.
  • Bold lips (deep red, plum, or berry).

Dramatic bridal makeup is not for every bride—but when it fits, it creates a stunning, memorable impact!

Bridal Makeup Consultation: Why It’s Essential

A consultation is the foundation of a successful bridal experience. This is where the artist and bride align expectations, explore inspiration, and discuss details that impact the final look.

Key Questions to Ask Your Bridal Client

During a consultation, ask questions that reveal preferences and comfort levels. Examples include:

  • What type of makeup do you wear daily?
  • Do you prefer matte, dewy, or satin finishes?
  • Are there any celebrity or Pinterest looks that inspire you?
  • How do you want your makeup to look in photos?
  • Do you have any allergies, sensitivities, or product concerns?

These questions help create a tailored plan and avoid surprises.

Elena says: I ask a series of questions to understand what a bride wants; whether she usually wears makeup, her favorite eyeshadow colors, or if she prefers a glowy or matte finish. I also check if there’s a feature she feels strongly about, like blush or brows. This helps me create a look tailored to her. The biggest concern between trial and wedding day is often lashes. If strip lashes feel uncomfortable at the trial, I recommend a lash lift or extensions so she’s confident and comfortable.

Helping Indecisive Brides Choose Their Look

Some brides don’t know what they want. Alternatively, they love too many different styles. As the MUA, it’s your job to guide them!

So, here are some tips for helping undecided brides:

  • Show them visual mood boards with varied looks.
  • Do a side-by-side trial of two different styles.
  • Recommend what will photograph best for their venue and dress.
  • Encourage them to choose a look that makes them feel confident, not just trendy.

By leading with expertise and reassurance, you’ll help your bride feel secure in her decision.

Elena says: Most of my clients come to me because I’ve mastered natural bridal looks. But even then, that makeup can feel like too much for some brides who never wear makeup. If that’s the case, I’m always sure to ask, “Do you want to look like you’re wearing makeup or not?” The answer will determine how much of something I’ll apply.

Do You Have Any Questions For Us?

Book a call with QC Makeup Academy today!

LET'S CHAT

How to Do Bridal Makeup Step by Step (With Trial First!)

Full stop: EVERY bridal look should begin with a trial. For starters, this gives the bride a chance to see how the makeup will look and feel before her big day. It also gives you, as the makeup artist, time to adjust products, colors, and techniques. Furthermore, a trial reduces stress, builds trust, and ensures the final result is exactly what the bride envisioned.

Below is a simple step-by-step routine for creating a natural bridal look. Each step can be adjusted or built upon if the bride wants something more bold or dramatic.

Psst! After you review these steps, don’t miss the full tutorial video led by celebrity makeup artist and QC Makeup Academy executive instructor, Nathan Johnson. He’ll walk you through the bridal trial process from start to finish!

Step 1: Skin Care (Moisturizer)

Firstly, prepping the skin is the foundation of long-lasting bridal makeup.

  • Cleanse the skin gently to remove any oils or residue.
  • Apply a lightweight moisturizer to hydrate without feeling greasy.
  • If the bride has oily skin, use a mattifying moisturizer. For dry skin, choose something richer.

This step helps foundation glide on smoothly and keeps skin comfortable throughout the day.

Elena says: For skin prep, I start with First Aid Beauty Facial Radiance Pads, then The Ordinary Hyaluronic Acid Serum, followed by Embryolisse Moisturizer. My go-to primers are NARS Pro-Prime Eyeshadow Base and e.l.f. Cosmetics Power Grip Primer, paired with MAC Studio Radiance or NARS Radiant Longwear Foundation for all-day wear. Longevity depends on the season. Set well in summer heat to prevent creasing, and in winter focus on hydration while setting eyes carefully to avoid dryness or watering.

Step 2: Eye Primer

Eye makeup should last through tears, dancing, and long hours. Primer is the secret!

  • Apply a thin layer of primer across the lids using a concealer brush.
  • Blend evenly to prevent patchiness.
  • Choose a primer that grips shadow without drying the eyelids.

This step prevents creasing and ensures vibrant shadow payoff.

Step 3: Eye Makeup (Shadows + Liner + Lashes)

Next, it’s always recommended that you start with the eyes before foundation. This way, any fallout from shadows can be cleaned up without ruining the base.

Eyeshadow:

  • Use neutral tones as a base, adding depth with slightly darker shades in the crease.
  • Apply shimmer or metallics to the lid for brightness.
  • Highlight the inner corners and brow bone for a lifted look.

Eyeliner:

  • For a natural style, softly line the lash line with brown or dark gray.
  • For more dramatic bridal makeup, add a wing or smudge liner for a smoky effect.

Lashes:

  • Curl natural lashes to open the eyes.
  • Apply mascara in thin coats to avoid clumping.
  • Add individual or cluster lashes for a natural yet enhanced look.

Step 4: Brows

Brows frame the entire face. So, they should look polished without looking overdone.

  • Lightly fill in sparse areas with a pencil or powder.
  • Use upward strokes for a natural hair-like effect.
  • Set with clear or tinted brow gel to keep them in place all day.

Step 5: Skin Makeup (Foundation, Concealer, Contour, Powder)

At this point, the goal is now to create a flawless yet natural base that photographs beautifully.

Foundation:

  • Match the shade to both face and neck to avoid lines.
  • Use a medium-coverage, long-wear formula.
  • Blend with a damp sponge or brush for a seamless finish.

Concealer:

  • Apply under the eyes and around the nose.
  • Spot-conceal blemishes or redness.
  • Only apply concealer on the exact areas that need it (avoid being liberal with this product).

Contour:

  • Use cream or powder contour to softly shape cheekbones, jawline, and nose.
  • Blend well for a natural shadow effect.

Powder:

  • Lightly set oily areas like the T-zone.
  • Avoid over-powdering so the skin still looks fresh.

Step 6: Blush

Blush brings the face to life and gives brides that radiant bridal glow.

  • Apply to the apples of the cheeks and blend upward toward the temples.
  • Choose shades that complement the bride’s skin tone and lip color.
  • For a modern touch, lightly dust blush across the nose bridge for a sun-kissed look.

Step 7: Lips

Lips are one of the most photographed features on a bride!

  • Prep with balm to avoid dryness.
  • Use liner to define the shape and prevent feathering.
  • Choose a long-lasting formula in the bride’s preferred shade (nude, rose, berry, or bold red).
  • Apply, blot, and reapply for durability.

Step 8: Highlight

Highlight enhances bone structure and adds dimension.

  • Apply to the tops of cheekbones, brow bones, cupid’s bow, and the inner corners of the eyes.
  • Choose a formula that complements the skin tone (champagne for fair skin, gold for deeper tones).
  • Keep it soft—too much shimmer can look harsh in photos.

Step 9: Show the Bride

Before setting the look, hand the bride a mirror.

  • Ask her how she feels about the makeup so far.
  • Encourage honest feedback.
  • Discuss any tweaks she’d like before moving on.

Step 10: Revisions

And finally, you’ll correct anything that needs correcting or refining. You’ll quickly come to find that small adjustments make ALL the difference!

  • Add or reduce blush, lipstick, or liner based on her preferences.
  • Double-check the makeup in natural light as well as indoor lighting.
  • Set the makeup with a setting spray for all-day wear.

Why You Need a Bridal Makeup Contract

A bridal makeup contract may not feel glamorous, but it’s one of the most important tools for every professional makeup artist. Contracts protect both you and your client. They ensure that expectations are clear, services are outlined, and there are no surprises on the wedding day. Moreover, including a contract shows professionalism and builds trust with your clients.

Elena says: A contract is essential for a bridal booking as it lets the client know what is expected of them throughout the process. Not to mention, it saves you the trouble of explaining policies you may have set in place. It’ll make you look professional and reliable. I would consider any makeup artist or wedding vendor that doesn’t have a contract to be a BIG red flag!
Makeup artist, Elena Franklin, applying foundation to a bride in a studio, showcasing professional techniques and elegant bride makeup ideas for wedding day looks.

Key Items to Include

Every bridal makeup contract should cover the basics. Think of it as your checklist for clarity and protection:

  • Services Provided: Detail exactly what’s included (e.g., makeup for the bride, bridesmaids, trial sessions, touch-ups).
  • Schedule and Location: Arrival times, addresses, and estimated time per client.
  • Pricing and Payment Terms: Total cost, deposits, due dates, and payment methods.
  • Cancellation Policy: Clear terms for refunds, reschedules, or last-minute cancellations.
  • Liability Clauses: Protect yourself in case of allergic reactions or unforeseen circumstances.

Protecting You and Your Client

Contracts do more than protect your business—they also help clients feel secure too. Think about it: brides are already under pressure. Knowing everything is in writing gives them peace of mind!

Elena says: It’s common for members of the bridal party or family to say they want makeup and then change their mind the week of. For this reason, my contract states that any services outlined within the contract can’t be subtracted at any point. That said, we can always add on if I am able to accommodate. This has saved me many times and makes it much easier to budget for when you know for sure that you’re getting paid “x” amount from a job.

Benefits of using a contract include:

  • Builds professionalism and credibility.
  • Reduces stress by clarifying expectations early on.
  • Prevents misunderstandings about cost or timing.
  • Offers legal protection if disputes arise.
  • Creates a smoother, more organized wedding day.

With a clear, professional contract in place, you’re free to focus on what you do best: creating stunning bridal makeup looks!

Conclusion: Elevate Your Bridal Makeup Career

Bridal makeup is about more than products; it’s about helping a bride feel confident and beautiful on the most important day of her life. These 13 bride makeup ideas—along with consultations, trials, and contracts—give you the foundation to deliver flawless results every time.

Learn Bridal Makeup with QC Makeup Academy

If you’re ready to take your skills to the next level, QC Makeup Academy’s Master Makeup Artistry Course is the perfect next step! Led by celebrity MUA and executive instructor, Nathan Johnson, this program gives you expert training and personalized feedback to build your career.

Elena says: QC Makeup Academy gave me the confidence and knowledge to build the business I have now, both in terms of makeup technique and business sense. I’ve learned a lot since being out on my own, and I am thankful that I was prepared accordingly for the real world! I’m always leaning on the foundational lessons taught in the Master Makeup Artistry Course, as those techniques are truly the building blocks for every natural or dramatic look.

Bride Makeup Ideas FAQs

What kind of makeup should a bride wear?

Brides should choose makeup that enhances their natural beauty while matching their personal style and wedding theme.

What is the most popular bridal makeup look?

Soft glam with glowing skin, neutral eyes, and nude or rosy lips remains the most requested bridal look worldwide.

How soon before a wedding should makeup be done?

Bridal makeup should be finished at least 1–2 hours before the ceremony to allow time for photos and touch-ups.

What kind of bridal makeup looks good in photos AND in person?

Balanced looks with even skin, softly defined eyes, and lips in flattering tones work best for both photography and real life.

What are some popular wedding makeup looks for various skin tones?

Bridal makeup should be tailored to undertones and complexion. For example, wedding makeup looks for Black women often feature radiant skin, jewel-toned eyeshadows, and bold lips that photograph beautifully.

Where is the best school to learn bridal/wedding makeup?

The best place to train is QC Makeup Academy. Our online Master Makeup Artistry certification course is taught by celebrity MUA, Nathan Johnson, and covers everything from fundamentals to advanced bridal techniques, with hands-on assignments and personalized feedback to help you succeed.

Turn Your Passion for Makeup Into Your Dream Career

Book your first bride in as little as 8 weeks!

START YOUR JOURNEY
Eye shadow looks tutorial showing step by step eyeshadow application chart for beginners, demonstrating how to wear eyeshadow with different eye makeup looks.

Eye Shadow Looks: Step-by-Step Guide for Stunning Eye Makeup

By Education, Makeup Tips and Tricks, Makeup Tutorial No Comments

Eye Shadow Looks: Key Points

  • Always adjust eyeshadow placement based on your unique eye shape.
  • Choose colors that complement your eye color to make them stand out.
  • Use the right brushes and tools to achieve clean, blended results.
  • Follow a simple five-step method: primer, base, crease, liner, and drop shadow.
  • Avoid common mistakes like skipping primer, starting too dark, or overusing glitter.

Introduction

Eye shadow can completely change the way your makeup looks. The right colors and techniques can make your eyes appear bigger, brighter, and more defined. In this guide, you’ll learn more than just how to apply eyeshadow—we’ll cover how to choose the right shades for your eye color, how to work with different eye shapes, and which tools will give you the best results! 

Additionally, you’ll also get a step-by-step eye shadow tutorial, expert tips, and a full breakdown of the most common mistakes to avoid. Every section will include clear visuals so you can follow along with ease.

So, keep reading to discover the best eyeshadow looks, complete with tutorials, charts, and expert tips to elevate your artistry!

Why Eye Shadow Looks Matter in Makeup Artistry

The way you apply eye shadow can transform your entire face. Great eye makeup looks can:

  • Draw attention to your eyes
  • Balance your features
  • Express your personality
  • Match your style to any occasion

If you’re an aspiring makeup artist, mastering eyeshadow looks is a MUST! After all, clients often ask for specific styles (e.g., smokey eyes, natural looks, or bridal makeup). Knowing how to create these looks step-by-step builds trust and shows your skill.

And if you’re an everyday makeup wearer? Learning the basics of how to apply eyeshadow will save you time, boost your confidence, and help you look polished in minutes.

“Before and after infographic showing the power of eye shadow looks with step by step eyeshadow application, including inner corner highlight, lid color, crease shadow, and outer V depth.

Understanding Eye Shapes and How They Influence Eyeshadow Looks

Fun Fact: The shape of your eyes changes how shadow looks when applied. Knowing your eye shape helps you place color in the right spots/where it flatters you most and avoid common mistakes. This is the first step to mastering eye shadow looks. 

Remember: the goal is to bring out your natural beauty while keeping your look balanced.

Step by step eyeshadow chart showing how to apply eyeshadow with inner corner highlight, lid color, crease shadow, outer V depth, and brow bone.

Almond Eyes

Almond eyes are balanced and slightly upturned at the outer corners. This shape works well with almost any eye makeup look.

TIPS:

  • Place light shadow on the lid to brighten.
  • Blend a mid-tone through the crease.
  • Deepen the outer corner with a darker shade.
How to apply eyeshadow chart for almond eyes showing highlight zone, crease shadow zone, and outer V placement for eye shadow looks.
Step by step eyeshadow guide for hooded eyes showing how to apply eyeshadow on the inner corner, lid, adjusted crease, and outer V zone.

Hooded Eyes

Hooded eyes have extra skin folding over the crease, which can hide shadow placement.

TIPS:

  • Use matte shades in the crease to reduce the look of heaviness.
  • Apply shadow slightly above the natural crease so the color shows when eyes are open.
  • Keep shimmer to the lid or inner corner.

Monolids

Monolids do not have a visible crease. The lid space is smooth and flat.

TIPS:

  • Build depth with gradient shading: light at the inner corner, medium in the center, dark at the outer edge.
  • Use small, precise brushes for detail.
  • Winged eyeliner can help elongate the eyes.
How to wear eyeshadow on monolid eyes with step by step placement chart showing inner corner, gradient lid, outer V, and optional winged liner.
Step by step eyeshadow chart for deep set eyes showing lid wash, center highlight, subtle crease, and outer corner depth for eye shadow looks.

Deep-Set Eyes

Deep-set eyes sit further back in the socket, often with a strong brow bone.

TIPS:

  • Stick with medium shades across the lid to bring eyes forward.
  • Avoid going too dark in the crease, as it can push the eyes back even more.
  • Add shimmer or highlight on the lid to create dimension.

Round & Downturned Eyes

Round eyes look open and youthful, while downturned eyes slope slightly downward at the outer corners.

TIPS:

  • For round eyes: use darker shades on the outer corners to elongate the shape.
  • For downturned eyes: lift the look with upward blending at the outer V.
  • Eyeliner flicks angled slightly upward can help balance.
How to apply eyeshadow chart for round and downturned eyes showing lid highlight, crease, outer V, crease definition, eyeliner flick, and lifted outer V placement.

Choosing Eye Shadow Colors That Complement Eye Color

The colors you choose for your eyeshadow can either make your eyes pop or leave them looking dull. By using shades that complement your natural eye color, you can create eye makeup looks that stand out in the best way. Moreover, once you know your best shades, you can mix, match, and experiment with confidence!

Eye makeup looks guide showing the best eyeshadow colors for brown, hazel, blue, and green eyes.

Blue Eyes

Blue eyes look brighter with warm shades that create contrast.

  • Copper, bronze, and warm browns
  • Peach and coral shades
  • Oranges and terracotta tones

Green Eyes

Green eyes stand out with rich, red-based or purple tones.

  • Plum, burgundy, and wine shades
  • Soft purples and mauves
  • Warm browns with red undertones

Brown Eyes

Brown eyes are the most versatile. Almost any color works, but some shades make them glow.

  • Gold, bronze, and metallics
  • Navy and deep blues
  • Emerald green or teal

Hazel Eyes

Hazel eyes shift between green and brown, so flexible shadow choices work best.

  • Gold and olive tones
  • Warm purples
  • Neutral browns to balance both undertones

Master Eye Shadow Looks and SO Much More

Get hands-on training, right from the comfort of home!

LEARN MORE

Essential Brushes & Tools for Step-by-Step Eyeshadow Application

The right brushes make all the difference in how your eyeshadow looks. On the other hand, using the wrong tool can cause harsh lines or muddy blending. With just a few key brushes, you’ll be able to apply and blend eyeshadow like a pro!

Flat Shader Brush

Step by step eyeshadow application showing how to use a flat shader brush for lid color placement.

This brush is dense and flat, perfect for packing color onto the lid.

  • Best for bold pigment and shimmer shades
  • Use patting motions for maximum color payoff

Fluffy Blending Brush

How to apply eyeshadow chart showing fluffy blending brush used for crease and transition shades.

A soft, rounded brush for applying transition shades in the crease.

  • Creates smooth gradients between colors
  • Ideal for diffused blending

Angled Brush

Step by step eyeshadow application using an angled brush for liner, precision work, and under eye definition.

Thin, angled brush with firm bristles.

  • Great for eyeliner application with powder or gel
  • Can also define brows or lower lash line

Pencil Brush

How to apply eyeshadow with a pencil brush for detail work and smudging in step by step eyeshadow looks.

Small, rounded tip for precision work.

  • Perfect for smudging shadow under the lower lash line
  • Can add highlight to inner corners or brow bone

Smudger Brush (Optional but Helpful)

Step by step eyeshadow application using a smudger brush for smokey eye makeup looks and soft blended effects.

Small, rounded tip for precision work.

  • Perfect for smudging shadow under the lower lash line
  • Can add highlight to inner corners or brow bone

With these tools, you can follow any step by step eyeshadow tutorial and get professional results!

Step-by-Step Eyeshadow Tutorial: 5 Things You Need To Master

Following a step-by-step eye shadow process makes application easy, whether you’re going for a natural day look or a bold glam finish. Below are the five key steps, based on expert techniques from QC Makeup Academy’s executive instructor, Nathan Johnson. Each step will have its own graphic so you can see exactly where to place your product.

Psst! At the end of this section, we’ll also show you the full 15-minute QC Makeup Academy tutorial video so you can watch these steps in action!

Step 1: Prime Your Lids

Primer creates a smooth base, evens out skin tone, and makes your shadow last all day.

TIPS:

  • Use a concealer brush to paint primer from lash line to brow bone.
  • Blend evenly so there are no streaks.
Step by step eyeshadow tutorial showing primer application as the first step for creating eye shadow looks.
Step by step eyeshadow tutorial showing how to apply a base shadow for creating eye shadow looks.

Step 2: Apple a Base Shadow

A neutral base shade helps lock in primer and gives you a clean canvas.

TIPS:

  • Use a flat shader brush to press a natural shade onto the lid.
  • Start at the inner corner (where you want brightness) and work outward.

Step 3: Define The Crease with a Mid-Tone Shade

Adding depth in the crease shapes the eye and makes blending easier.

TIPS:

  • Use a fluffy blending brush with a taupe or mid-brown.
  • Sweep back and forth in soft arcs (“windshield wiper” motion).
  • Extend slightly beyond the outer corner for lift.
Step by step eyeshadow tutorial showing how to define the crease when creating eye shadow looks.

One of the trademarks of a beautiful makeup application is the blend. Fluffy brushes are what deliver that. So, never be afraid to go in a few times and blend.

Nathan JohnsonCelebrity Makeup Artist & QC Makeup Academy Executive Instructor
Step-by-step eye shadow looks tutorial showing how to apply eyeliner for a complete eye makeup look. Helpful guide for how to wear eyeshadow and follow a how to apply eyeshadow chart.

Step 4: Add Liner for Definition

Liner frames the eye and makes lashes appear fuller.

TIPS:

  • For a soft look, press your powder liner into the lash line with an angled brush.
  • For more drama, use gel or liquid liner.
  • Extend slightly at the outer edge for lift.

Step 5: Create a Drop Shadow

Adding shadow under the lower lashes balances the look and makes lashes appear thicker.

TIPS:

  • Use a pencil or smudger brush with taupe or soft brown.
  • Apply from the outer corner to just under the pupil.
  • Keep it diffused, not heavy.
Step-by-step eye shadow looks tutorial showing how to apply drop shadow for balance in eye makeup looks. Guide on how to wear eyeshadow with a how to apply eyeshadow chart.

Pro Tips for Flawless Eye Shadow Looks

Once you’ve mastered the basic steps, the right pro techniques will take your eye makeup looks from good to stunning! These tips will help you blend like a professional, avoid harsh lines, and make every eye shadow look polished. Not to mention, they’ll give you the polished finish that sets professional eye shadow looks apart from beginner attempts.

Tip 1: Always Work from Light To Dark

Start with lighter shades and gradually layer darker colors. This makes blending easier and prevents harsh lines.

Eye shadow looks tutorial showing light to dark layering technique. Step-by-step eyeshadow guide for how to apply eyeshadow smoothly from light to medium to dark shades.
Eye shadow looks tutorial comparing powder only vs cream and powder layering. Step-by-step eyeshadow guide showing how to apply eyeshadow for longer-lasting eye makeup looks.

Tip 2: Layer Creams and Powders

Using a cream shadow base under powder can make the color more intense and longer-lasting.

Tip 3: Blend with a Clean Brush

After applying shadow, use a separate clean fluffy brush to diffuse edges. This softens transitions without muddying colors.

Eye shadow looks tutorial showing how to use a clean brush for smooth edges. Step-by-step eyeshadow guide for blending and softening eye makeup looks.
Eye shadow looks tutorial demonstrating the foil technique, comparing dry brush vs damp brush application. Step-by-step eyeshadow guide for metallic eye makeup looks with best color payoff.

Tip 4: Use Metallics and Foils Correctly

Apply metallics/foiled shadows with a damp flat brush or your fingertip for best payoff.

Tip 5: Avoid Harsh Lines

Harsh cutoffs make shadows look unblended. Always extend edges softly outward with blending motions.

Eye shadow looks tutorial showing harsh lines versus blended edges. Step-by-step eyeshadow guide for how to apply eyeshadow smoothly with no harsh lines.

Common Eyeshadow Mistakes to Avoid

Even if you follow a step by step eyeshadow tutorial, small mistakes can make your look less polished. Below are 15 of the most common eye shadow mistakes—and how to fix them. Avoiding these mistakes will instantly elevate your eye makeup looks, whether you’re creating a natural style or going full glam.

Mistake #1: Skipping Primer

Skipping primer is one of the fastest ways to ruin even the best eye shadow looks. Without it, oils from your skin break down the shadow, causing creasing and fading within hours. Furthermore, primer also evens out skin tone and grabs onto pigment so your colors appear brighter. 

Always apply a thin, even layer of eyeshadow primer from lash line to brow bone BEFORE your first shade.

“Eye shadow looks tutorial showing the mistake of skipping primer versus using primer. Step-by-step eyeshadow guide for longer-lasting and smoother eye makeup looks.

Mistake #2: Using Concealer Instead of Primer

Concealer is made to cover blemishes, not prep your eyelids. When used as a base, it tends to cake, crack, and change the color of your shadows. It also doesn’t control oil the way a primer does. 

For smooth, long-lasting results, stick to an actual eyeshadow primer or a product made specifically for lids.

Mistake #3: Overloading the Brush with Product

Dipping too heavily into your palette leads to fallout, harsh application, and wasted product. A good rule: pick up a little at a time. Gently dip the tip of your brush, then tap off the excess before applying. It’s easier to build color than to erase it!

Become a Professional Makeup Artist

Earn your certification + book your first client in just 2 months!

BROWSE OUR COURSES

Mistake #4: Not Tapping Off Excess

Similarly, this goes hand-in-hand with overloading your brush. If you don’t tap off the extra powder, it falls onto your cheeks and under-eye area, essentially ruining your base makeup (if you did the skin first). 

Instead, get in the habit of giving your brush a light tap after each dip into shadow—it makes cleanup much easier.

Mistake #5: Starting with Dark Shades First

If you start with your darkest shade, you’ll have a tough time blending it out. Dark pigments are harder to soften and can leave patchy spots. Thus, always follow the “light to dark” rule: apply lighter transition shades first, then layer darker tones gradually to build depth. This makes your blending smoother and your eye makeup look more professional.

Eye shadow looks tutorial showing the mistake of starting with dark shades first versus applying light to dark. Step-by-step eyeshadow guide for smooth blending in eye makeup looks.

Mistake #6: Applying Shadow Too High Toward Brow Bone

Unless you’re going for a bold editorial look, shadow shouldn’t reach all the way up to your brows. This makes eyes look heavy and messy. Instead, keep your darkest shades in the crease and outer corner, then apply a subtle highlight just under the brow bone to lift and open the eyes.

Mistake #7: Ignoring Eye Shape

Not every eyeshadow technique works for every eye shape! What flatters almond eyes may not work for hooded or monolid eyes. To create balanced eye makeup looks, adjust your placement. For example, hooded eyes often need color placed slightly above the crease, whereas monolids look best with gradient shading across the lid.

Mistake #8: Using the Wrong Brush

Each brush has a purpose. A flat shader is meant to pack color, while a fluffy brush blends it out. If you try to blend with a dense shader or apply detail with a huge blending brush, your results won’t look clean. 

For this reason, we suggest investing in a few quality brushes and learning their uses. You’ll instantly see an improvement!

Mistake #9: Not Blending Enough (or Over-Blending)

Both under-blending AND over-blending can ruin a look. Not blending leaves visible lines between colors, while over-blending muddies shades together. The trick: blend edges until they’re smooth, but stop before the colors lose their definition. Using a clean brush for final blending can help keep the look crisp.

Mistake #10: Applying Too Much Glitter or Shimmer

Shimmer and glitter can be gorgeous, but too much can overpower your look and highlight skin texture. Keep shimmer shades on the inner corner or lid center for brightness. Use matte or satin finishes in the crease and outer corner for balance. This way, shimmer enhances your look instead of overwhelming it.

Eye shadow looks tutorial showing the mistake of applying too much glitter versus using subtle shimmer. Step-by-step eyeshadow guide for balanced eye makeup looks.

Mistake #11: Forgetting to Highlight Inner Corner & Brow Bone

These small touches make a BIG difference! A light highlight in the inner corner opens up the eyes and makes them look awake. A subtle highlight under the brow bone lifts the eye area and completes the look. Skipping them can leave your makeup looking unfinished.

Mistake #12: Skipping Shadow on the Lower Lash Line

Only applying shadow on the top lid makes the eyes look unbalanced. On the other hand, adding a touch of shadow under the lower lash line ties the look together and gives depth. The key is to keep it soft! Use a pencil or smudger brush and stop under the pupil for a natural effect.

Mistake #13: Using Only One Shade

A single shade on the lid can look flat. Dimension comes from layering at least three tones: a light base, a mid-tone in the crease, and a darker shade in the outer corner. This creates depth and makes the eyes appear bigger and more defined.

Mistake #14: Heavy Eyeliner Hides Shadow Work

A thick, harsh line of eyeliner will often (and unintentionally) wind up hiding all the blending work you did with your shadows. Instead, try pressing powder liner into the lash line with an angled brush for a softer effect. If you love a bold line, keep it thin and precise so it enhances the shadow rather than covering it!

Mistake #15: Skipping Clean-Up & Finishing Touches

Lastly, a beautiful eyeshadow look can easily be ruined by fallout under the eyes or uneven edges. Therefore, always finish with cleanup: use a fluffy brush or a little translucent powder to sweep away fallout. Check that edges are even, and add final touches like inner-corner highlight. These small details make the difference between amateur and polished!

Eye shadow looks tutorial showing the mistake of skipping clean-up and finishing touches versus a polished result. Step-by-step eyeshadow guide for professional eye makeup looks.

Eye Shadow Looks for Every Occasion

Hands down, the BEST thing about eyeshadow is how versatile it can be. With a few simple changes in shade and technique, you can create eye makeup looks for any occasion—from quick everyday styles to dramatic evening glam. Get inspired by these versatile eye shadow looks below, and you’ll always have the perfect style, whether you’re aiming for soft and subtle or bold and unforgettable!

Natural & Everyday Looks

Natural eyeshadow looks are perfect for work, school, or casual days. The goal is to enhance your eyes without making them the center of attention.

TIPS:

Use soft matte neutrals like beige, taupe, or light brown.

Apply a light shade on the lid, a mid-tone in the crease, and a touch of highlight in the inner corner.

—Keep eyeliner soft or skip it altogether.

Eye shadow looks tutorial showing a natural everyday look with soft, blended shades. Step-by-step eyeshadow guide for simple daily eye makeup.
Eye shadow looks tutorial showing a soft glam bridal look with shimmer accents. Step-by-step eyeshadow guide for elegant wedding eye makeup.

Soft Glam & Bridal Looks

Soft glam is a step up from natural but still wearable. It’s the go-to style for bridal makeup, date nights, or special events.

TIPS:

—Combine neutral mattes with shimmery champagne or rose gold on the lid.

—Blend warm browns into the crease for soft depth.

—Pair with defined lashes or wispy false lashes for a polished finish.

Smokey Eyes in Neutral Tones

The smokey eye is a classic: bold, sultry, and perfect for evenings or photoshoots!

TIPS:

Use a gradient from medium brown on the lid to dark brown or gray at the outer corner.

—Blend upward and outward to soften edges.

—Add liner smudged along both upper and lower lash lines for intensity.

Eye shadow looks tutorial showing a neutral smokey eye with blended brown tones. Step-by-step eyeshadow guide for creating a classic smokey eye makeup look.

Trendy Looks (Cut Crease, Halo, Color Pop)

Trendy techniques make your eye shadow looks modern and Instagram-ready.

Cut Crease

  • Sharp division between lid and crease, usually with a lighter lid shade and darker crease.
  • Best for dramatic, defined styles.
How to apply eyeshadow chart showing a cut crease look. Step by step eyeshadow tutorial for sharp, professional eye makeup looks

Halo Eye

  • Light shimmer shade in the center of the lid, framed by darker shades on both sides.
  • Creates a rounded, spotlight effect.
How to wear eyeshadow tutorial showing a halo eye effect. Step by step eyeshadow chart for creating luminous eye makeup looks with shimmer in the center.

Color Pop / Festival Look

  • Bright, bold shades like blue, purple, or neon.
  • Can be applied all over the lid or as a liner accent.
Eye makeup looks tutorial showing a festival color pop style. Step by step eyeshadow guide on how to apply eyeshadow with bold shades for fun events

Final Thoughts: Take Your Eye Shadow Looks to the Next Level

Eye shadow is more than just color on your lids; it’s one of the most powerful tools in makeup artistry! With the right shades, tools, and techniques, you can create eye makeup looks that suit any occasion, from quick everyday styles to bold and glamorous finishes.

Now that you’ve learned how to apply eyeshadow step by step, seen how to avoid common mistakes, and discovered different looks for every event, it’s time to take things further. Practice is important, but real growth comes from learning with expert guidance…

That’s Where QC Makeup Academy Can Help!

Our online makeup certification courses are taught by professional MUAs (like Nathan Johnson!) who know what it takes to succeed in the industry. You’ll get personalized feedback, step-by-step video training, and certification that proves your skills.

QC Makeup Academy is worth every penny! The Master Makeup Artistry Course changed me in such a profound way. From matching foundation to creating a beautiful smoky eye, I learned it all!

Erica CanoQC Makeup Academy Multi-Graduate

Ready to elevate your artistry? Explore QC Makeup Academy’s online courses today and start your journey toward mastering eye shadow looks—and SO much more!

FAQs About Eyeshadow Looks

What is the easiest eyeshadow look for beginners?

A simple natural look is best for beginners. Apply a light shade on the lid, a medium shade in the crease, and a touch of highlight in the inner corner. This basic three-shade technique works for almost every eye shape and is a great starting point.

What are the basic rules for applying eyeshadow?

The golden rules are:

  • Start with an eyeshadow primer.
  • Apply lighter shades first, then build up to darker ones.
  • Blend edges with a clean brush.
  • Keep shimmer shades on the lid or inner corner.
  • Always finish with a touch of shadow on the lower lash line to balance the look.

How do you blend eye shadow perfectly?

Blending takes patience and the right brush. Use a fluffy blending brush and move it in small windshield wiper motions along the crease. Layer colors gradually, and keep a clean brush nearby to soften edges without adding more product.

What’s the difference between everyday eye makeup and glam eye makeup?

Everyday looks use soft neutrals and light blending to enhance the eyes without being dramatic. Glam looks use deeper shades, shimmers, and bolder liner or lashes for a more dramatic, camera-ready effect.

Can I create a full look with just one eye shadow shade?

Yes, a one-shadow look can be chic and simple. Sweep a mid-tone shade across the lid, then use the same shade to lightly define the crease and lower lash line. For extra dimension, you can add shimmer to the center of the lid.

And remember: makeup is supposed to be fun, so experiment and play around with your colors! For instance, you don’t have to stick to traditional dark or black shades for dramatic looks like a smoky eye. ANY color can be used to create beautiful, bold effects. The fun of eye shadow looks is in experimenting, so try new colors and see which ones make your eyes stand out most!

Start Your Dream Career in Makeup

Begin your certification training with QC Makeup Academy today!

LET'S GO
Woman removes eye makeup using gentle makeup remover

The Best Makeup Remover: Ultimate Tips for Flawless Skin

By Makeup Tips and Tricks, Uncategorized No Comments

Are you tired of struggling with stubborn makeup that just won’t budge? Do you want to keep your skin healthy and glowing, even after a long day? Look no further! In this guide, we’ll dive into the world of makeup removers and share the ultimate tips for finding the best makeup remover for your beauty routine.

From micellar water to cleansing oils and wipes, we’ll explore the various types of makeup removers available, their benefits, and how to use them effectively. Whether you have sensitive skin, prefer a gentle approach, or need a heavy-duty solution, we’ve got you covered.

Read on to uncover the secrets to effortless cleansing and achieving a radiant complexion!

Benefits of Using Makeup Remover in Your Skincare Routine

Properly removing makeup is essential for maintaining healthy skin. Here are some benefits of using makeup remover in your skincare routine that can enhance your overall skin health:

  • Removes all traces of makeup: A good quality makeup remover eliminates every last bit of makeup, including stubborn waterproof products. These specialized removers effectively break down makeup without harming the skin, ensuring a thorough cleanse that prepares your skin for the rest of your routine.
  • Prevents clogged pores and breakouts: Leaving makeup on overnight mixes it with oil, dirt, and sweat, leading to clogged pores and breakouts. By removing your makeup before bed, you significantly lower the risk of acne and allow your skin to breathe and regenerate as you sleep.
  • Keeps skin hydrated: Many makeup removers contain nourishing ingredients like aloe vera, hyaluronic acid, or vitamin E, which help dissolve makeup while hydrating and soothing the skin. This dual action keeps your skin moisturized and promotes a healthy complexion, even after cleansing.

Incorporating a quality makeup remover into your routine is a simple yet effective step toward achieving and maintaining radiant, healthy skin.

Want to learn more about skincare? Check out this skincare course sample about identifying skin types!

Woman in white robe removes makeup using makeup remover

Types of Makeup Removers: Which One is Right for You?

Selecting the perfect makeup remover is crucial for keeping your skin healthy. With so many options out there, it’s easy to feel a bit lost. But don’t worry! Let’s explore some popular types of makeup removers to help you find the one that fits your needs perfectly. Your skin will thank you!

1. Oil-Based Makeup Removers

Oil-based makeup removers are great for removing heavy, waterproof makeup. They work by breaking down the oils in your makeup and lifting it away from your skin. These types of removers are best for dry or mature skin as they don’t strip the skin of its natural oils. However, if you have oily or acne-prone skin, it’s best to avoid using oil-based removers as they may clog pores and cause breakouts. Some popular oil-based makeup removers include coconut oil, almond oil, and jojoba oil.

2. Balm Cleansers

Balm cleansers are similar to oil-based removers, but they are in a solid form. They work by melting into an oil when applied to the skin and effectively removing makeup. Balm cleansers are suitable for all skin types as they do not contain harsh chemicals or stripping ingredients.

3. Micellar Water

Micellar water has become a favorite among many for its gentle yet effective makeup-removing abilities. It contains tiny micelles (oil molecules) that attract dirt, oil, and makeup from the skin’s surface without drying it out. Micellar water is suitable for all skin types, especially sensitive skin, as it does not require any rubbing or tugging on the skin.

4. Makeup Removing Wipes

Makeup-removing wipes are convenient and easy to use, especially when you’re on-the-go. However, they may not be the best option for everyday use as they can be harsh on the skin and may not completely remove all traces of makeup. It’s best to use them as a quick fix or for touch-ups rather than relying on them for your entire makeup removal routine.

Want to learn more beauty tips? Here are 30 beauty habits you should start doing ASAP.

Makeup remover does great job removing makeup

Micellar Water: The Gentle Cleanser Everyone’s Talking About

What is Micellar Water?

Micellar water has gained popularity in recent years as a gentle and effective makeup remover. It is a type of cleanser that contains tiny micelles (oil molecules) suspended in soft water. These micelles work like magnets, attracting dirt, oil, and makeup from the skin’s surface without drying it out or leaving any residue.

How to Use Micellar Water

Aside from being an excellent makeup remover, micellar water also has other uses in your beauty routine. You can use it as a facial cleanser in the morning to refresh and hydrate your skin before starting your day. It can also be used as a toner after cleansing to remove any remaining impurities and balance the skin’s pH levels. Some people even use micellar water as a makeup primer before applying their makeup. Its gentle formula leaves the skin clean, moisturized, and ready for flawless application.

Who Should Use Micellar Water?

Micellar water is suitable for all skin types, including sensitive skin. It does not contain any harsh chemicals or fragrances, making it a great option for those with easily irritated skin. Plus, it’s quick and easy to use – simply saturate a cotton pad with micellar water and gently wipe it over your face until all traces of makeup are removed. No rinsing is required!

At Home DIY Micellar Water

If you’re feeling crafty, you can also make your own micellar water at home using simple ingredients. Here’s a quick recipe to try:

  • 1 cup distilled or filtered water
  • 1 tablespoon witch hazel
  • 2 tablespoons vegetable glycerin
  • 1 tablespoon castile soap
  • A few drops of your favorite essential oil (optional)

Mix all the ingredients in a clean glass bottle and shake well before each use. Use it just like you would any store-bought micellar water.

Women pouring micellar water to prepare to remove makeup using the top makeup remover

Finding Your Perfect Match: Tips for Choosing the Right Makeup Remover

Using the right type of makeup remover is crucial for maintaining healthy skin. Here are a few tips to keep in mind when choosing the right one for you:

  • Consider your skin type: Different types of makeup removers work best for different skin types. Oily or acne-prone skin may benefit from micellar water or balm cleansers, while dry or mature skin may prefer oil-based removers.
  • Check the ingredients: Look for makeup removers that contain nourishing and hydrating ingredients like aloe vera, hyaluronic acid, or vitamin E. Avoid those with harsh chemicals or fragrances that can irritate the skin. Learning how to understand skincare ingredients is crucial in making the best decisions for you!
  • Research reviews: Don’t be afraid to do some research and read reviews before purchasing a makeup remover. This can give you insights into how effective and suitable it is for different skin types.
  • Try samples or travel sizes: If you’re unsure about a particular makeup remover, try purchasing a sample size or travel size first to test it out before committing to the full-size product.

Now that you know some tips for finding the right makeup remover, you’re one step closer to glowing and radiant skin. While purchasing products is one way to go, some people prefer to create makeup removers themselves!

Simple DIY Makeup Remover: Natural Alternatives You Can Make at Home

If you prefer to use natural products on your skin, making your own makeup remover at home is a great option. Here are some easy and effective DIY makeup remover recipes:

Coconut Oil and Honey

Mix equal parts of coconut oil and honey to create a nourishing and hydrating makeup remover that will leave your skin feeling soft and moisturized.

Olive Oil and Castor Oil

This combination works well for removing stubborn eye makeup while also conditioning the lashes.

Milk and Almond Oil

Combine 1/4 cup milk with 1 teaspoon of almond oil for a gentle yet effective cleanser suitable for all skin types.

Aloe Vera and Witch Hazel

Mix 2 tablespoons of aloe vera gel with 1 tablespoon of witch hazel for a soothing remover that helps calm the skin while effectively removing makeup.

Remember to always patch-test any DIY recipe before fully incorporating it into your routine to avoid any potential allergic reactions.

Did you know QC’s skincare consultant course covers making DIY products? Check out the skincare consultant course outline to learn more!

Smiling woman removes makeup using best makeup remover

5 Common Mistakes to Avoid When Using Makeup Remover

Adding makeup remover to your skincare routine is a must- but only if done properly! Many people make simple makeup remover mistakes that can harm their skin. Here are some common pitfalls to avoid:

  1. Not using enough product: Using too little makeup remover may not effectively remove all your makeup, causing you to go through multiple cotton pads and potentially irritate your skin from excessive rubbing.
  2. Rubbing too harshly: Be gentle when removing your makeup, especially around the delicate eye area. Excessive rubbing can cause irritation or even contribute to premature wrinkles.
  3. Skipping removal altogether: Even on days when you don’t wear makeup, it’s important to cleanse your skin before bed to remove any dirt and oil buildup from throughout the day.
  4. Using the wrong type of remover: Different makeup products require specific types of removers. For example, waterproof makeup often needs an oil-based remover, while lighter makeup can be removed with a gentle cleanser.
  5. Not following up with skincare: After using makeup remover, it’s crucial to follow up with a cleanser to ensure all residue is gone, preventing clogged pores and breakouts.

By avoiding these common mistakes, you can achieve clean and radiant skin!

Pro Tip: Always read the ingredients when purchasing makeup products. When looking for new products, be sure to avoid these 6 harmful makeup ingredients!

Woman removes eye makeup using gentle makeup remover

Is Natural Makeup Remover Better?

In today’s market, there’s a treasure trove of information about natural makeup removers. However, not all of it is true! It’s important to distinguish between myths and facts to ensure we care for our skin effectively.

Natural Makeup Removal Myths

  • Natural makeup removers are always better for your skin.
  • Traditional products are less effective than natural options.
  • All “natural” labeled products are completely safe.

Natural Makeup Remover Facts

  • The best makeup remover depends on personal preference and skin type.
  • Effectiveness and safety should be prioritized over labeling, being natural doesn’t always make it safer
  • Choose a makeup remover that meets your needs and maintains healthy skin without irritation.

Keep in mind when shopping that many companies try to entice consumers with labels like “natural,” which are often unregulated. When searching for products, keep an eye out for the term “organic.” Unlike “natural,” organic is a regulated label that means at least 95% of ingredients capable of being organic have to be.

At the end of the day, the most important thing is to do your research! Dive into the ingredients, read reviews, and discover what works best for your unique skin. Whether you choose natural products or not is entirely up to you—just remember to make informed choices that make you feel fabulous! Happy shopping! 🌿✨
Smiling woman uses makeup remover to remove makeup and give herself a youthful glow

Makeup Remover FAQ

What's the difference between eye makeup remover and regular makeup remover?

A: Eye makeup removers are specially formulated to be gentle on the delicate skin around the eyes and effectively remove waterproof or long-wearing eye makeup. Regular makeup removers can also be used on the entire face but may not be as gentle on the eyes.

Can I use just water to remove my makeup?

A: Water alone is not enough to effectively remove makeup, especially waterproof or long-wearing formulas. It’s best to use a designated makeup remover for proper cleansing.

What's the difference between makeup remover and cleanser?

A: Makeup remover is specifically designed to remove makeup, while cleanser is meant to cleanse the skin of dirt, oil, and impurities. It’s important to use both in your skincare routine for optimal results.

How often should I use a makeup remover?

A: It’s recommended to use a makeup remover every night before bed, even on days when you don’t wear makeup, to ensure your skin is clean and free of any buildup.

Do I still need to wash my face after using a makeup remover?

A: Yes, it’s important to follow up with a gentle cleanser and moisturizer after using a makeup remover. This helps remove any residual product and prepares the skin for the rest of your skincare routine.

Become a Certified Makeup Artist

Build your skills in makeup artistry today!

ENROLL NOW
Woman with beautiful mature skin poses for camera

Ageless Beauty: The Ultimate Guide to Makeup for Mature Skin

By Makeup Tips and Tricks, Uncategorized No Comments

As we get older, our skin changes and that means we need to adjust the makeup products we use. To keep our skin looking beautiful and glowing, it’s important to update our beauty routines. In this guide, you’ll find everything you need to achieve a radiant look that celebrates your age! We’ll talk about how skin changes over time, how to prepare your skin for makeup, the best foundations and concealers for mature skin, eye makeup tips, and helpful makeup techniques just for mature skin.

Ready to discover the secrets to flawless makeup for mature skin? Let’s dive into expert tips and product recommendations that will help you shine at any age!

Woman with beautiful mature skin poses for camera

Understanding the Aging Process: Key Changes in Your Skin Over Time

As we age, our skin changes due to a combination of genetics, lifestyle choices, and environmental factors. For everyone, this process can lead to a range of common skin issues.

Both men and women may experience increased dryness, diminished elasticity, and the appearance of fine lines and wrinkles. Factors such as sun exposure, smoking, and poor diet can exacerbate these changes. To lessen these effects, adopting a healthy lifestyle is key. Understanding these changes can help individuals take proactive steps to care for their skin and find the right products.

Aging Skin in Women

  • Decrease in Collagen Production: Collagen is a protein that provides structural support to the skin and gives it a youthful appearance. As women age, their bodies produce less collagen, resulting in thinner and more fragile skin.
  • Loss of Elasticity: With a decrease in collagen production, there is also a loss of elasticity in the skin. This results in sagging and wrinkles.
  • Dryness: As women enter menopause, their bodies produce less estrogen, which is responsible for maintaining the skin’s hydration. This can lead to dryness and dullness.
  • Age Spots: Over time, exposure to sunlight causes melanocytes (cells that produce pigment) to clump together, leading to age spots or hyperpigmentation.

Want to learn about men’s skincare needs? Check out our article “Easy 5-Step Skincare Routine for Men”.

Mature makeup client prepares the skin for makeup application using hydrating product for mature skin

Skincare Preparation for Mature Skin

Before applying makeup, it is important to prepare your skin properly. This will not only make your makeup look better but will also help it last longer throughout the day. Here are some skincare tips specifically for mature skin:

  1. Exfoliate regularly: As we age, our cell turnover slows down, which can lead to dull and flaky skin. Exfoliating 1-2 times a week can help remove dead skin cells and reveal smoother and brighter skin.
  2. Moisturize thoroughly: Mature skin tends to be drier, so it is crucial to moisturize well. Look for moisturizers that contain hyaluronic acid, glycerin, or ceramides, which can help hydrate and plump the skin.
  3. Use an eye cream: The delicate skin around our eyes is often the first area to show signs of aging. Look for an eye cream with ingredients like caffeine or retinol, which can help reduce puffiness and fine lines.
  4. Prime your skin: Using a primer before applying makeup can create a smooth canvas for your makeup. Look for primers that are specifically formulated for mature skin, as many contain anti-aging ingredients.
  5. Know your skin type: Make sure you learn how to identify your skin type before purchasing products.  Knowing this will ensure you’re using the best products for you.

Best Primers for Mature Skin

One of the key steps in preparing mature skin for makeup application is using a primer. Here are some of the best primers for mature skin:

Choosing the Right Foundation for Mature Skin

Foundation is the base of any makeup look. As such, finding one that works well with your mature skin is crucial. Here are some tips for choosing the right foundation:

  1. Look for hydrating formulas: Mature skin tends to be drier, so look for foundations that have a hydrating formula. Avoid matte foundations, as they can accentuate fine lines and dry patches.
  2. Choose medium coverage: Heavy, full-coverage foundations can often settle into fine lines and wrinkles, making them more noticeable. Opt for a medium coverage foundation instead and use concealer in areas where you need extra coverage.
  3. Try out different application techniques: Instead of using a brush or sponge, try applying foundation with your fingers. The warmth from your fingers can help the product blend seamlessly into your skin. You can also try using a damp beauty sponge, which can help achieve a more natural and dewy finish.
  4. Consider a luminous finish: Foundations with a luminous or satin finish can give your skin a healthy glow, helping to minimize the appearance of dullness and dryness. Look for products specifically designed for mature skin to enhance your natural radiance.
Aging woman matches foundation to skin. Using best foundation for mature skin.

Best Foundations for Wrinkles and Fine Lines

Some foundations are specifically formulated to work well with mature skin, targeting concerns such as wrinkles and fine lines. Here are some of the best foundations for wrinkles and fine lines:

Concealer for Mature Skin

Concealer is an essential component of any makeup routine, especially for mature skin. As we age, our skin undergoes changes that can lead to dark circles, age spots, and other concerns. A good concealer not only helps to cover these flaws but also enhances the overall complexion, giving a more radiant look. Additionally, knowing where and when to use concealer can help create an age-defying look. Here are some tips for choosing the right concealer:

  1. Opt for a creamy formula: Creamy concealers are typically more hydrating and blend better on mature skin compared to thicker formulas.
  2. Go one shade lighter than your foundation: Choosing a concealer that is slightly lighter than your foundation can help brighten and lift the under-eye area. This makes you look more awake and youthful.
  3. Use a color-correcting concealer: For specific concerns like dark circles or age spots, try using a color-correcting concealer. Peach tones can help neutralize dark circles, while green tones can cancel out redness from blemishes.
  4. Don’t forget to set it: To ensure your concealer stays put throughout the day, use a setting spray. This will help prevent creasing and keep your makeup looking fresh.

Best Concealers for Mature Skin

Here are some of the best concealers for mature skin:

Woman with eye makeup for mature skin. Eyes are closed showing off eyeshadow and eyeliner for aging skin.

Eye Makeup for Mature Skin

As we age, our eye area may start to droop or become more hooded. Here are some tips for eye makeup application on mature skin:

  1. Start with a good base: Just like your face, it is important to prep your eyelids before applying eye makeup. Use an eyeshadow primer to help your eyeshadow last longer and prevent creasing.
  2. Avoid shimmery shadows: Shimmery or glittery eyeshadows can accentuate fine lines and wrinkles around the eyes. Opt for matte or satin finishes instead.
  3. Use neutral shades: Neutral shades such as taupes, browns, and creams can help create a soft and natural look on mature eyes. Avoid using harsh or bright colors, as they can make the eyes appear more tired.
  4. Don’t forget about eyeliner: A thin line of black or brown eyeliner along the upper lash line can help define and lift drooping eyelids. Avoid thick or winged liner, as it can make the eyes look smaller.
  5. Curl your lashes: As we age, our lashes may become thinner and less voluminous. Using an eyelash curler can help open up the eyes and make them appear more awake.

Pro Tip: Watch QC’s live makeup class Q&A where Nathan Johnson tackled questions about eye makeup, makeup for mature skin, and more!

Top 10 Makeup Tips for Aging Skin

In addition to the advice above, here are 10 more makeup tips specifically designed for aging skin!

  1. Stay hydrated: Drink plenty of water to keep your skin hydrated from the inside out. This will help prevent dryness and dullness.
  2. Moisturize before makeup: Make sure to moisturize your skin before applying any makeup products. This will create a smooth base for application.
  3. Use a color-correcting primer: If you have areas of redness or discoloration on your face, using a color-correcting primer can help neutralize them before applying foundation.
  4. Invest in quality brushes: Good quality makeup brushes can make a world of difference. Look for soft, dense brushes that will blend products seamlessly.
  5. Avoid heavy powder: As we age, our skin tends to become drier. Avoid using heavy powders that can make it look even drier and more textured.
  6. Fill in your eyebrows: Eyebrows tend to thin with age. Filling them in with a brow pencil or powder can help frame the face and give a more youthful appearance.
  7. Choose cream blushes and highlighters: Cream formulas are great for aging skin! They add moisture and create a natural, dewy finish.
  8. Set makeup with setting spray instead of powder: Instead of using powder to set your makeup, use a setting spray. This will keep your makeup in place without drying out the skin.
  9. Take care of your lips: As we age, our lips may lose volume and become more dry and lined. Use a hydrating lip balm regularly and opt for creamy or satin finish lipsticks instead of matte formulas.
  10. Remove makeup before bed: It is important to remove all traces of makeup before going to bed. Leaving it on can clog your pores and lead to breakouts.
Woman with mature skin practices strong makeup routine for mature skin.

Embracing Your Beauty: Final Thoughts on Makeup for Mature Skin

Aging is a part of life, and a beautiful part of your journey. Your makeup should help enhance that beauty, not hide it. So embrace your wrinkles and fine lines, and let your inner radiance shine through. Overall, the key to successful makeup application on mature skin is to focus on moisture, luminosity, and enhancing your features in a subtle way. Remember to have fun with it, don’t let age hold you back!

Don’t be afraid to experiment and find what works best for you. After all, age is just a number and beauty knows no limits!

Makeup For Ageing Skin FAQ

Do I need to switch to all "anti-aging" makeup products?

Not necessarily. While many anti-aging products can be beneficial for mature skin, not all of them are. It is more important to focus on hydrating and nourishing ingredients rather than just labels such as “anti-aging”.

How do I prevent my foundation from settling into fine lines and wrinkles?

Make sure to properly prep your skin with moisturizer before applying foundation. Using a primer and opting for lighter, buildable coverage can also help prevent settling into fine lines.

Do I apply foundation or concealer first?

It’s usually best to put on foundation first, then use concealer on spots that need more coverage. This method helps you get a smooth, even look while letting you fix specific areas as needed.

What's the best way to remove makeup without irritating my aging skin?

To start, try using a gentle cleanser designed for mature skin. After this, follow up with a moisturizer or night cream to remove makeup without irritating your skin. Micellar water can also be a great option for quick and gentle makeup removal.

What's the best way to apply concealer on mature skin?

To avoid creasing and caking, use a small amount of concealer and blend it in with your fingers or a damp beauty sponge. Also, make sure to choose a lightweight, hydrating formula.

Should I still wear sunscreen under my makeup as I age?

Absolutely! Protecting your skin from sun damage is important at any age. Look for makeup products that contain SPF or apply mineral sunscreen before applying your makeup.

As a makeup artist, are there differences to consider when working with mature clients?

Providing business to mature clients is similar to any other client. However, as mentioned throughout this article you will likely need to use different products and makeup application techniques. Mature clients can also have different expectations than younger clients. We recommend checking out our article “What Mature Clients Look for in a Makeup Artist.”

Become a Certified Makeup Artist

Build your skills in makeup artistry today!

ENROLL NOW
Makeup photography Feature Image

18 Secrets to Makeup Photography Success

By Career Advice, Makeup Tips and Tricks, Your Makeup Career No Comments

Are you a professional makeup artist and want to improve your portfolio? Have you been hired to do editorial makeup and you want to make sure you deliver the best possible results? Or maybe you’re a makeup lover who simply wants to improve your makeup photography skills for your Instagram feed?

If you answered YES to any of these questions, we’ve got some great news for you! Makeup photography doesn’t have to be complicated. In this article, we’ll go over 18 secrets that will help you take your makeup photos from mediocre to magazine-worthy.

So, let’s get started!

The Importance of Makeup in Photography

Makeup plays an an important role in in photography, as it helps enhance your features and create a certain look. Furthermore, makeup also makes it easier for photographers to capture colors, tones, and textures in the images they take.

In the world of professional makeup artistry, makeup is especially important in editorial work. In a nutshell, editorial photoshoots are all about creating a specific look or atmosphere. Usually, the purpose is to sell some sort of product, tell a story, or portray a concept. Makeup is the key to helping achieve this vision!

You’ll also find that makeup photography is of major importance when it comes to building your professional portfolio. After all, as a makeup artist, your portfolio is essentially your resume! It’s what potential employers look at to determine if you have the skillset they’re looking for. As such, knowing how to apply makeup for the camera is a must.

Now, let’s say you’re not a professional MUA. Perhaps you simply want to take your social media content to the next level. Well, makeup is just as important here, too. It helps you look your best and creates a more polished image!

Makeup photography in-post image 1

18 Secrets to Makeup Photography Success

Okay, let’s not waste anymore time! Here are 18 tips to help you achieve the perfect makeup look for photography…

But WAIT! Before we reveal these 18 secrets, make sure you know HOW to build a professional makeup artistry portfolio first!

Secret #1: Prep the skin with moisturizer and primer!

Make sure your (or your client’s) skin is well-hydrated and prepped first before applying makeup. This will help ensure that the products you use stay put and look their best all day long!

Secret #2: Know how to color correct!

Color correcting is basically using a specific product to cancel out any unwanted tones in your skin. Make sure you have a good understanding of how to color correct before doing makeup for photography. Otherwise, you’ll end up with an uneven and inconsistent look.

Pro Tip: Become a color correcting master with the help of this educational webinar – hosted by QC Makeup Academy executive instructor and professional MUA, Nathan Johnson!

Secret #3: Use bold colors that’ll pop on camera!

When it comes to makeup photography, bold colors are always best! So, make sure you use products that’ll show up clearly and will stand out in photos.

Secret #4: Ditch the cakey foundation!

Cakey foundation looks unnatural and unflattering in photos. For this reason, it’s important to avoid this look! Instead, make sure you use a lightweight foundation that’ll provide a sheer and polished finish.

Secret #5: Focus on the eyes!

The eyes are the most important feature in makeup photography because they’re the “windows to the soul”. So, make sure you focus on creating a dramatic and beautiful eye look that’ll make an impact in photos. You can achieve this by:

  • Swiping on some colorful eyeshadow;
  • Applying a dramatic cat eye;
  • Doing a sharp, crisp wing;
  • Applying false lashes;
  • Choosing colors that enhance the eye color;
  • And more!

Pro Tip: Need help perfecting your smokey eye? This step-by-step video tutorial by QC Makeup Academy grad, Devyn Gregorio, will show you everything you need to know!

Fashion African American model in gold jewelry, with perfect bright makeup and pigtails. Beautiful stylish African model on colored background. Makeup photoshoot article.

Secret #6: Make sure the lips don’t go unnoticed!

Just because you’re focusing on the eyes doesn’t mean you should overlook the lips. Make sure to create a luscious and full-looking pout with the help of lip liner, lipstick, and/or gloss!

Secret #7: Go with matte products!

Shimmery and sparkly products can be distracting in photos. Furthermore, they can also cause unwanted shine. Instead, make sure you opt for matte or subtle sheen products instead.

By doing this, you’ll be able to create a more subtle and polished look!

Secret #8: Use powder so skin doesn’t look shiny!

While we’re on the subject, applying a translucent setting powder on the face is also essential for keeping skin from getting shiny or greasy. So, make sure you lightly dust this over your (or your client’s) face – either before or after taking photos.

Secret #9: The fashion should match the makeup (and vice versa)!

If you’re choosing your or your client’s wardrobe, make sure to choose an outfit that’ll match the makeup look. This means making sure the colors, styles, and textures don’t clash with each other! And if someone else has picked out the wardrobe, make sure to adjust the makeup accordingly.

Either way, creating a cohesive look is key for achieving the perfect makeup photography look!

Interested in a career as a Fashion Styling Consultant? Become trained and certified in as little as 8 weeks with QC Makeup Academy’s self-paced, online Fashion Styling Course!

Secret #10: Choose colors that compliment the skin tone (and undertones)!

The colors you use in makeup photography can make or break the final look. Thus, we strongly recommend choosing colors that are flattering and will highlight the best features of the person you’re working with. Make sure to take their skin into consideration before you choose colors – as this will help create a more balanced and harmonious look.

For example, all people’s skin tones fall into any of these categories:

  • Cool (blue undertone)
  • Warm (yellow/golden undertone)
  • Neutral (a balance of cool and warm undertones)

Once you know the undertones, you can then choose colors that’ll enhance them!

Secret #11: Don’t be afraid of natural skin texture!

No amount of makeup in the world can completely erase skin texture – and that’s just a fact. Personally, when I see a model who has no pores, I immediately think “Photoshop”… And Photoshop doesn’t sell me on anything other than Photoshop.

So, when applying makeup for photography, as it’s important to keep some of the natural skin texture still visible. Of course, this doesn’t mean you should leave your or your client’s skin looking dull and dry. It simply means that you shouldn’t cake on the makeup.

Make sure to use the right products and techniques to create a glowing, healthy complexion without losing the skin’s natural texture. Remember: having texture on our skin is part of being human. There’s absolutely nothing wrong with it!

Secret #12: Make sure to use a setting spray!

Setting spray is essential for keeping your makeup in place and ensuring it still looks fresh after hours of shooting. We recommend using a product that’s specifically designed for photography (such as any of these), as this will give you the best results.

Male skincare routine showing male model with great skin

Secret #13: Know how to do a variety of looks!

You’ve probably noticed that so far, we’ve put a lot of emphasis on the bolder, more dramatic side of makeup photography. That being said, you should also be aware of the importance of subtler looks as well. Not only does your professional portfolio need variety; if you’re limited to one or two styles, you won’t be able to book as many photoshoot jobs!

With that in mind, you should learn how to do a variety of looks, such as:

  • Everyday makeup;
  • Soft glam makeup;
  • Bridal/wedding makeup;
  • SFX makeup;
  • Makeup for men;
  • Makeup for mature skin;
  • Global beauty makeup, etc.

Pro Tip: QC Makeup Academy’s self-paced, online courses cover ALL of these styles of makeup (and SO much more)! Plus, you’ll earn a legitimate, globally-recognized certification AND learn how to start/run your own MUA business… All in as little as 12 short weeks!

Secret #14: Do touch-ups throughout the photoshoot!

No matter how perfect the makeup looks at first, it’s bound to need a few touch-ups here and there. When you forget to re-apply powder or blend eyeshadow, the makeup will begin to look patchy and cake-like. So, make sure you have a few key products on hand to help you out when needed.

How to Retouch Makeup for Photography

If you or your client/model needs their makeup retouched during the photoshoot, you’ll need to do two things:

  1. Make sure your makeup is still intact (i.e., powder, eyeshadow, blush, etc.);
  2. And make sure your skin is still matte and not shiny or greasy.

To do this, use a setting spray to re-set the makeup and blot any excess oil with a tissue or blotting paper.

Secret #15: Lighting is literally everything!

We can’t stress this one enough! Makeup photography is all about playing around with light and making sure it’s hitting the face in the most beautiful and flattering way possible. Make sure to experiment with different lighting techniques, as this will help you create a more dynamic look!

Makeup Photography Lighting

Here are the different types of lighting you can work with, and the pros and cons of each:

Natural Lighting

This is widely considered the most flattering type of light, as it comes from the sun and is softer on the skin. However, you’ll need to plan your photoshoots around certain times of day (which may be difficult to do!)

Studio Lighting

This is often used in professional photography studios, and provides a more direct/intense light. It’s trickier to work with, as you’ll have to experiment a lot until you find the right balance.

Moreover, the type of light bulbs used will also affect the final result. For example, “warm” bulbs are often used to create softer and more subtle lighting, while “cool” bulbs can be used to create a sharper look.

Ring Lighting

Used predominantly by social media influencers and beauty gurus, this is a diffused light that’s perfect for makeup photography. Why? Because it provides an even and soft illumination on the face.

While ring lighting isn’t common for professional shoots, it’s definitely recommend for those wanting to take pics of themselves for social media. If you’re interested in trying out ring lighting for your personal photos, make sure to play around with the strength of the light, too. This will help you create different effects.

Secret #16: Take multiple shots from different angles!

If you’re working with a professional photographer, we guarantee this is something they’ll do. But if you’re the one snapping the pics, you’ll need to remember to take multiple shots from different angles. This will ensure that you get the best results!

For starters, this will allow you to capture more detail (such as different eyeshadow colors). And secondly, it allows for better creativity, too, as you can choose the most flattering angles of your – or your client’s – face.

Portrait of elegant beautiful Asian woman in a fashionable raincoat around colourful bright neon uv lights posing in studio. Makeup photoshoot article.

Secret #17: NEVER take selfies!

This one’s important, whether you’re taking pics of makeup for your portfolio or simply adding content to your social media pages. Now, it’s first key to point out that when we say “selfie”, we don’t simply mean a photo you take of yourself. If done correctly, a self-portrait is absolutely fine!

What we’re referring to is when people take photos of themselves with their arms stretched out and the camera in an unflattering position. A better solution is to buy a tripod, position it at the correct angle, and place your phone or camera on it. This will provide much more professional-looking results.

Remember: makeup photography should be taken seriously. If you have trouble taking the perfect pic of yourself, try getting help from a professional photographer or even an assistant.

Secret #18: Know what makes for a high-quality shot!

Finally, it’s important to understand what makes for a high-quality makeup shot. If you’ve been hired for a professional gig, then you probably won’t have to worry about this. Chances are, the photographer hired will be able to deliver the best images.

Essentially, makeup photography should be crisp, clear, and detailed. It should NOT be blurry or grainy – no matter the type of camera you (or the photographer) are using!

How to Take Amazing Makeup Pictures

Here are some tips to help you achieve this, if you’re the one snapping the pics:

  • Make sure to adjust your white balance settings correctly, as this will help create a more even and accurate tone;
  • Set your camera to “Manual Mode”, so you can adjust the exposure, shutter speed and aperture;
  • Set your camera to the highest resolution available. This will ensure that no details are lost in translation;
  • If you’re using the camera on your phone, make sure to check your focus before taking a photo.
  • Furthermore, if you have an iPhone, you can also set your phone camera settings to “Portrait Mode”. This will greatly help you blur out the background – which is perfect for showcasing makeup looks!

If You’re Hiring a Photographer

Now, if you’re looking to hire a photographer to take the pics (say, for your professional portfolio or social media), the key is doing your research. The goal here is to hire somebody who has an eye for detail and knows how to capture the best shots.

Make sure to look through their portfolio and ask questions about their experience and process. Furthermore, don’t be afraid to ask them for any tips they have on taking great makeup pictures!

How to do Makeup for Photography: Black and White Photos

Now, we would be remiss if we didn’t mention black and white photography. After all, makeup looks can look amazing in black and white! However, as an MUA, you’ll have to pay extra attention to detail when doing makeup for this type of photography.

The key here is to think of the contrast. Make sure your makeup pops! This means going for a bold lip or an eyeshadow that will stand out against the darkness of the photo. Plus, you should also make sure you also focus on highlighting your or your client’s features, as this will help them stand out even more.

FAQs

Phew, that was a lot of info! Let’s wrap things up by answering some of the common questions people have about makeup and photography:

Q: What is makeup photography called?

A: Makeup photography is also known as beauty photography.

Q: What is the best makeup for photography?

A: Makeup for photography should be bold and full coverage, in order to make sure all the details show up in the pictures. Some brands that meet this criteria include (but certainly aren’t limited to):

  • Tarte Cosmetics
  • Rimmel London
  • Anastasia Beverly Hills
  • Hourglass
  • Urban Decay
  • Becca
  • Charlotte Tilbury
  • Jouer
  • Fenty Beauty
  • e.l.f. Cosmetics
  • Huda Beauty
  • Marc Jacobs Beauty
  • Patrick Ta

As an added bonus, all of these makeup brands are also cruelty-free! Win-win!

Q: What are the steps for flawless makeup on camera?

A: Here are the steps for flawless makeup on camera:

  1. Make sure your (or your client’s) skin is properly prepped and hydrated.
  2. Choose makeup products that are full-coverage and long-lasting.
  3. Make sure to pay extra attention to the lips, cheeks, and eyes.
  4. Keep your makeup natural and dewy-looking.
  5. Set the makeup using a setting spray or powder.
  6. Finally, adjust the white balance settings on your camera to ensure accurate colors.
Makeup photography in-post image 5

Q: What are the 7 tips for taking good photographs?

A: In the world of makeup photography, it’s important to keep these seven photo-taking tips in mind:

  1. Have a clear vision of what you want the end result to look like.
  2. Set up your lighting correctly.
  3. Choose the right lens and background.
  4. Stick to natural poses, as they tend to look better on camera.
  5. Pay attention to the makeup details and adjust accordingly.
  6. Use a setting spray or powder to set the makeup in place.
  7. Make sure the colors are accurate by adjusting the white balance on the camera.

Q: Why doesn’t my makeup look good in pictures?

A: Makeup doesn’t always look the same in pictures as it does in person – and there are lots of factors to consider.

Make sure your makeup is full coverage, long-lasting, and natural-looking. What’s more – make sure to focus on the details of the eyes, lips, and cheeks. Next, ensure that the lighting is good, and adjust the white balance on your camera. Lastly, use a setting spray or powder to make sure everything stays in place!

Q: Is makeup really necessary for photography?

A: Makeup is essential for photography – both for everyday pictures AND professional photoshoots! Makeup can enhance the features of whoever’s in the photo, as well as bring out the colors and help create contrast. Plus, it’s also a great way to experiment with different looks and create something unique!

Conclusion

Makeup is an essential part of photography, whether you’re a professional MUA or just someone taking pictures for personal use!

As such, make sure to pay attention to the details and use products that are full coverage and long-lasting. Your lighting should be good and the white balance should be adjusted on your camera for accurate colors. Lastly, set everything in place with a setting spray or powder.

With all of these tips in mind, you’ll be able to take stunning makeup photos every time! Make sure to also check out the recommended reading section for more information on makeup portfolios and how to showcase them.

Good luck, beauties, and happy snapping!

In as little as 2 months, learn how YOU can put together the ULTIMATE makeup portfolio for your career as an MUA. Enroll in QC Makeup Academy’s self-paced, online Portfolio Development Workshop and get started today!

Beauty habits you should start doing Feature Image

30 Beauty Habits You Should Start Doing ASAP

By Education, Makeup Tips and Tricks, Skincare No Comments

Does your beauty routine need a little work? You’re in luck! In this article, you’ll find 30 game-changing beauty habits you should start doing right away. By the time you’re finished reading, we GUARANTEE that you’ll have a brand-new beauty routine that’ll help you look and feel your best.

So, keep reading to find out what beauty habits you should adopt ASAP!

30 Beauty Habits You Should Start Doing Immediately

Beauty Habit #1: Stay hydrated!

FACT: Staying properly hydrated has countless benefits on your skin!

For example, drinking plenty of water helps keep your skin plump and hydrated, which can prevent wrinkles and sagging. Not to mention, it’s good for your overall health, too!

Experts recommend that the average adult should drink approximately 8 glasses of water per day.

Beauty habits you should start doing in-post image 1

Beauty Habit #2: Never go to bed still wearing your makeup!

No matter how tired you are, taking a few minutes to remove your makeup before bed is non-negotiable! After all, makeup residue can clog pores and cause serious skin issues. We recommend using an oil-based cleanser or micellar water (whichever is more agreeable with your skin type) to effectively remove all traces of makeup.

Beauty Habit #3: Don’t JUST use a makeup wipe to clean your face!

This is a big mistake! Makeup wipes are appropriate for removing one layer of makeup, but they can’t get deep into your pores to remove all dirt and oil. So, if you want to ensure that your skin is as clean as possible, make sure to use a gentle cleanser in addition to the wipes.

Related: Are makeup removers actually bad for your skin? Learn the truth for yourself!

Beauty Habit #4: Try to avoid touching your face!

It can be hard to resist the temptation, but constantly touching your face can cause breakouts and other skin problems. Furthermore, your hands carry a lot of bacteria, which can easily transfer onto your face.

So, be sure to keep your hands clean and away from your face!

Beauty Habit #5: Wear sunscreen every single day!

Yes, even if it’s cloudy outside. Sunscreen is the key to having healthy, youthful-looking skin! UV rays can cause sunburns, wrinkles, and even cancer. So, make sure to use a broad-spectrum SPF 30+ sunscreen every day.

Beauty Habit #6: Figure out your skin type!

If you don’t know your skin type, chances are, you’re using the wrong products for your skin. In order to get the best possible results, it’s important to use products that are specifically designed for your skin type.

To figure out your skin type, we recommend reading this informative blog article by QC Makeup Academy‘s executive instructor (and certified Skincare Consultant), Nathan Johnson!

Closeup head shot pleasant beautiful woman applying moisturizing creme on face after shower. Smiling young pretty lady wrapped in towel smoothing perfecting skin, daily morning routine concept. Beauty habits article.

Beauty Habit #7: Craft a skincare routine that’s tailored to this specific skin type!

Once you’ve figured out your skin type, it’s time to craft a skincare routine that caters to its needs. This may include using gentle cleansers, moisturizers, serums, face masks, and more. Remember: the specific products you use should depend on your individual skin type. So, be sure to do plenty of research before you make any purchases!

Beauty Habit #8: Exfoliate (but not every day)!

Exfoliating is one of the best ways to get rid of dead skin cells and keep your pores clear. However, it’s important not to overdo it. Experts recommend exfoliating only 1-3 times per week to avoid irritating your skin. So, find a gentle exfoliator and use it sparingly!

Beauty Habit #9: Extend your skincare application to your neck and chest, too!

Your neck and chest are just as important as your face. That’s why it’s important to extend your skincare routine to these areas! We recommend using a gentle cleanser and moisturizer to keep your skin looking its best.

Beauty Habit #10: Eat a healthy diet!

Yes, what you eat can have an impact on your skin. Eating a diet full of healthy fruits and vegetables has been proven to give your skin a healthy glow. On the other hand, eating a lot of processed foods and sweets can lead to breakouts and other skin issues.

So, as much as it may suck for my fellow sweet-toothed beauties, make sure to eat a healthy, balanced diet for the best possible results!

Beauty Habit #11: Get advice from a certified Skincare Consultant!

If you’re still having trouble figuring out the best skincare routine for your skin type, it might be worth considering hiring a certified Skincare Consultant. They can help you craft a routine that caters to your exact needs, and give you advice on the best products for your skin type.

So, if you’re looking for help with your skincare routine, don’t hesitate to reach out to a professional! They can be an excellent resource.

Or, here’s an even BETTER idea: become a certified Skincare Consultant YOURSELF! You can do this in as little as 2 short months with QC Makeup Academy’s self-paced, online Skincare Course!

Beauty habits you should start doing in-post image 3

Beauty Habit #12: Switch your pillowcase!

It’s important to switch out your pillowcase every few days, as it can build up bacteria over time. Also, try using a silk pillowcase if possible, as it can help reduce wrinkles and keep your skin looking its best.

Beauty Habit #13: Wash your face in the morning and before bed!

Cleaning your face twice a day is one of the most important beauty habits you can have. Make sure to use a gentle cleanser, and…

Beauty Habit #14: Don’t forget to moisturize afterwards!

Moisturizing is essential for keeping your skin hydrated and looking its best. This is because moisturizers help to lock in hydration, so your skin stays healthy and glowing. Therefore, don’t forget to moisturize after you wash your face!

Of course, we recommend using a moisturizer that’s appropriate for your skin type, too. That way, you can ensure maximum results! Additionally, you may want to use a different moisturizer at night than you use in the morning. Nighttime moisturizers tend to be heavier and more hydrating, so they can help you wake up looking refreshed.

Beauty Habit #15: Protect your eyes from the sun!

And by that, we mean wear sunglasses. On top of the fact that, obviously, sunglasses will help protect your eyes from the sun’s harmful rays, they can also reduce wrinkles around your eyes. After all, when there’s a bright light on our face, our tendency is to squint…

But squinting too much can eventually lead to fine lines and wrinkles! So, don’t forget to throw on a pair of sunglasses whenever you’re out and about!

Beauty Habit #16: Get your beauty sleep!

For SO many reasons, make sure you’re getting enough sleep. Lack of sleep can lead to dull skin and dark circles under the eyes, so make sure to get your beauty rest. Plus, getting enough sleep (at least 7 hours at night) can help reduce stress and keep hormones balanced… Which means healthier skin all around!

Beauty Habit #17: Try using a serum!

Serums are a great way to give your skin an added boost. They contain concentrated ingredients that can help hydrate, brighten, and smooth your skin.

So, why not try using a serum every day and see how your skin responds? You may just be surprised at the results!

Beauty Habit #18: Avoid makeup and skincare testers at all cost!

Testers can be a great way to try out a product before you buy it – but the truth is, they can (and often do) also contain bacteria. This can lead to skin breakouts and other issues, so it’s best to just avoid them altogether.

It’s much better (and safer) to stick to products that you’re sure are clean. Plus, it’s also a good idea to switch out your makeup and skincare frequently, as bacteria can eventually accumulate on your products over time.

Fun (but gross) fact: most of our makeup products are literally swimming in bacteria. It’s actually quite impressive – although, again, so gross.

Beauty cosmetic skincare products on marble bathroom table, set of jars, droppers and bottles. Spa, daily natural skin care routine concept. Beauty habits article.

Beauty Habit #19: Prioritize your mental health!

Yes, this is very much a beauty habit you should start doing ASAP (if you aren’t already)! Mental health is just as important for your beauty routine, as it can affect how your skin looks and feels. Not to mention, obviously, your overall well-being is the most important thing of all!

So, make sure to take time out of your day to focus on your mental health. This can be anything from reading a book, taking a walk, or treating yourself to an occasional spa day. Prioritizing your mental health can help keep your skin looking its best (and keep you feeling happy and relaxed too).

What could be better than that?

Beauty Habit #20: Throw away outdated makeup and/or skincare products!

It’s not just a good beauty habit to throw out outdated products – it’s actually an important safety precaution. If you don’t know the expiration date of a product, look for the open jar symbol on the packaging. That will tell you how long it’s safe to use the product before you should discard it.

After all, expired makeup and skincare products can contain bacteria that can lead to skin infections or other issues. It’s just not worth the risk – so, better safe than sorry!

Beauty Habit #21: Clean your phone screen!

Your phone screen, believe it or not, can be a major source of bacteria. Just think about all the places your phone has been and all the germs it has come in contact with. Yuck, right?

So, make sure to clean your phone screen frequently with a damp cloth – and don’t forget to clean the case, too!

And while you’re at it, why not give your hands a good wash, too? There’s no such thing as being “too clean” when it comes to skincare and beauty habits!

Beauty Habit #22: Opt for natural skincare products!

Whenever possible, try to choose natural skincare products – even if it’s just some of the time. Natural products are much gentler on skin and can be more effective than harsh chemical alternatives. Plus, they often smell great, too (and those yummy smells aren’t artificial either!).

Beauty Habit #23: Regularly clean your makeup and skincare tools!

Makeup brushes, sponges, tweezers, and all those other tools we use for our beauty routines are all prone to collecting bacteria. This is why it’s so important to clean them regularly and properly. Otherwise, you could be introducing bacteria onto your skin each time you use them.

As such, make sure to give your tools a good scrub every few weeks (or even more often if possible) to keep them – and your skin – clean and healthy.

Pro Tip: Not sure how to properly clean your makeup tools? We’ve got you covered!

Beauty Habit #24: Be consistent with your skincare routine!

A great skincare routine is only as effective as your consistency. If you’re only using your products every now and then, it’ll be much harder to see the results you want – and your skin won’t be as healthy either.

So, make sure to stick to your routine! That way, you can reap the full benefits of it, and actually see the results you’re after.

And, of course, don’t forget to enjoy it, too! Make it part of your self-care routine and take some time to pamper yourself each day.

Beauty Habit #25: Know which powerhouse skincare ingredients to look for!

When it comes to skincare, not all ingredients are created equal. Instead of just reaching for any old product off the shelf, educate yourself on which ingredients are the best for your skin type – and look out for those powerhouse ones!

A few of our favorite skincare ingredients include vitamin C, hyaluronic acid, AHAs, and BHAs. (If you want to know why, check out this amazing webinar!) Not only do they help to boost skin radiance; they can also help to reduce signs of aging and improve skin tone.

So, be sure to look for these ingredients in your favorite skincare products – your skin will thank you for it!

Understanding Skin types and undertones

Beauty Habit #26: Try not to pop your zits!

I don’t know about you, but I’m terrible for this – and always have been. But, it’s actually a very bad habit to get into!

Popping your zits can lead to skin issues such as scarring and infection. Plus, it can damage the delicate skin around and beneath the pimple. So, instead of popping or picking at your acne, opt for a gentle spot treatment instead… Or, better yet, go see a dermatologist!

Pro Tip: Not sure where to find the right dermatologist for you? These 7 simple steps break down the process from start to finish!

Beauty Habit #27: Leave the invasive skincare treatments to the professionals!

Nowadays, you can find literally everything online – and that includes things like chemical peels, laser treatments, and Botox. However, it’s important to remember that these are invasive treatments and should only be performed by a qualified professional!

Don’t be tempted by the thought of getting these treatments done at home – it won’t end well. We can promise you that. At best, you’ll be disappointed with the results; at worst, you could end up doing serious damage to your skin.

As a good rule of thumb, if you want any of these types of treatments, always seek out a board-certified practitioner to make sure you get the best possible results.

Beauty Habit #28: Always perform a patch test first with any new products!

It doesn’t matter how much your friend raves about a particular product; you should always be sure to perform a patch test first. It’s the best way to make sure that the product is suitable for your skin type, and won’t cause any reactions or irritation.

All you need to do is apply a small amount of the product to your skin and wait for 24-48 hours. If there’s no reaction, then it should be safe to use on your face. Just don’t forget to apply a moisturizer afterwards!

Beauty Habit #29: Treat yourself to a face mask!

We all know that a face mask can be a great way to give your skin an extra boost. They’re also super relaxing, which always helps to reduce stress and promote healthy skin.

If you want maximum results, opt for a clay mask! They work best to purify your skin, draw out impurities, and even control excess oil. Furthermore, you can also find face masks with other powerhouse ingredients, too – such as vitamin C or hyaluronic acid.

Beauty Habit #30: Take a skincare course so you can better understand your skin!

Understanding your skin is one of the best things you can do for it. Taking a skincare course will help you to learn more about your skin type, what ingredients are best for you, and how to take proper care of it – in a fun and interactive way.

In QC Makeup Academy’s self-paced, online Skincare Course, for example, you will learn all about:

  • The basics of skincare;
  • Skin anatomy and types;
  • Understanding (and being able to read) skincare labels;
  • Picking the right products and tools;
  • Makeup recommendations with skin consideration in mind;
  • Morning vs. nighttime skincare regimens;
  • Different skin concerns and conditions;
  • How to assess skin and recognize these concerns and conditions;
  • Skincare for acne-prone skin;
  • Anti-aging skincare;
  • How to launch a successful business as a professional Skincare Consultant;
  • And more!

And the best part?

The right skincare course can even arm you with a professional certification that you can add to your resume! Meaning, if you wanted to, you can even turn your newfound knowledge into a successful business!

Close up portrait of relaxed black woman has gentle skin after taking shower, satisfied with new lotion, has no makeup, smiles tenderly, shows perfect teeth, stands shirtless against blue background. Beauty habits article.

Frequently Asked Questions

Lastly, let’s wrap things up by answering some commonly asked questions about beauty habits…

Q: How do I start a daily beauty routine?

A: The best way to start a daily beauty routine is to make sure you’re sticking with the basics. Cleanse and tone your skin, and then apply a moisturizer. You can also add in other steps, such as toning and exfoliating your skin, as well as applying eye cream and facial masks.

Q: What habits make your skin glow?

A: The best habits for glowing skin are:

  • A healthy diet;
  • Drinking lots of water;
  • Using natural products and ingredients;
  • Exercising regularly;
  • Getting enough sleep;
  • Protecting your skin from the sun;
  • Limiting sugar and processed foods;
  • Using gentle cleansers and moisturizers;
  • And using weekly face masks.

Q: What are the 5 basics of skincare?

A: The 5 basics of skincare are:

  1. Cleansing
  2. Toning
  3. Moisturizing
  4. Exfoliating
  5. Using sunscreen

These five steps will help to keep your skin looking and feeling its best! By following these simple steps, you can maintain a healthy and glowing complexion.

Q: How do I simplify my beauty routine?

A: To simplify your beauty routine, focus on only the essentials. Stick to cleansers and moisturizers that work for your skin type, stay away from harsh ingredients, and don’t be afraid to experiment with different products. Also, make sure you’re taking care of your skin from the inside out by eating a balanced diet, drinking lots of water, and getting enough sleep.

Remember: beauty starts from within!

Q: What is a really good morning beauty routine?

A: A really good morning beauty routine should include cleansing and toning your skin, applying a moisturizer, using sunscreen, and drinking plenty of water. This routine should be followed every day – even on days when you don’t wear makeup or plan to leave the house. This will help to keep your skin looking and feeling its best.

Q: What skincare routine should I do at night?

A: At night, your skincare routine should consist of cleansing and toning your skin, applying a moisturizer, exfoliating (if necessary), and using an eye cream. It’s also important to remember to remove any makeup before going to bed. As we mentioned earlier, this helps to unclog your pores and allow your skin to breathe.

Q: What are some of the top recommend DAILY beauty habits?

A: Some of the top recommended daily beauty habits include:

  • Cleansing and toning your skin;
  • Using a moisturizer;
  • Using sunscreen;
  • Removing makeup and unclogging pores;
  • Drinking lots of water;
  • Eating a balanced diet;
  • Exercising regularly;
  • Protecting your skin from the sun;
  • Using gentle products and ingredients;
  • And using weekly facial masks.

Q: How can I build a skincare regimen on a budget?

A: Building a skincare regimen on a budget is possible! Start by focusing on the basics, such as cleansing and moisturizing your skin. You can also look for affordable skincare products that are made with natural ingredients.

Additionally, you can use DIY skincare recipes, such as homemade masks and face scrubs, to help keep your skin looking and feeling its best!

Beauty habits you should start doing in-post image 7

Conclusion

Beauty is all about taking care of your skin from the inside out. Start with building a daily beauty routine, and make sure you’re sticking to the basics – that way, you’ll be well on your way to having beautiful and glowing skin! Remember: there are plenty of affordable options for skincare products, DIY recipes, and natural ingredients that are all great for your skin.

With a little bit of care and dedication, you can have gorgeous skin in no time!

Good luck and happy beauty habits-ing!

UP NEXT: Think a career in skincare consulting is the perfect path for you? Discover how YOU can get certified, launch your business, and book your first client – all within 12 short weeks!

When to throw away makeup and skincare products Feature Image

When to Throw Away Your Old Makeup and Skincare Products

By Makeup Tips and Tricks No Comments

Updated 2024.

Key Points

  • As soon as makeup and skincare products are opened, they begin to expire due to natural oxidation and the introduction of bacteria.
  • Expired makeup and skincare products can cause skin irritation, dryness, allergic reactions, rashes, breakouts, and even serious infections.
  • 3 ways to tell if makeup has gone bad are: seeing if the product smells bad or not, looking for changes in color or texture, and checking the packaging for an expiration date.
  • Most experts suggest tossing out any (opened) makeup products that haven’t been used in the last 3-6 months. Individual shelf lives vary and depend on the given products, though.
  • Contrary to popular belief, old/expired makeup cannot be cleaned back to a truly healthy, sanitized state. Once it’s expired, just throw it away.
  • Generally speaking, most opened skincare products last for approx. 10-12 months. If unopened and stored correctly, many can last as long as up to 2 years. Again, though, individual shelf lives vary and depend on the given products.
  • You can typically find the expiry date (a.k.a. the “best by” or “use by” date) for makeup and skincare products on the packaging itself – typically either on the bottom, side, or back of the product.
  • Tips for helping your makeup and skincare products last include: keeping them away from heat + direct sunlight, storing them in a cool + dry place, cleaning brushes and beauty blenders regularly with soap and warm water, refraining from sharing/swapping products with other people, and throwing away expired products immediately.
  • QC Makeup Academy has helped 8,000+ students and grads launch successful careers in the makeup and beauty industry.
  • You can become a trained/certified Master International Makeup Professional™ (MIMP™) in as little as 2 months by completing QC Makeup Academy’s self-paced, online Master Makeup Artistry Course.
  • You can become a trained/certified International Skincare Consulting Professional™ (ISCP™) in as little as 2 months by completing QC Makeup Academy’s self-paced, online Skincare Course.
When to throw away makeup and skincare products in-post image 1

Introduction

It’s a brand new year – so now is the perfect time to sort through all of your makeup and skincare products, and get rid of anything that’s old or expired! After all, there are definite expiration dates that you should be aware of… And not paying attention to them can have damaging effects on your skin.

In this article, we’ll reveal when to throw away your makeup and skincare products. This way, you can keep your skin its healthiest!

So, let’s find out when to throw away old makeup and skincare products!

Makeup

What Happens To Makeup As It Gets Old?

Makeup products don’t last forever. In fact, as soon as you open them, they begin to expire. This is due to natural oxidation and the growth of bacteria. And when makeup gets old, it can cause irritation, breakouts, and other unwanted reactions on your skin.

Pro Tip: Here are 6 reasons why your makeup products are likely bathing in bacteria – and what to do about it!

How to Tell When Makeup Products Have Expired

There are a few ways to tell when your makeup products have gone bad. The first is the smell test – if it smells rancid, then it’s probably time to toss it. You can also look for changes in texture or color, as this is another good indication that the product has expired. Finally, you may want to check the packaging for an expiration date.

What Happens When You Use Old/Expired Makeup?

Using old/expired makeup can lead to a variety of skin issues, such as:
  • Irritation;
  • Rashes;
  • Allergic reactions;
  • Breakouts;
  • Dryness, etc.
Not only that – it can also make your skin look dull and aged due to the oxidation process. So, if you want to keep your skin looking its best, be sure to throw away any old or expired makeup!

Become a certified MUA and start booking clients in as little as 2 months

Start your professional makeup training with QC Makeup Academy today

VIEW OUR COURSES

So, How Often Should You Get Rid Of Your Makeup?

Most experts suggest tossing out any makeup that you haven’t used in the last 3-6 months. Of course, the shelf life may vary, depending on the product. (We’ll delve more specifically into different products momentarily!)

In general, though, whenever you purchase any makeup products, be sure to find and note its expiration date. From there, you can make things easier for yourself by setting reminders or writing yourself little notes to remind you when it’s time to toss out your products.

And as we mentioned earlier, it’s also a good idea to regularly check your makeup products for any changes in smell, color or texture. After all, these can all be signs that it’s time to throw them away!

When to Throw Away Makeup Products

When to throw away makeup and skincare products in-post image 3

Where to Find the Expiration Date on Makeup Products

Most makeup products should have an expiration date printed somewhere on the packaging or label. If you don’t see anything that explicitly says ‘expiration date’, then it’s a good idea to check for a ‘best by’ or ‘use by’ date. You should be able to find this by looking at either the bottom, side, or back of the product. This will tell you how long the product is good for and when it should be replaced.

It’s also important to keep in mind that your makeup products may expire sooner if they’ve been exposed to extreme temperatures/humidity or simply haven’t been stored/taken care of properly. When in doubt, replace your products as soon as you can to make sure that your skin stays healthy and free from bacteria!

“Can’t I Simply Clean Old Makeup? Do I Really Need to Throw It out?”

The short answer is no – you should not attempt to clean old makeup products. When it comes to eye shadow, eyeliner, and other products that come in a powder form, the bacteria buildup may be too deep into the product and simply can’t be removed.

Liquid makeup products (such as foundation or concealer) tend to expire much faster due to the bacteria that can form from being exposed to air. When it comes to makeup and skincare products, we always recommend replacing them as soon as they become expired or look like they have been used too much.

Bottom line? When in doubt, throw it out! Not only will this help you stay safe and healthy; it’ll also keep you looking fabulous!

Become a Master International Makeup Professional™ all from the comfort of your own home

Train online with QC’s self-paced certification programs

GET STARTED TODAY

Skincare Products

What Happens to Skincare Products as They Get Old?

Most people don’t realize this, but using expired skincare products can actually be really damaging to your skin. When skincare products get old, the active ingredients start to break down and become ineffective… Meaning that they won’t give you the same benefits as when they were fresh!

Additionally, bacteria can start to form on the surface of the product, which can be really bad for your skin if you don’t clean it off regularly. When this happens, it’s important to throw away the product and invest in a new one.

What Happens When You Use Old/Expired Skincare Products?

Using expired skincare products can cause a number of issues, including:
  • Irritation
  • Breakouts
  • Dryness
  • Allergic reactions
  • Redness
  • Bacterial infections
Furthermore, as we mentioned above, using expired skincare products won’t actually be beneficial for your skin – or helping you achieve the goals you have for your skincare routine. Basically, you should always check the expiration date and replace skincare products as soon as they become expired. This will help keep your skin healthy, safe, and looking/feeling its best!

What is the Shelf Life of Skincare Products?

In general, most skincare products (once opened) have a shelf life of 10-12 months. If left unopened and stored correctly, many skincare products can last up to two years. That said, the shelf life ultimately varies, depending on the type of product and how you store it.

For example, products that come in a pump or spray bottle often have shorter shelf lives than products that come in a jar or tube. Additionally, storing your skincare products in areas with excessive heat or humidity may – and probably will – cause them to expire sooner than expected.

The best way to keep track of your skincare products’ expiration dates is to check the bottom, side or back of the product for a ‘best by’ or ‘use by’ date. Then, set yourself reminders to replace them as soon as they become expired.

Pro Tip: Here are 10 steps to properly understanding skincare labels and ingredients!

Interested in a career as a Skincare Consultant?

Become an International Skincare Consulting Professional (ISCP) in as little as 8 weeks

QC'S SKINCARE COURSE

How to Tell When Skincare Products Have Expired

When it comes to liquids, the product may change in consistency or color – often becoming darker or runnier than usual. For powders and creams, they may become lumpy or discolored. When this happens, they should be immediately thrown away.

Additionally, you may notice a foul odor or a change in the scent of your skincare product when it has expired. This is often an indication that bacteria has started to form on the surface of the product. Again, if this happens, throw it away and invest in a new one.

What Happens if You Get an Infection?

While you may be tempted to just wait it out and hope things clear up on their own, we don’t recommend this. If your skin has become inflamed, red, or irritated after using an expired product, it’s important to see a doctor as soon as possible.

Depending on the severity of the infection, they may prescribe antibiotics or other treatments to help clear it up. Better to be safe than sorry, right?

After all, in some cases, infections caused by using old makeup and skincare products can be serious! For example, staph infections can lead to long-term skin damage and even scarring. So, it’s important to take the immediate, necessary steps towards healing.

How to Make Your Makeup and Skincare Products Last

It all boils down to properly taking care of your products! Here are a few things you can do:
  • Keep them away from heat and direct sunlight
  • Check expiration dates regularly
  • Don’t share or swap old products with friends (as this can lead to bacteria and infections)
  • Store them in a cool, dry place
  • Clean brushes and beauty blenders regularly (with soap and warm water)
  • Throw away expired products immediately
By following these tips, you’ll be able to maximize the shelf life of your makeup and skincare products, as well as avoid any potential infections.

Join the QC Community today

We’ve helped over 8,000+ students and grads launch successful careers in the makeup and skincare industries!

START YOUR CAREER
Hiring a makeup artist Feature Image

Hiring a Makeup Artist: Everything You Need To Know

By Makeup Tips and Tricks No Comments

Updated 2025.

Key Points

  • 3 main benefits of hiring a makeup artist are: they can create a look that’s best tailored to you, they have access to products/techniques/knowledge you may not, and they’ll save you both time and the hassle.
  • The 5 steps for picking a professional makeup artist are knowing what you need done, setting a budget, doing your research, making a list of your top 3-5 choices, and then setting up consultations.
  • In the United States, the average cost for a professional MUA ranges between USD $150-$180.
  • Typically, you can expect to pay anywhere from USD $50-$200+ to get your makeup done professionally – depending on how much you need done.
  • Included in the overall cost should be the initial consultation, a makeup trial, the application itself, and a touch-up (if needed).
  • Before your consultation, ensure to thoroughly research the MUA online so that you’re confident you’ll be hiring someone who truly knows what they’re doing.
  • During the consultation, make sure to ask about: trials, what’s included in their rates, if they have a cancellation policy (and what theirs is), if you can see their contract, and whether or not they’re available the day/time you need them for.
  • Some red flags to watch out for include: MUAs who don’t have insurance, no contract, lateness to the consultation, lack of experience and/or training, little to no online presence, more bad reviews than good, and MUAs who are ONLY self-taught.
  • The 6 main categories for MUAs are: beauty makeup, theatrical and performance makeup, airbrush makeup, TV and film makeup, SFX makeup, and celebrity makeup.
  • You can become a professional MUA yourself in as little as 2 months by enrolling with QC Makeup Academy’s self-paced, online certification training.
Hiring a makeup artist in-post Image 1

Introduction

Is hiring a makeup artist worth it?

Well, picture this: you’re all dolled up for your friend’s wedding. As you take a step back to admire your handiwork in the mirror, you realize that something doesn’t look quite right. Your eyes are puffy, your lipstick is smudged, and your blush is streaky.

Uh oh! It’s time for a wardrobe change – but not before you put on some concealer to cover up those dark circles!

If this sounds like a familiar story, then you know firsthand how important it is to have a good makeup artist on-hand. In this article, we’ll explore everything you need to know about hiring a makeup artist – from the benefits they offer to the key information you should gather before booking with anyone.

Well, picture this… You’re all dolled up for your friend’s wedding, and as you take a step back to admire your handiwork in the mirror, you realize that something doesn’t look quite right. Your eyes are puffy, your lipstick is smudged, and your blush is streaky.

Keep reading for our crash course on hiring a makeup artist 101!

First Thing’s First: What Is a Makeup Artist?

A makeup artist is a professional who uses their creative talents to apply cosmetics and enhance an individual’s appearance. They have the ability to completely transform a person’s look with the stroke of a brush, and they often work in the fashion, film, television, and theater industries.

Makeup artists typically use a wide range of products, including:

  • Foundation;
  • Powder;
  • Concealer;
  • Eye shadow;
  • Eyeliner;
  • Mascara;
  • Lipstick;
  • Lip gloss;
  • Fake eyelashes;
  • Special effects makeup (for film, TV, theatre, etc.);
  • And more!

What Does a Makeup Artist Do?

  • Meet with clients to discuss their specific needs and wants.
  • Create a custom makeup look that meets the client’s individual needs.
  • Apply the makeup using a variety of techniques.
  • Touch-up the makeup throughout the day or evening as needed.
  • Remove the makeup at the end of the event or shoot.

Furthermore, many makeup artists work as freelancers and/or run their own business. As such, they are also responsible for:

Pro Tip: Learn even more about a day in the life of a professional makeup artist!

Become a certified makeup artist yourself in as little as 2 months

Earn a globally-recognized makeup certification with QC Makeup Academy – right from the comfort of home!

VIEW OUR COURSES

How Are Makeup Artists Hired? The 6 Different Types of MUAs

1. Beauty Makeup Artists

Beauty makeup artists typically work in the cosmetics industry. They may be employed by a cosmetics company, department store, or salon. Alternately, they may freelance and/or run their own business.

Either way, their job is to apply makeup. They may also teach people how to properly use cosmetics as well.

Bridal makeup artists are a particularly popular type of beauty MUA. As the name suggests, they specialize in doing makeup for brides (as well as, potentially, bridesmaids and family members) on their big day.

2. Theatrical and Performance Makeup Artists

Theatrical and performance makeup artists are responsible for applying makeup to actors, dancers, and other performers. They often work in live theater or film and television productions.

3. Airbrush Makeup Artists

Airbrush makeup artists use an airbrush gun to apply a thin layer of makeup. This type of makeup is often used in weddings, proms, and other special events. It can also be used in the film and television industry.

4. Makeup Artists for TV and Film

MUAs who work in this field are responsible for creating makeup looks for actors, actresses, and other on-screen talent. This may include special effects makeup as well.

5. Special FX Makeup Artists

These professionals are responsible for creating realistic (or even unreal!) effects using makeup. This might include wounds, bruises, scars, aging, etc. Special FX makeup artists often work in the film and television industry as well.

6. Celebrity Makeup Artists

Last but not least, we have celebrity makeup artists. As the name suggests, these professionals work with celebrities to help them create red carpet-ready looks. They may also work with models, athletes, and other high-profile individuals.

Hiring a makeup artist in-post Image 2

Should YOU Hire a Makeup Artist?

There are countless scenarios in which hiring a professional MUA can help save the day! For instance, maybe you’re getting married and want to look your absolute best for the big day. Or, perhaps you’ve been invited to a gala or black-tie event and need some help creating a glamorous look.

Other times, you might just need a little pick-me-up after a long week. Hiring a makeup artist for a makeup lesson can teach you techniques to help you feel more confident in your everyday makeup routine. Additionally, if you have a big job interview or presentation coming up, having your makeup professionally done can help boost your confidence – not to mention make the right impression on your potential employer or client!

In short, there are lots of reasons why someone might seek out the services of a makeup artist – and there’s no shame in it! Hiring a professional to help you look and feel your best is a smart investment.

Benefits of Hiring a Makeup Artist

Firstly, a professional makeup artist can help you create a look that’s tailored specifically for you!

They’ll take into account your unique features, skin type, and personal style to create a look that flatters you and makes you feel your best.

Secondly, makeup artists have access to the latest products, trends, and techniques!

As such, they know which products work best for different skin types and can help you find the right foundation, concealer, eyeshadow, etc. to suit your needs.

Thirdly, they can save you time and hassle!

They’ll do all the hard work for you. All you have to worry about is sitting back and relaxing while they transform you into a glam goddess!

Become a Master International Makeup Professional™ all from the comfort of your own home

Learn how to start your very own makeup business!

LEARN MORE

How Much Does It Cost To Have a Makeup Artist Do Your Makeup?

The average cost of hiring a makeup artist varies depending on a number of factors, including:

  • Their location;
  • Their experience of the makeup artist;
  • The length of time needed;
  • And the type(s) of service(s) you’re requesting.

“Should I Pay Someone To Do My Makeup? What Will The Cost Be?”

Generally speaking, you can expect to pay anywhere from USD $50-$200+ for professional makeup services. According to Thumbtack, for example, the current national average cost for an MUA in the United States is between USD $150-$180.

However, it’s important to keep in mind that you usually get what you pay for.

For example, if you’re looking for a top-notch MUA to help you create a stunning look for your wedding day, expect to pay on the higher end of the spectrum. On the other hand, if you just need a little help with your everyday makeup routine, you may be able to find someone who charges on the lower end.

Furthermore, it’s also worth noting that many makeup professionals offer discounts for groups. So, if you’re getting your makeup done with a friend or family member, you may be able to save some money!

What’s Included In The Cost?

When hiring a makeup artist, you’re not simply paying for them to apply makeup in a one-and-done situation. Instead, you’re paying for their time, expertise, and access to high-quality products! Typically, the cost of hiring a makeup professional includes:

  • A consultation: This is where you’ll discuss your desired look, skin type, etc. with the makeup artist. They’ll use this information to create a custom look for you.
  • A makeup trial: This is an optional service, but it’s a good idea if you’re hiring an MUA for your wedding day or another major event. During a trial run, they will do your makeup exactly as they would on the day of the event. That way, you can see how you like the finished product and make any necessary adjustments.
  • The actual makeup application: This is the time when the magic happens! Here, your makeup artist will use their skills and expertise to transform you into a glam queen.
  • Touch-ups (if necessary): After the initial makeup application is complete, your MUA will usually do a quick touch-up to ensure that everything looks perfect.

Key Questions To Ask Your Makeup Artist

Before The Consultation

“How professional is their website?”

A professional website is a good indication that the makeup artist is serious about their work and takes pride in their business. It also shows that they’re willing to invest in their career.

“What is their education and/or experience?”

It’s important to hire a makeup artist who has plenty of experience. If they also have some sort of professional training/certification, this is also a great indication that this MUA is the real deal… And will be worth your time and money!

“What are their rates?”

As we mentioned before, the average cost of hiring a makeup artist ranges from $50-$200+. However, it’s important to get an idea of the MUA’s specific rates before booking anything. That way, there are no surprises later on.

“What’s their portfolio like?”

Seeing a makeup artist’s previous work is critical! After all, this will give you a good idea of their style and whether or not they’re a good fit for you.

“Do they currently have any discounts?”

Many makeup artists offer discounts for groups, so if you’re getting your makeup done with a friend or family member, you may be able to save some money.

“Are they on social media?”

Social media is a great way to see what kind of work a makeup artist does on a day-to-day basis. It’s also a good way to get an idea of their personality and see if you’ll be a good fit.

“What do their reviews say?”

Checking out online reviews is always a good idea before hiring any type of professional. That way, you can see what other people’s experiences have been like and get an idea of what to expect.

During The Consultation

“Do you offer trials?”

Not all makeup artists offer trials, but it’s worth asking if they do.

“What’s included in your rates?”

When hiring an MUA, you’re also paying for their time, travel expenses, etc. So, it’s important to know what’s included in their rates.

“What products do you use?”

After all, you want to make sure that you avoid any potential allergies or skin reactions.

“Are you available on the day and time that I’ll need you?”

This is critical! Make sure to ask about the makeup artist’s availability before booking anything.

“Can you do my makeup on site?”

This is mainly important if you need makeup done for a special event. Otherwise, you’ll have to travel to them, which can be inconvenient.

“What is your cancellation policy?”

Life happens, and sometimes things come up that we can’t control. So, it’s important to know the makeup artist’s cancellation policy in case you need to cancel or reschedule.

“Can I take a look at your contract?”

Always, always, ALWAYS read over the contract before signing anything! This will help you avoid any misunderstandings or surprises later on.

“Do you have insurance?”

If anything goes wrong, you want to be covered. If you discover that the MUA does not have any insurance, this should be considered a red flag.

“What makeup look would you suggest for me?”

Although you may come prepared with some inspiration/reference photos, it’s always a good idea to get the makeup artist’s professional opinion. After all, they’re the experts!

“Do you have any questions for ME?”

This is an important one, as it will help them understand your vision and create a look that you love. If they don’t have any questions for you at all, that’s a bad sign.

Fun Fact: Here are 6 questions that a makeup artist should be asking YOU during the consultation!

Hiring a makeup artist in-post Image 3

How To Pick a Makeup Artist in 5 Steps

Step #1: Know What You Need!

Are you looking for someone to do your makeup for your wedding? Or do you just need a makeup lesson? Once you know what you need, you can start the process of finding a makeup artist who can provide that service.

Step #2: Set a Budget!

Before you start reaching out to makeup artists, it’s important to set a budget. Makeup artists typically charge by the hour, so you’ll need to know how much you’re willing to spend. That way, you can avoid any sticker shock later on.

Step #3: Do Your Research!

Use Google, social media, etc. to find makeup artists in your area. Once you’ve found a few MUAs that you like, check out their websites and social media pages to get a better idea of their work.

Step #4: Make a List of Your Top 3-5 Choices!

After you’ve done your research, it’s time to make a list of your top 3-5 choices. Once you have your list, you can start reaching out to the makeup artists to set up consultations.

Step #5: Set Up The Consultations!

Here, you’ll get to meet the makeup artists in person and see their work up close. During the consultation, be sure to ask all of the questions that we listed above. By the time you’re done, you should have a good idea of which MUA is the right fit for you!

Red Flags To Avoid

  • Makeup artists who are underinsured or uninsured. As we mentioned earlier, it’s always a good idea to hire a makeup artist who is insured. That way, if anything goes wrong, you’ll be covered.
  • Makeup artists who refuse to sign a contract. A contract is important because it protects both you and the makeup artist. So, if a makeup artist refuses to sign a contract, that’s a major red flag because it shows that they’re not professional.
  • Makeup artists who are late to the consultation. This is just unprofessional and shows a lack of respect for your time.
  • Makeup artists who are inexperienced or untrained. Hiring an inexperienced and/or untrained makeup artist is definitely a gamble. And while you may get lucky, it’s probably not worth the risk.
  • Makeup artists who have little to no online presence. In today’s day and age, it’s important for businesses to have an online presence. So, if a makeup artist doesn’t have a legitimate website or social media page, that’s a major red flag!
  • Makeup artists who have more bad reviews than good ones. When you’re looking at reviews, it’s important to take the bad with the good. But if a makeup artist has more bad reviews than good ones, that’s definitely something to be aware of.
  • Makeup artists who are only self-taught through YouTube videos. Watching YouTube videos does not make someone a professional makeup artist – FULL STOP! Hiring a self-taught makeup artist is a huge risk because they likely have no formal training. Instead, they’ve only learned the style of “social media makeup”, rather than actually learning the core techniques that’ll allow them to do ANY style of makeup.

Pro Tip: Here’s why YouTube tutorials are NOT the same as professional makeup training!

Join the QC Community today

We’ve helped THOUSANDS students and grads launch successful careers in the makeup industry!

DOWN OUR FREE COURSE CATALOG

So, Is Hiring a Makeup Artist Worth It?

YES, hiring a makeup artist is definitely worth it because:

  • A professional makeup artist has the experience and training to do your makeup exactly the way you want it!
  • Professional MUAs will save you time and hassle!
  • They come with a kit full of high-quality products – products that you likely don’t have access to!
  • Makeup professionals can give you advice on what colors and styles will look best on you!
  • Hiring a makeup artist is a great way to pamper yourself and feel your best on a special day!

How To Become a Makeup Artist Yourself

Perhaps by now, you’re thinking to yourself, “Hey, that sounds like an awesome career… I want to do that!” If so, then we have great news: you can ABSOLUTELY make this happen. What’s more – with the help of QC Makeup Academy, you can make it happen in as little as 2 short months!

With QC’s self-paced, online makeup certification training, you’ll gain all the skills you need to take the beauty industry by storm – all while learning right from the comfort of home, on your preferred schedule! Starting from the date you first enroll, you’ll be given two full years to finish your program. However, since there are NO deadlines or due dates, you get to choose how much or how little of those two years you’ll actually need.

For reference: many of our grads found that they could complete their training and earn their internationally-recognized certification in approx. 2-6 months, simply by dedicating a mere 1-2 hours of their week to their studies!

Hiring a makeup artist in-post Image 4

Hiring a Makeup Artist FAQ

Can I pay someone to teach me how to do my makeup?

Yes, you certainly can! Many professional makeup artists offer personalized lessons to teach you how to apply your own makeup like a pro. These sessions can be tailored to your needs – whether you want to learn everyday makeup techniques, advanced skills, or how to enhance specific features. It’s a fantastic way to get one-on-one instruction and gain confidence in your abilities while using products you’re already familiar with!

How do I find the perfect makeup artist in my area?

Finding the perfect MUA in your area starts with a bit of research. First, check online platforms like Google, Yelp, or social media to find artists with great reviews and portfolios that match your style. Instagram is especially helpful, as many makeup artists showcase their work there.

Next, you can also ask friends or family for recommendations if they’ve worked with someone they love. Once you have a few options, look for testimonials and photos of their work to see if their expertise aligns with your needs. Don’t hesitate to schedule a consultation or trial session to make sure they’re the perfect fit!

How do you interview a makeup artist?

Start by asking about their experience and training to get an idea of their background. Ask to see their portfolio or photos of past clients, too, to understand their style and versatility. It’s also helpful to discuss the types of products they use – especially if you have specific preferences or skin sensitivities.

Furthermore, be sure to ask about their availability on your desired date, as well as any cancellation or rescheduling policies they have in place. Lastly, talk about their rates and what’s included in their packages to ensure there are no surprises later. Remember: this is a two-way conversation—don’t be afraid to share your vision and see if they’re excited to bring it to life!

Become a Certified Makeup Artist

Turn your passion for beauty into a paying, successful career!

START YOUR JOURNEY
Basic skills every makeup artist should know Feature Image

The Basic Skills EVERY Makeup Artist Should Know

By Career Advice, Makeup Tips and Tricks, Your Makeup Career No Comments

Updated 2024.

Key Points

  • Soft skills for makeup artists include listening and understanding clients’ needs, effective communication and rapport-building, remaining calm under pressure, and learning from constructive criticism;
  • Essential hard business skills for makeup artists include marketing and promoting the business, financial management, networking with industry professionals, goal setting, and business planning;
  • MUAs don’t need to excel at drawing, but understanding art can enhance their creativity;
  • You’ll stand out as a makeup artist if you develop a unique style, stay current with trends, maintain a strong, versatile portfolio, and cultivate both excellent communication and interpersonal skills;
  • Important skills for a makeup artist to include on their resume are technical skills (e.g., contouring, color correction, and various makeup styles), certifications from reputable institutions, soft skills (e.g., communication and teamwork), and business skills (e.g., marketing and networking);
  • Educational requirements for a makeup artist are not strict, but professional training is strongly recommended;
  • QC Makeup Academy offers certification with free business training and continuing support for makeup artists.

Introduction

Makeup artists are responsible for making their clients look beautiful, no matter what the occasion. The best makeup artists not only have technical skills – but also a number of other important skills that help them do their job properly. In this article, we’ll discuss the basic skills that every makeup artist should know.

By possessing these specific, key skills, you’ll be able to find true success in the professional beauty industry!

Basic skills every makeup artist should know in-post image 1

Is Doing Makeup a Skill?

A lot of people seem to think that applying makeup is a skill that anyone can do. And while it’s true that literally anyone can apply makeup – not everyone can do it well.

Think about it this way: You wouldn’t trust just anyone to give you a haircut, would you? The same logic applies to makeup! Just because someone knows how to put on a little foundation and mascara doesn’t mean they’re qualified to give you a full-blown makeover!

No, in order to be considered a skilled makeup artist, there’s MUCH more than that required… And this is exactly why professional training is critical to long-term success.

So, let’s take a look at that, shall we?

Pro Tip: Not yet a professional makeup artist? Here’s how to become one, from start to finish!

What Subjects Do You Need to Be a Makeup Artist?

In order to be a successful makeup artist, you’ll need to have a firm understanding of basic artistry and color theory. We’re talking about concepts like shading, highlight, and contouring – along with an understanding of how light interacts with various colors.

You’ll also want to make sure you have a good grasp on hygiene practices (more on that later) and understand the different skin types people have. Oh, and don’t forget about the actual makeup application techniques themselves! The better you are at applying makeup, the happier your clients will obviously be.

See? There’s a lot more to being an MUA than just “putting on some lipstick”.

Learning Via Social Media Vs. Proper Courses

Social Media

Importantly, the knowledge mentioned above isn’t something you can acquire simply by watching YouTube tutorials, or by following social media gurus. Why is this?

Simply put, most of these MUAs – while great at what they do – only know how to apply makeup to their own face. They can’t actually teach you the foundational knowledge required to know how to apply techniques to other faces. Sure, knowing how to create a stunning look on your own face is useful… But clients will have different bone structures, facial features, skin types, skin tones, etc.

If you can’t actually apply your skill to other people, you won’t be much use to them, will you?

Furthermore, most makeup gurus on social media only know how to create the “social media style“. A lot of the time, this style of makeup doesn’t actually utilize professional, classic techniques. As such, it won’t be overly useful in most areas of the professional beauty industry (such as in bridal makeup, editorial makeup, SFX makeup, etc.).

As a makeup artist, you have to be able to create any and every style of makeup the job is asking for – not simply one style. The only way to know how to create any style is by first understanding the core techniques of makeup artistry… And this is where a legitimate makeup school comes into play.

Basic skills every makeup artist should know in-post image 2

Professional Makeup Training

So, what’s the best way to learn how to legitimately do makeup to a professional standard?

The answer is simple: by enrolling in a professional makeup training program!

In a proper makeup course, you’ll learn from qualified instructors who have years (if not decades) of experience in the industry. They’ll be able to teach you everything from the basics of color theory and artistry… To more advanced techniques like airbrushing, special effects makeup, and even henna tattoos.

What’s more, your practical assignments will also give you plenty of hands-on experience working with real models. This is critical, as it’ll give you the chance to put your newly-learned skills into practice. As a result, you can then grow in confidence as you see just how great you’re at doing makeup!

Not to mention, once you graduate, the right makeup course will arm you with an actual certification and professional designation. These will look amazing on your resume – and be sure to impress potential clients and prospective employers alike!

These are just some of the reasons why professional makeup training is so important, and why social media simply can’t compare. If you’re serious about becoming a skilled MUA, make sure to enroll in a quality course… It’ll be the best decision you ever make!

Become a certified MUA and start booking clients in as little as 2 months

Start your professional makeup training with QC Makeup Academy today

VIEW OUR COURSES

Makeup 101: Simple Makeup Skills All MUAs Need to Master

By the time any makeup artist is taking on paying clients, there’s a certain level of subject-matter expertise they’re expected to have. Otherwise, the customer likely won’t be getting their money’s worth – and you probably won’t get a very good review.

For instance, here are just 5 basic skills/techniques you’ll need to master BEFORE booking any jobs:

1 – Skin Prep

The first step to any good makeup look is proper skin prep. This means cleansing, exfoliating, and moisturizing the skin to create a smooth, hydrated base.

If you don’t prep the skin properly, your foundation will look patchy and your concealer won’t stay put. Furthermore, if you don’t know how to identify your client’s skin type, you won’t know the right skin products to put on their skin – let alone the right makeup products!

In other words: take the time to do this step right, and your whole makeup look will be better for it!

2 – Hygiene

As a makeup artist, you’ll be working with all sorts of different people. This means it’s important to always practice good hygiene, both for your own sake and for the sake of your clients! Some key things to remember:
  • Always wash your hands before starting any makeup application
  • Use clean brushes, sponges, and other tools
  • Use disposable applicators whenever possible
  • Never share makeup products with anyone
  • Disinfect your workstation before and after every application
By taking these simple precautions, you can help prevent the spread of bacteria and illness – and keep yourself (and your clients) healthy and happy!

3 – Color Correcting

Color correcting is a technique used to neutralize discoloration on the skin. This can be anything from dark circles to redness, hyperpigmentation, or even bruises!

Makeup artists use color theory to determine which concealer shades will cancel out specific types of discoloration. For example: green concealer is typically used to neutralize redness. On the other hand, yellow concealer can help cancel out dark under-eye circles.

If you don’t know how to color correct, your concealer will just end up looking muddy and won’t do a very good job of hiding imperfections. As a result, your client’s skin will look uneven and their makeup will appear cakey and heavy. To avoid this, make sure you know the basics of color correcting before taking on any clients!

4 – Color Matching

Once you’ve prepped and corrected your client’s skin, it’s time to start matching them to the right foundation shade.

This might seem like a no-brainer, but you’d be surprised how many makeup artists get this step wrong. The wrong foundation shade can completely throw off the rest of your client’s makeup – and make them look either washed out or overly made-up. To avoid this, it’s important to take the time to identify your client’s skin tone and then find their perfect foundation match.

If you don’t have a product that already matches their skin tone, don’t worry! Your training will equip you to mix and match your foundations in order to createthe color they need!

5 – Eyebrows

Eyebrows are arguably one the most important feature on the face. As a makeup artist, it’s your job to make sure they look their best! This means knowing how to shape your client’s brows, fill them in, and highlight them properly.

It also means being able to identify the different eyebrow shapes and determine which one will suit your client’s face the best. If you don’t know how to do all of this, your client’s eyebrows will end up looking uneven, sparse, and just plain bad.

(And let’s be honest – no one wants that!)

So, if you’re serious about becoming an MUA, make sure you put in the time to master the art of eyebrow shaping. Once you’ve got that down, the rest will be a breeze!

Pro Tip: Watch QC Makeup Academy alumnus and certified MUA, Amanda Ramey, as she demonstrates how to create realistic eyebrows (starting with no brows at all!).

Basic Soft Skills Every Makeup Artist Should Know

Now that we’ve gone over some of the basic technical skills every makeup artist should know, let’s talk about the soft skills you’ll need to be successful in this industry.

While hard skills are important, they’re not the only thing that will make you a great makeup artist. In order to really excel in this field, you’ll need to possess certain soft skills as well. Some of the most important soft skills for MUAs include the ability to:

  • Listen to and understand your client’s needs
  • Communicate effectively with your client
  • Build a respectful, positive rapport with your clients
  • Stay calm under pressure
  • Embrace and learn from constructive criticism

Learn everything you need to launch your very own business in as little as 2-6 months

Every QC Makeup Academy certification course comes with FREE business training

DOWNLOAD OUR FREE COURSE CATALOG

What Hard Skills Does a Makeup Artist Require to Run Their Own Business?

There are also certain hard business skills every MUA should have if they want to be successful long-term:

  • Market and promote your business
  • Manage your finances
  • Network and build relationships with other industry professionals
  • Set goals and create a business plan

Basic Makeup Skills FAQ

Do you need to be good at drawing to be a makeup artist?

A: No, you don’t need to be good at drawing to be a makeup artist. However, being able to understand and visualize different types of art can help you create better makeup looks.

For example, if you’re doing a period-inspired look, being familiar with classic paintings can give you a great starting point for your design. Similarly, if you’re creating a modern or avant-garde look, knowing about contemporary art styles can help you come up with something truly unique!

Of course, at the end of the day, the best way to improve your skills is simply by practicing as much as possible. The more looks you create, the better you’ll become at understanding what works and what doesn’t.

So, even if you don’t consider yourself to be particularly “artistic”, don’t worry – you can still become a great makeup artist. The key is to simply never stop practicing, and to always be open to new ideas!

What makes a makeup artist stand out?

A: You need to combine your technical skills and creative artistry with outstanding soft skills. First and foremost, developing a signature style or unique approach to makeup that highlights your creativity can set you apart.

Additionally, staying updated with the latest trends and continuously honing your skills through education and practice will keep your techniques fresh and innovative. A strong portfolio showcasing your versatility and expertise is crucial to attracting new clients.

Finally, cultivating excellent communication and interpersonal skills will help you build lasting relationships with your clients. As a result, you’ll then create a memorable experience that encourages repeat business and referrals!

What should I list for my makeup artist skills on my resume?

A: When listing your makeup artist skills on your resume, it’s important to highlight both your technical AND soft skills. Under technical skills:
  • Mention your proficiency in various makeup techniques (such as contouring, color correction, foundation matching, and eyebrow shaping);
  • Demonstrate your versatility with a range of makeup styles (like bridal, editorial, or special effects);
  • If you have training or certification from reputable institutions, such as QC Makeup Academy, be sure to include that as well.
In the soft skills section:
  • Emphasize abilities like effective communication with clients, active listening, flexibility, and maintaining a calm demeanor under pressure;
  • Highlight your ability to work collaboratively with a team and your commitment to ongoing learning and professional development;
  • Showcase any relevant business skills, such as marketing or networking, as this can also be advantageous for MUAs interested in managing or building their own business.

What are the educational requirements for a makeup artist?

A: While there are no strict educational requirements in order to become an MUA, formal training is highly recommended to build a foundation strong enough to withstand the professional, competitive world of makeup artistry. In fact, many successful makeup artists choose to get professionally trained and certified through reputable programs.

By enrolling in a professional school like QC Makeup Academy, you can gain comprehensive knowledge and skills that are crucial for a long, thriving career. QC Makeup Academy offers a variety of courses, covering everything from foundational techniques to advanced, specialized skills. Certification from such a well-regarded institution not only enhances your credibility – it also sets you apart in a competitive industry, opening doors to numerous career opportunities.

Plus, with QC Makeup Academy, you benefit from free business training and a supportive online community, thus ensuring you’re fully prepared to succeed as a professional makeup artist!

Become a Certified Makeup Artist

Build your skills in makeup artistry today!

START YOUR CAREER