
You’ve completed your makeup training—now it’s time to work on building your makeup artistry portfolio! Whether it’s on your Instagram or website, we know you always want to post beautiful, perfect photos. For professional portfolios, though, having high-quality, gorgeous images that capture your skills is crucial. With Photoshop and other editing software so readily accessible, it can be very tempting to create the perfect picture on your computer, even if it is wasn’t exactly at that level when you uploaded it from your camera. While virtually every professional photo has undergone some editing, you can avoid Photoshop fails and misrepresenting your work by following these tips!
Keep retouching specific
If a strand of hair has fallen over your model’s face, then it’s completely OK to remove it during editing. Cleaning up the small details will make your shot look professional, without seeming fake.
But don’t change the overall appearance of the photo by blurring or smoothing the image. This will just distort the makeup, and make it difficult for the viewer to pick up on the fine details. And changing the appearance of your model is also a major misstep! Don’t erase skin texture or fine lines as viewers will be able to tell that these edits were made. Keep touch ups very specific and only for tiny errors like stray hairs or a spot on your model’s shirt.

Don’t change the actual look!
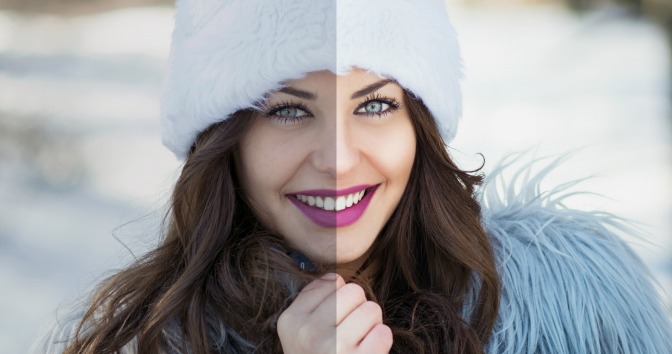
The point of the shots in your makeup artistry portfolio is to show off your makeup, so make sure it’s actually your application in the photo! Editing makeup mistakes like an uneven lip liner or foundation that wasn’t blended properly can be obvious, and it does nothing to show off your true skills. Likewise, don’t intensify the color of eye shadow or lipstick, or add contouring that wasn’t originally there. This is just being dishonest in what you are presenting and your clients deserve better than that! Rather than editing mistakes after the fact or including images of looks that aren’t perfect, just practice your makeup artistry skills—and your photography—until your work is giving you the results you want.
Keep the Focus
If you have a gorgeous shot but you caught some bad lighting and your image turned out just a little too bright or a tad dark, subtly changing the lighting is totally fine. Make sure you keep it as natural as possible, and only make adjustments as far as they relate to the look.
You can also crop your photo to edit out unnecessary space or peripheral details that could distract from the great makeup artistry that you’re trying to show off. If the shot was taken outdoors, or really anywhere other than against a neutral background, you might decide blur the area surrounding your model. This will make your look stand out in contrast to the background, but you don’t have to change anything about the focus of the photo. Make sure you never use the blur tool on skin—even subtle blurring will give your makeup an unnatural Barbie-doll vibe, rather than making it look smoothed out.
Stay Professional
Remember that these shots are for your professional makeup artistry portfolio, so make sure they look the part! Heavily filtered or saturated images may be fine for Instagram, but they have no place in your professional body of work. Your portfolio is intended to present your skills as a makeup artist, not your talent with applying filters. Keep the makeup as the focus in every shot and prospective clients will be able to really see what you can do!

Keep it Simple!
Don’t worry about buying expensive photo editing software now (or possibly ever!). The changes you’ll be making should be subtle, and can be applied using free or inexpensive tools. Save yourself a headache down the road, and make sure you’re saving your files in a size and format that preserves the quality of the image. You don’t want to run into a situation where you need to drastically expand or compress a photo and have the content of the image distorted as a result.
When in doubt, risk under- rather than over- editing an image. A photo with few to no touch ups will look natural and, depending on your aesthetic, could provide a cool contrast to the heavy editing done by other MUAs.
We’ve written about how to take good makeup photos before, but knowing what to do after you’ve got the shot can be just as important! Keep the focus on the makeup application, and avoid the temptation to get too fancy with your editing. After all, your beautiful looks should always speak for themselves!