Eye Shadow Looks: Key Points
- Always adjust eyeshadow placement based on your unique eye shape.
- Choose colors that complement your eye color to make them stand out.
- Use the right brushes and tools to achieve clean, blended results.
- Follow a simple five-step method: primer, base, crease, liner, and drop shadow.
- Avoid common mistakes like skipping primer, starting too dark, or overusing glitter.
Introduction
Eye shadow can completely change the way your makeup looks. The right colors and techniques can make your eyes appear bigger, brighter, and more defined. In this guide, you’ll learn more than just how to apply eyeshadow—we’ll cover how to choose the right shades for your eye color, how to work with different eye shapes, and which tools will give you the best results!
Additionally, you’ll also get a step-by-step eye shadow tutorial, expert tips, and a full breakdown of the most common mistakes to avoid. Every section will include clear visuals so you can follow along with ease.
So, keep reading to discover the best eyeshadow looks, complete with tutorials, charts, and expert tips to elevate your artistry!
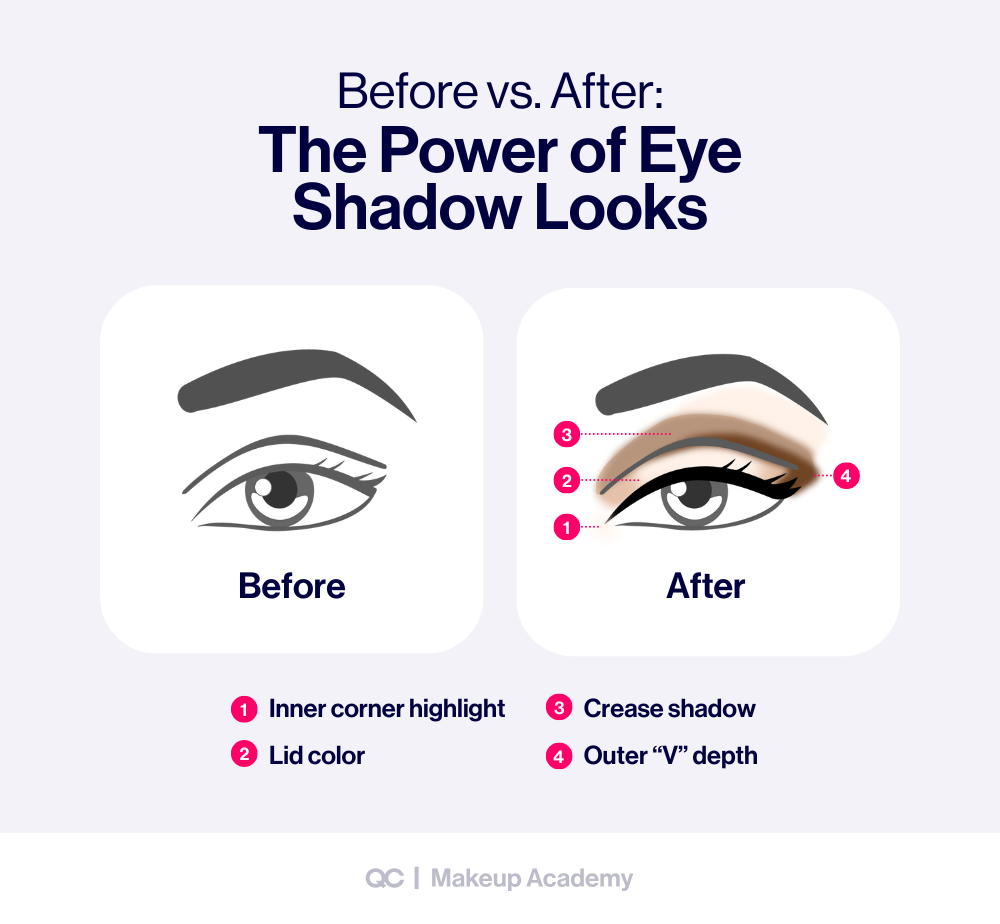
The way you apply eye shadow can transform your entire face. Great eye makeup looks can:
- Draw attention to your eyes
- Balance your features
- Express your personality
- Match your style to any occasion
If you’re an aspiring makeup artist, mastering eyeshadow looks is a MUST! After all, clients often ask for specific styles (e.g., smokey eyes, natural looks, or bridal makeup). Knowing how to create these looks step-by-step builds trust and shows your skill.
And if you’re an everyday makeup wearer? Learning the basics of how to apply eyeshadow will save you time, boost your confidence, and help you look polished in minutes.
Understanding Eye Shapes and How They Influence Eyeshadow Looks
Fun Fact: The shape of your eyes changes how shadow looks when applied. Knowing your eye shape helps you place color in the right spots/where it flatters you most and avoid common mistakes. This is the first step to mastering eye shadow looks.
Remember: the goal is to bring out your natural beauty while keeping your look balanced.
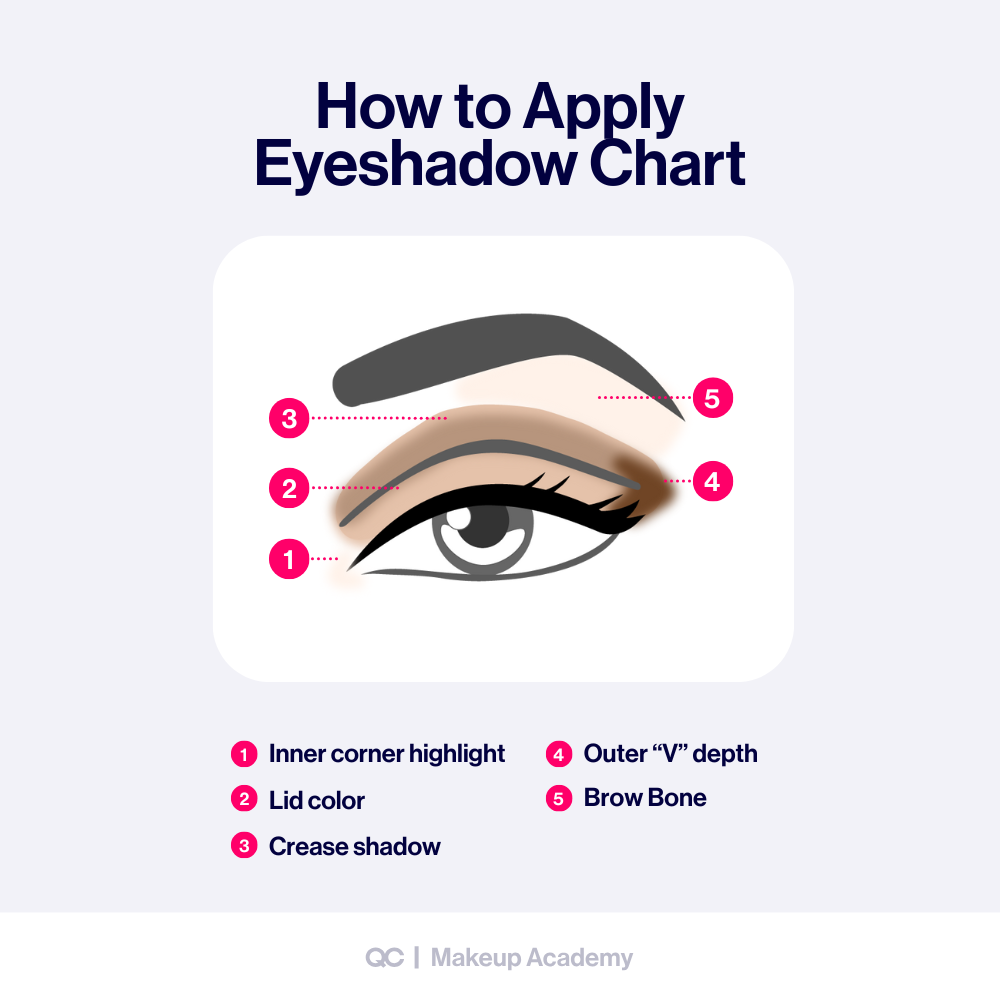
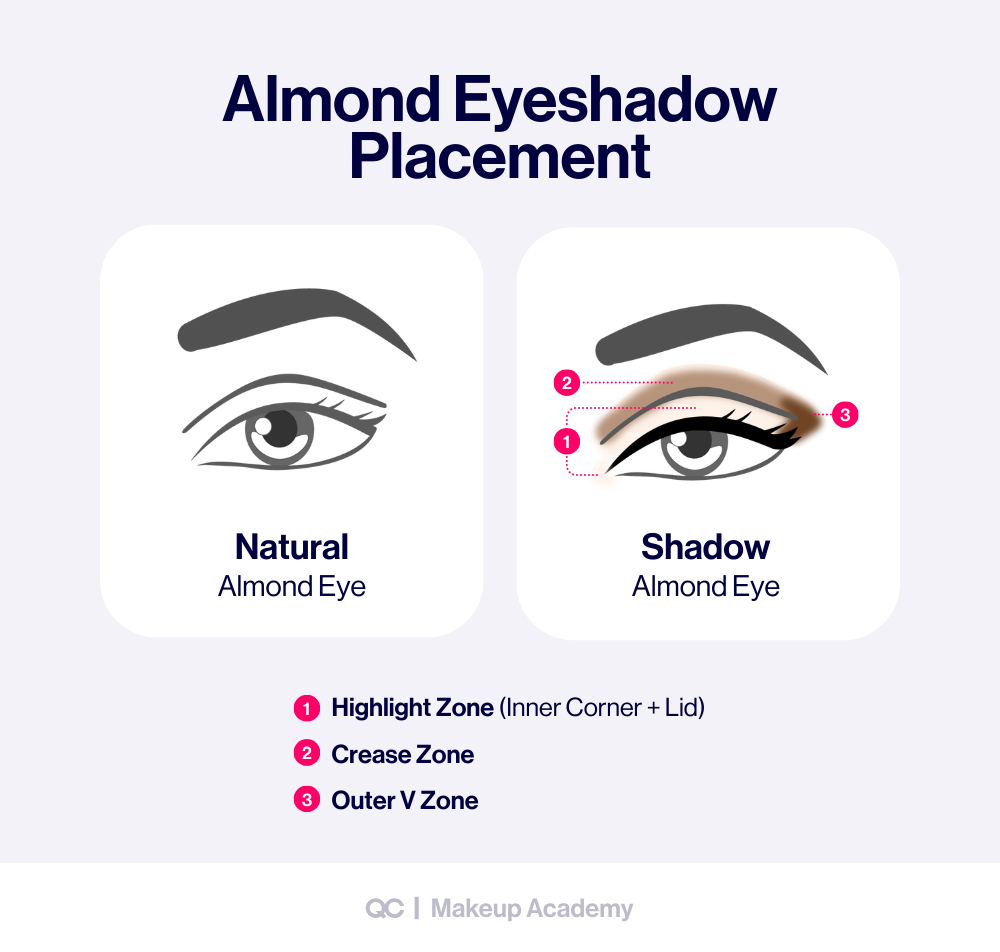
Almond Eyes
Almond eyes are balanced and slightly upturned at the outer corners. This shape works well with almost any eye makeup look.
TIPS:
- Place light shadow on the lid to brighten.
- Blend a mid-tone through the crease.
- Deepen the outer corner with a darker shade.
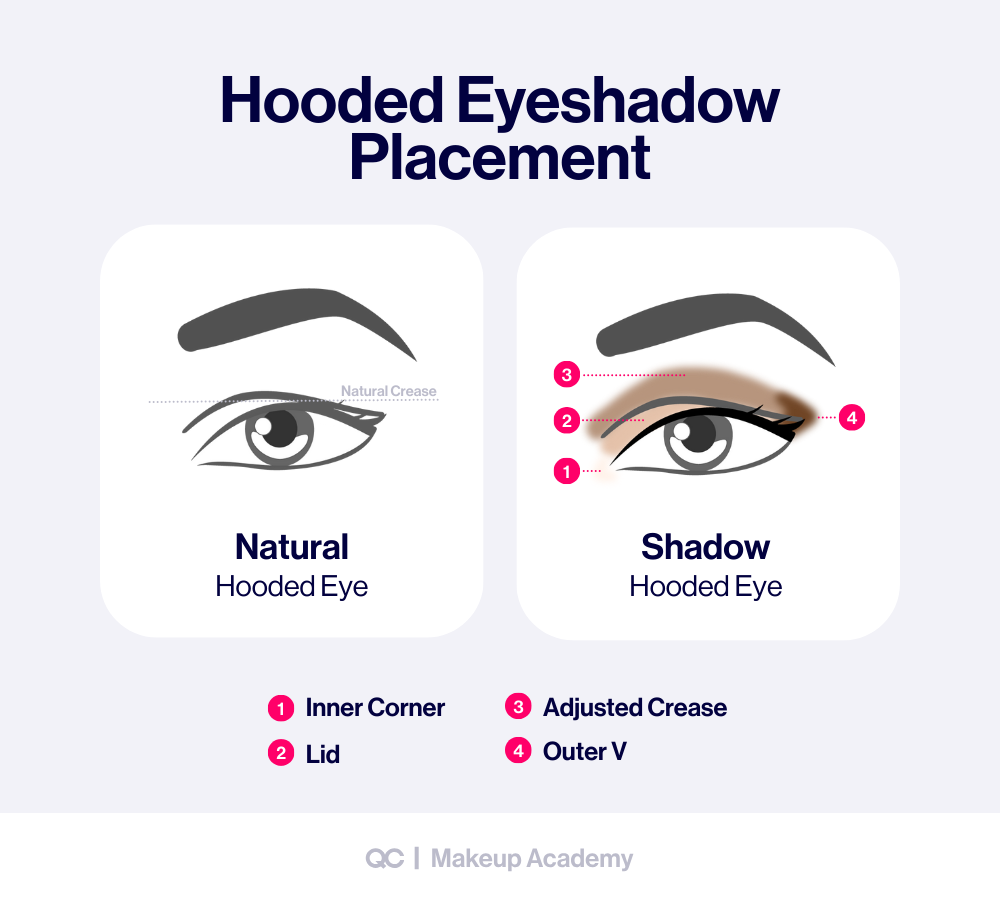
Hooded Eyes
Hooded eyes have extra skin folding over the crease, which can hide shadow placement.
TIPS:
- Use matte shades in the crease to reduce the look of heaviness.
- Apply shadow slightly above the natural crease so the color shows when eyes are open.
- Keep shimmer to the lid or inner corner.
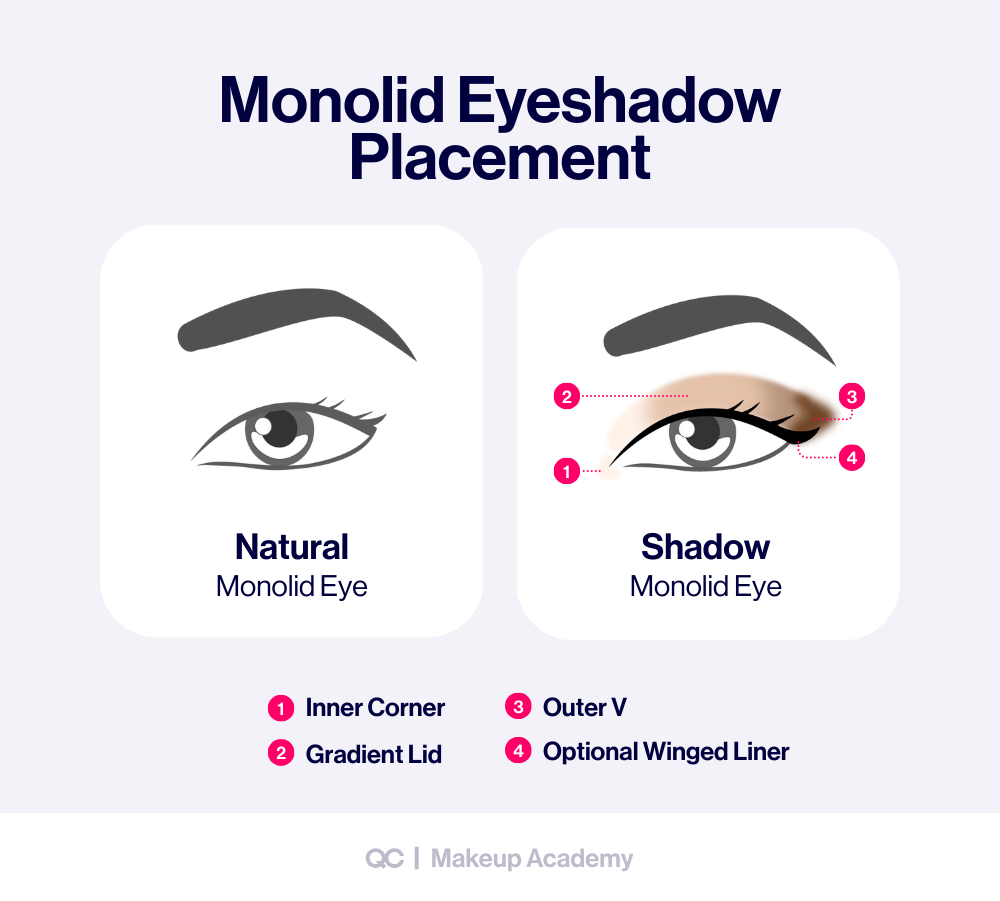
Monolids
Monolids do not have a visible crease. The lid space is smooth and flat.
TIPS:
- Build depth with gradient shading: light at the inner corner, medium in the center, dark at the outer edge.
- Use small, precise brushes for detail.
- Winged eyeliner can help elongate the eyes.
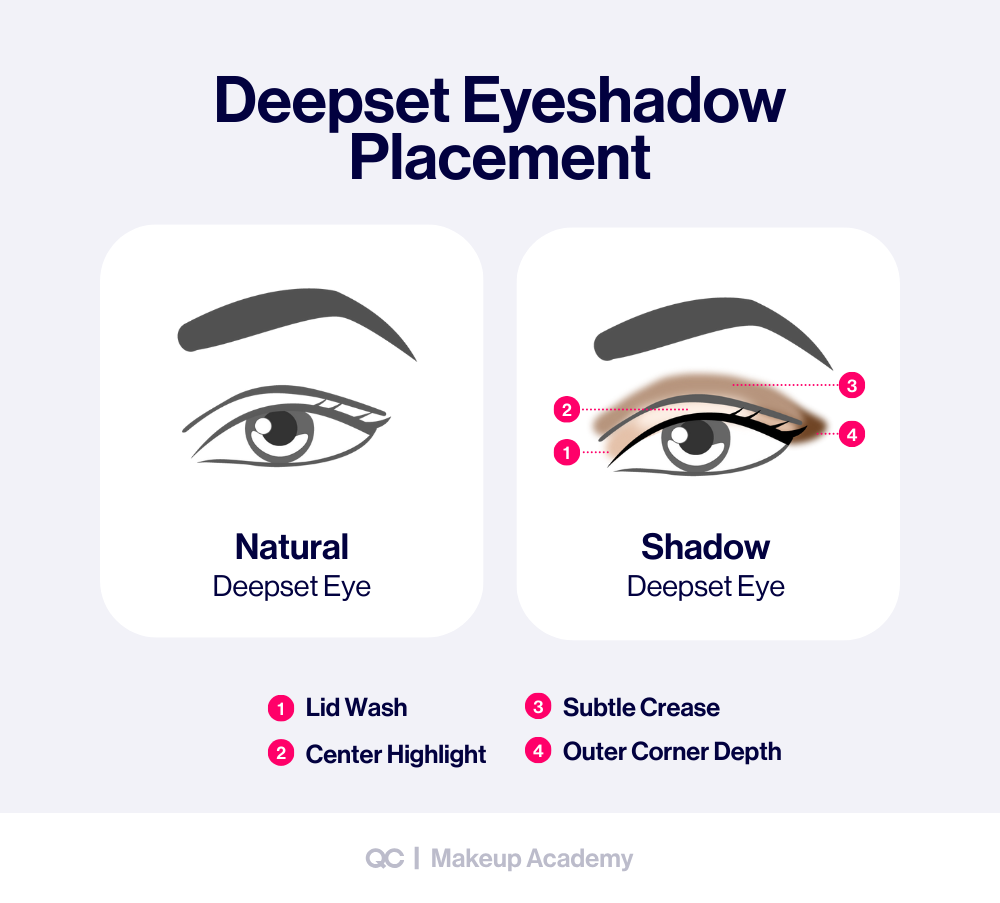
Deep-Set Eyes
Deep-set eyes sit further back in the socket, often with a strong brow bone.
TIPS:
- Stick with medium shades across the lid to bring eyes forward.
- Avoid going too dark in the crease, as it can push the eyes back even more.
- Add shimmer or highlight on the lid to create dimension.
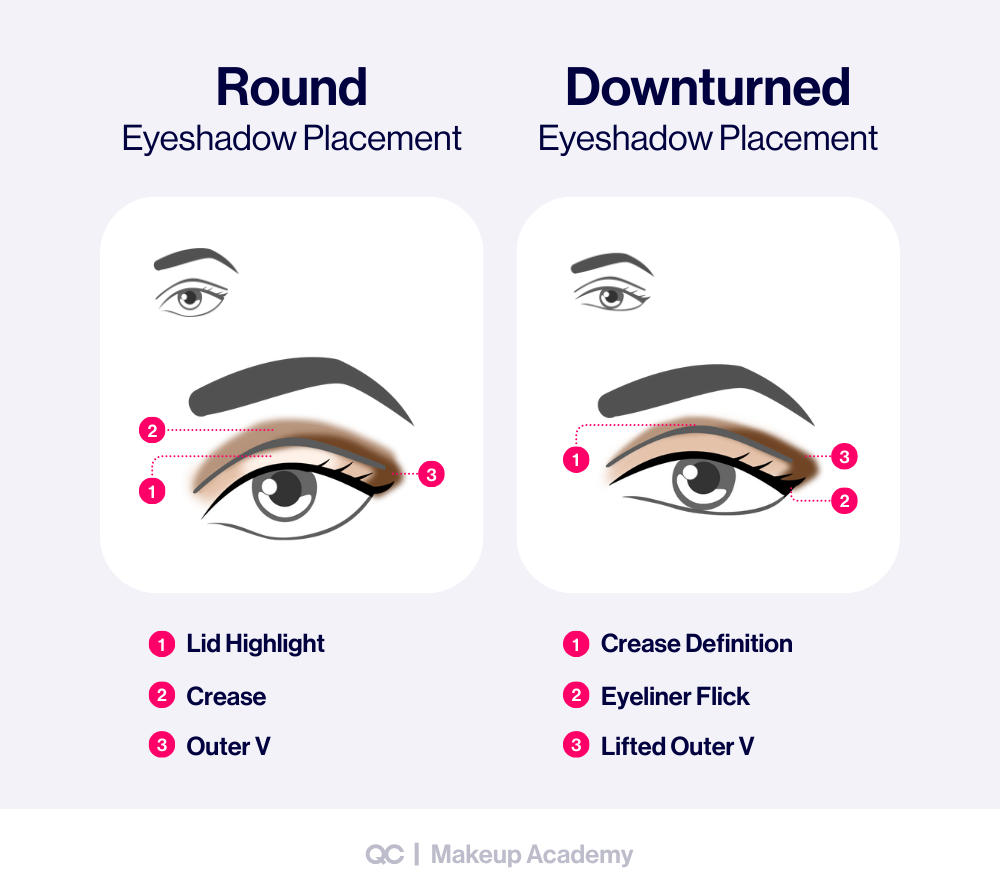
Round & Downturned Eyes
Round eyes look open and youthful, while downturned eyes slope slightly downward at the outer corners.
TIPS:
- For round eyes: use darker shades on the outer corners to elongate the shape.
- For downturned eyes: lift the look with upward blending at the outer V.
- Eyeliner flicks angled slightly upward can help balance.
Choosing Eye Shadow Colors That Complement Eye Color
The colors you choose for your eyeshadow can either make your eyes pop or leave them looking dull. By using shades that complement your natural eye color, you can create eye makeup looks that stand out in the best way. Moreover, once you know your best shades, you can mix, match, and experiment with confidence!
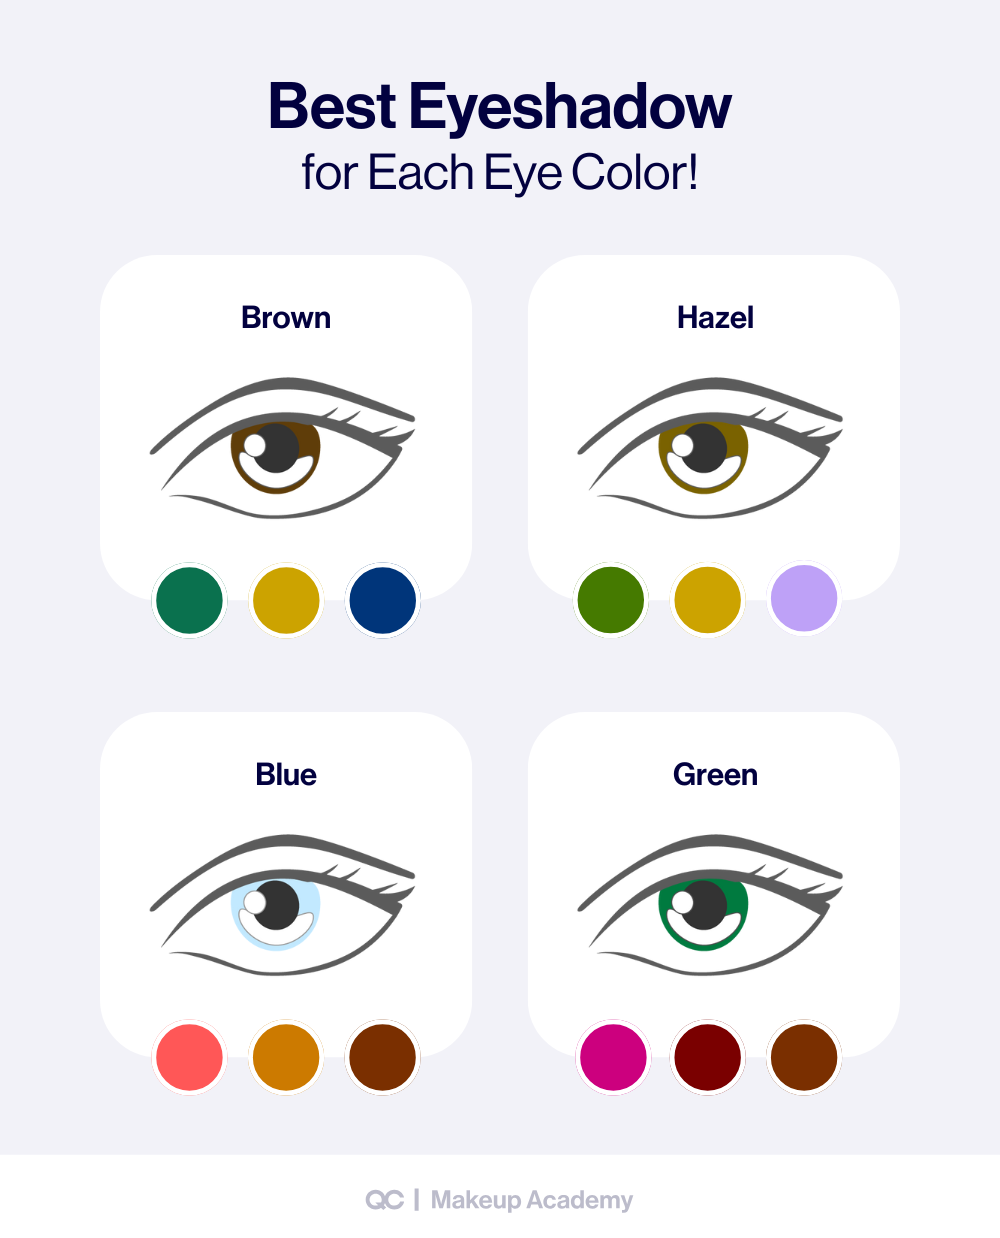
Blue Eyes
Blue eyes look brighter with warm shades that create contrast.
- Copper, bronze, and warm browns
- Peach and coral shades
- Oranges and terracotta tones
Green Eyes
Green eyes stand out with rich, red-based or purple tones.
- Plum, burgundy, and wine shades
- Soft purples and mauves
- Warm browns with red undertones
Brown Eyes
Brown eyes are the most versatile. Almost any color works, but some shades make them glow.
- Gold, bronze, and metallics
- Navy and deep blues
- Emerald green or teal
Hazel Eyes
Hazel eyes shift between green and brown, so flexible shadow choices work best.
- Gold and olive tones
- Warm purples
- Neutral browns to balance both undertones
Master Eye Shadow Looks and SO Much More
Get hands-on training, right from the comfort of home!
Essential Brushes & Tools for Step-by-Step Eyeshadow Application
The right brushes make all the difference in how your eyeshadow looks. On the other hand, using the wrong tool can cause harsh lines or muddy blending. With just a few key brushes, you’ll be able to apply and blend eyeshadow like a pro!
Flat Shader Brush
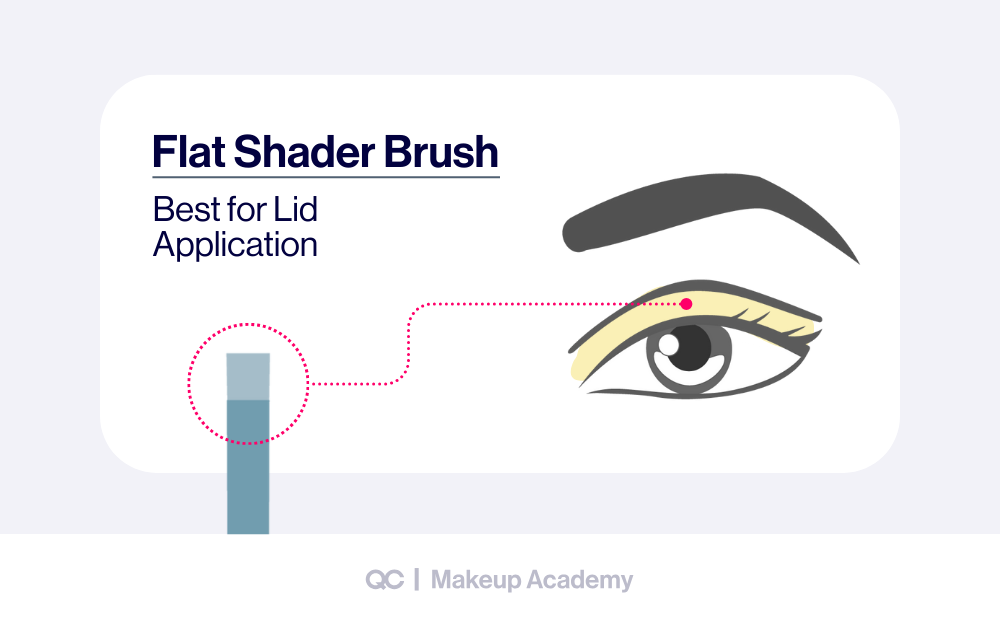
This brush is dense and flat, perfect for packing color onto the lid.
- Best for bold pigment and shimmer shades
- Use patting motions for maximum color payoff
Fluffy Blending Brush
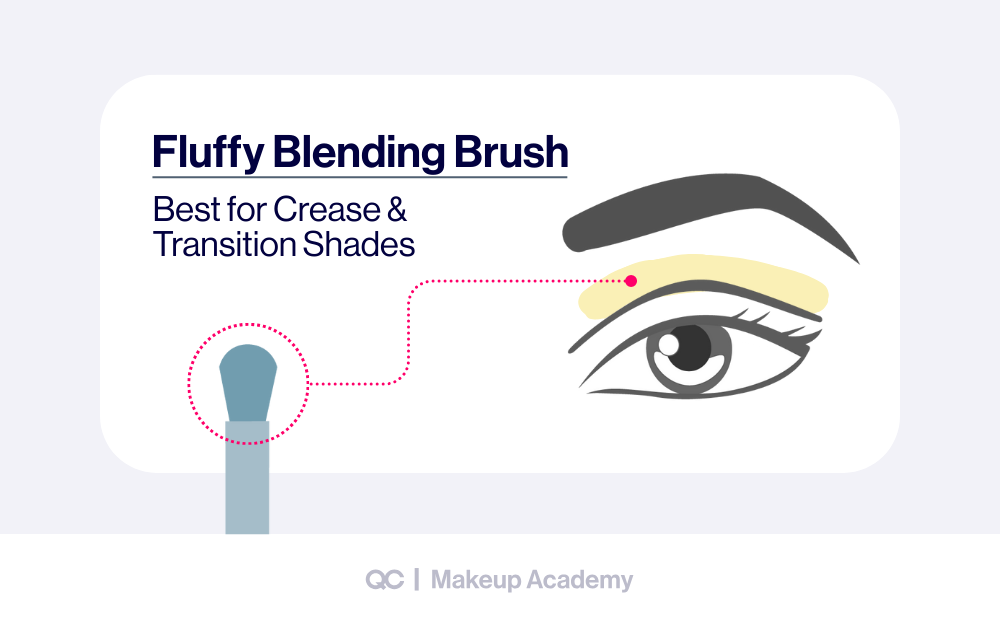
A soft, rounded brush for applying transition shades in the crease.
- Creates smooth gradients between colors
- Ideal for diffused blending
Angled Brush
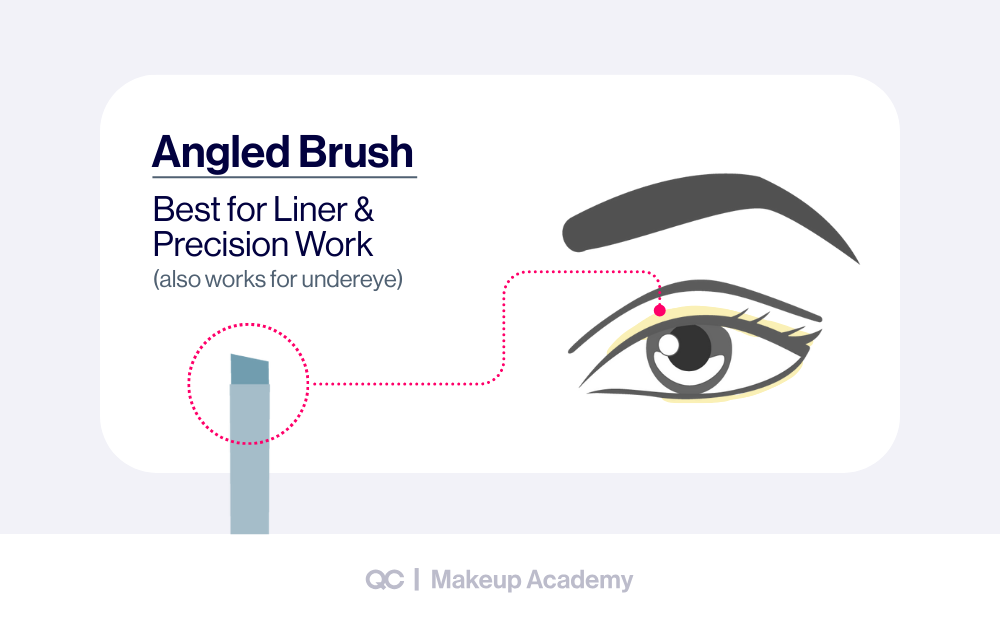
Thin, angled brush with firm bristles.
- Great for eyeliner application with powder or gel
- Can also define brows or lower lash line
Pencil Brush
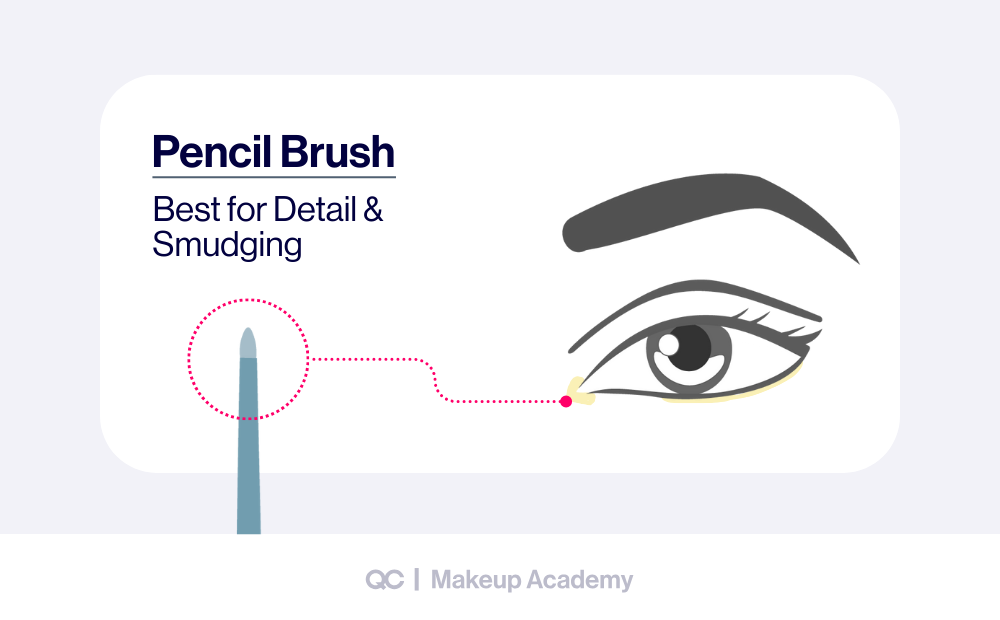
Small, rounded tip for precision work.
- Perfect for smudging shadow under the lower lash line
- Can add highlight to inner corners or brow bone
Smudger Brush (Optional but Helpful)
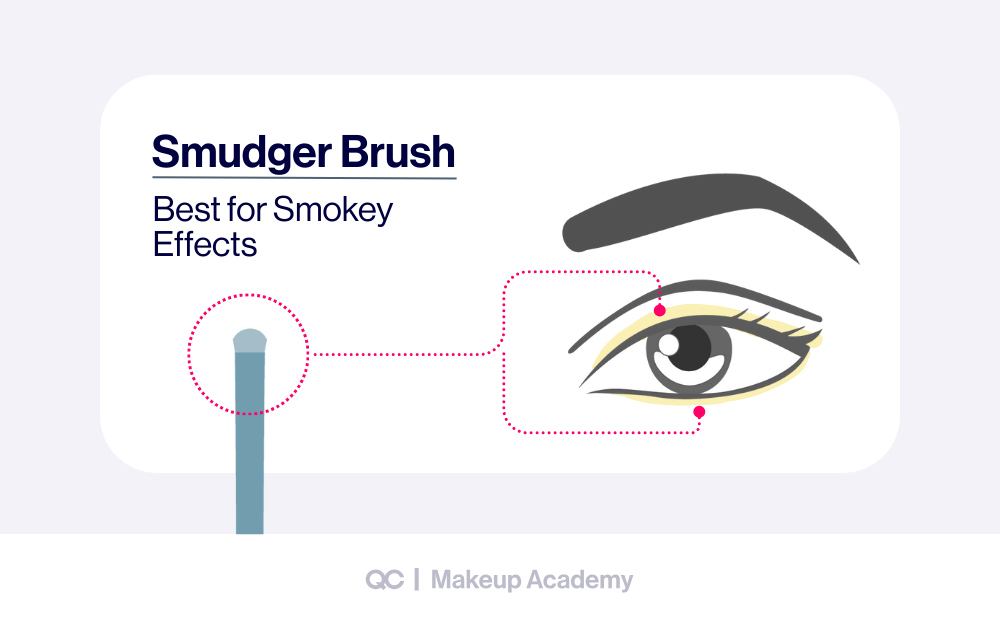
Small, rounded tip for precision work.
- Perfect for smudging shadow under the lower lash line
- Can add highlight to inner corners or brow bone
With these tools, you can follow any step by step eyeshadow tutorial and get professional results!
Step-by-Step Eyeshadow Tutorial: 5 Things You Need To Master
Following a step-by-step eye shadow process makes application easy, whether you’re going for a natural day look or a bold glam finish. Below are the five key steps, based on expert techniques from QC Makeup Academy’s executive instructor, Nathan Johnson. Each step will have its own graphic so you can see exactly where to place your product.
Step 1: Prime Your Lids
Primer creates a smooth base, evens out skin tone, and makes your shadow last all day.
TIPS:
- Use a concealer brush to paint primer from lash line to brow bone.
- Blend evenly so there are no streaks.

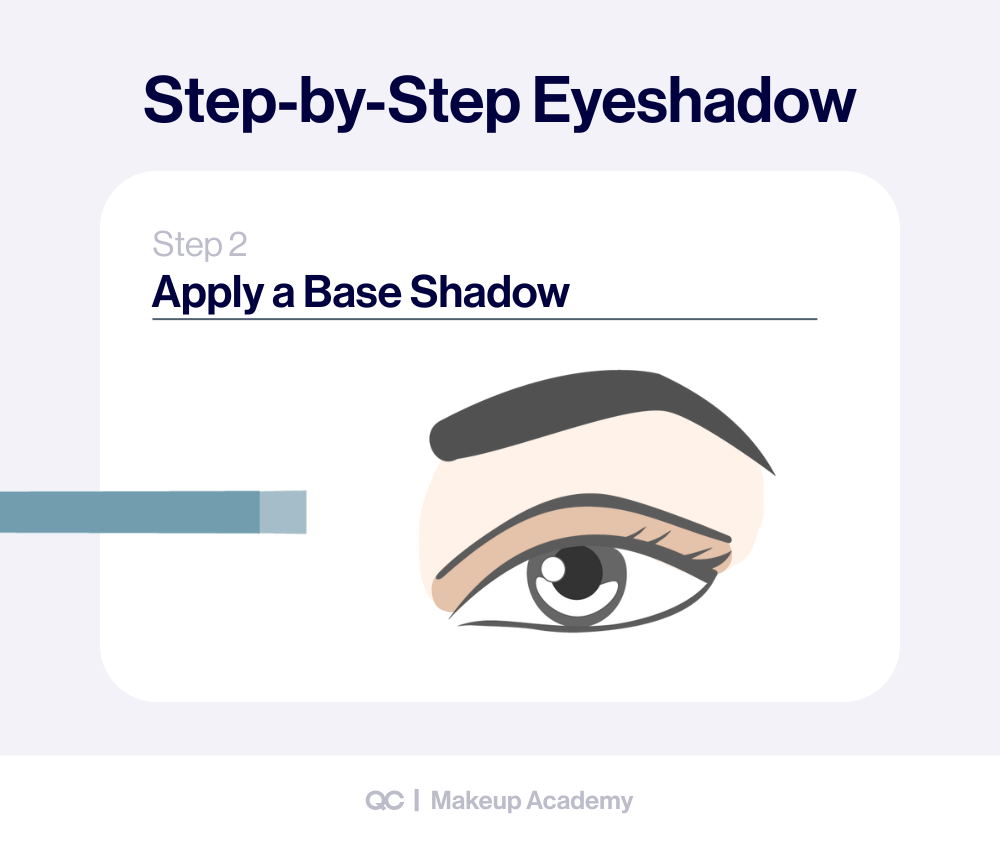
Step 2: Apple a Base Shadow
A neutral base shade helps lock in primer and gives you a clean canvas.
TIPS:
- Use a flat shader brush to press a natural shade onto the lid.
- Start at the inner corner (where you want brightness) and work outward.
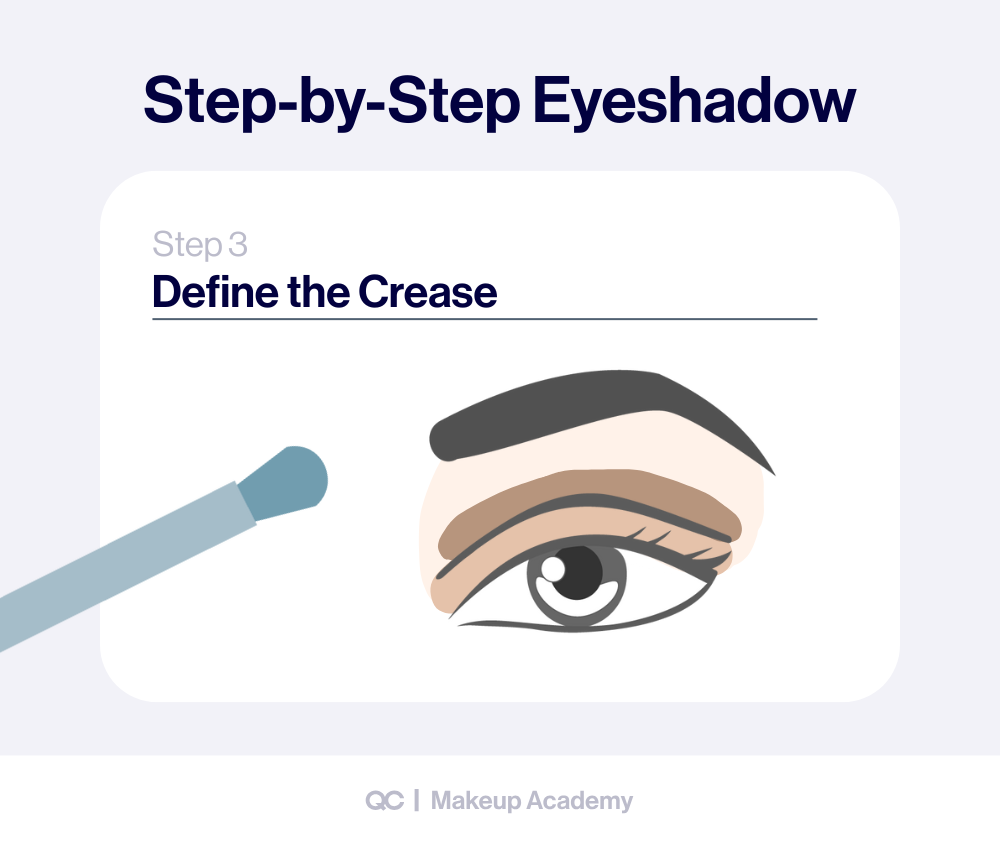
Step 3: Define The Crease with a Mid-Tone Shade
Adding depth in the crease shapes the eye and makes blending easier.
TIPS:
- Use a fluffy blending brush with a taupe or mid-brown.
- Sweep back and forth in soft arcs (“windshield wiper” motion).
- Extend slightly beyond the outer corner for lift.
”One of the trademarks of a beautiful makeup application is the blend. Fluffy brushes are what deliver that. So, never be afraid to go in a few times and blend.
Nathan JohnsonCelebrity Makeup Artist & QC Makeup Academy Executive Instructor
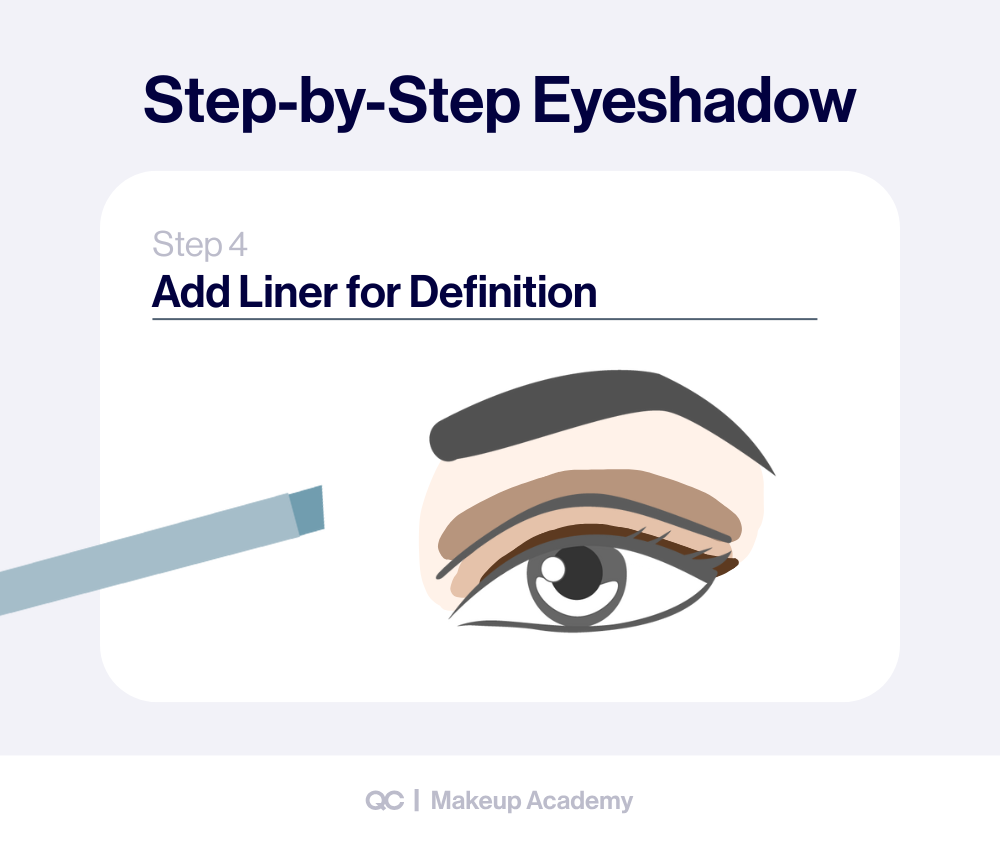
Step 4: Add Liner for Definition
Liner frames the eye and makes lashes appear fuller.
TIPS:
- For a soft look, press your powder liner into the lash line with an angled brush.
- For more drama, use gel or liquid liner.
- Extend slightly at the outer edge for lift.
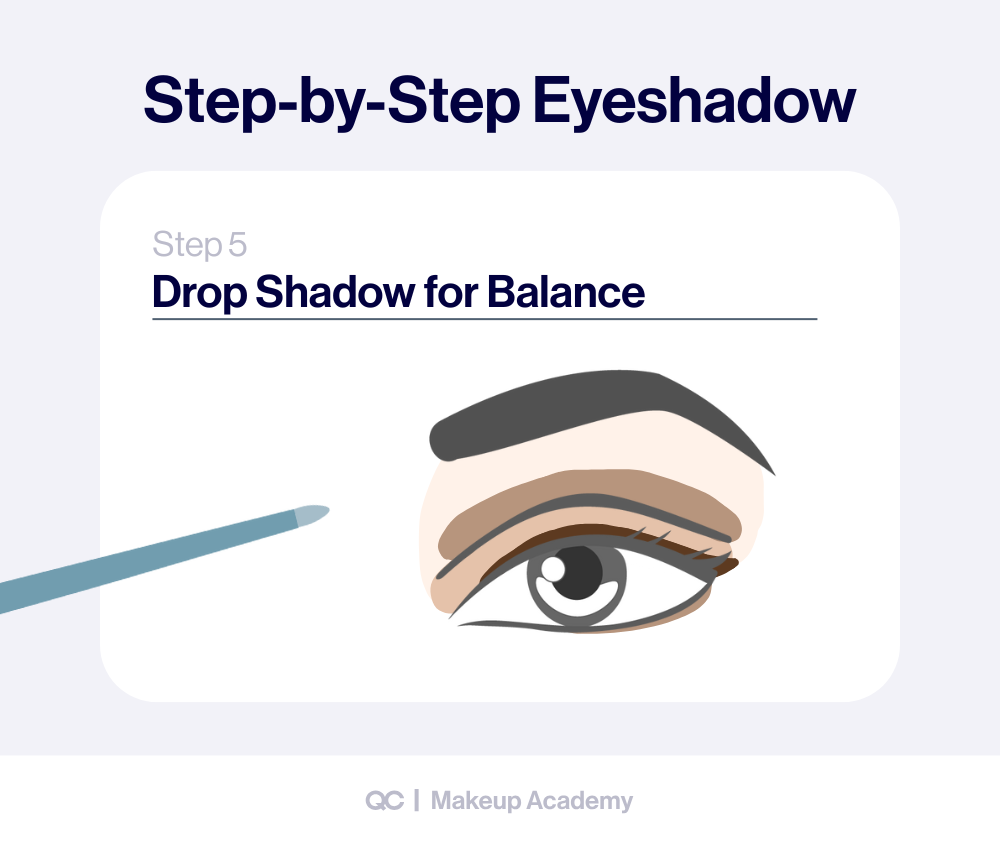
Step 5: Create a Drop Shadow
Adding shadow under the lower lashes balances the look and makes lashes appear thicker.
TIPS:
- Use a pencil or smudger brush with taupe or soft brown.
- Apply from the outer corner to just under the pupil.
- Keep it diffused, not heavy.
Pro Tips for Flawless Eye Shadow Looks
Once you’ve mastered the basic steps, the right pro techniques will take your eye makeup looks from good to stunning! These tips will help you blend like a professional, avoid harsh lines, and make every eye shadow look polished. Not to mention, they’ll give you the polished finish that sets professional eye shadow looks apart from beginner attempts.
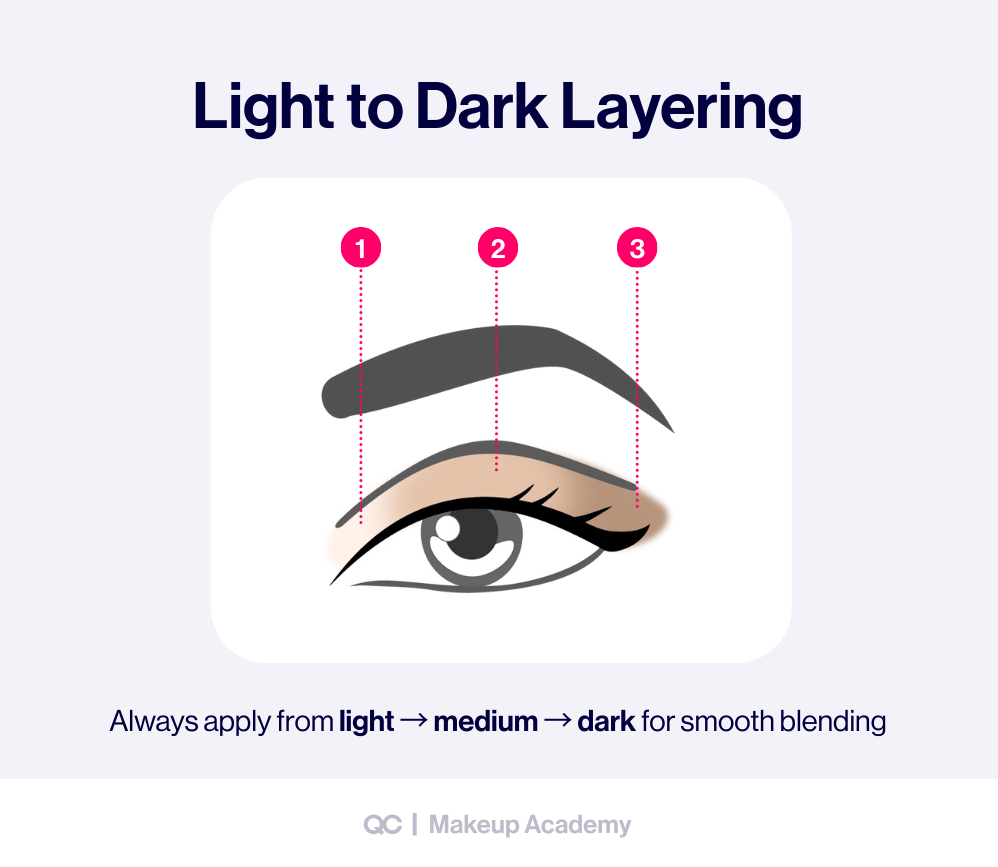
Tip 1: Always Work from Light To Dark
Start with lighter shades and gradually layer darker colors. This makes blending easier and prevents harsh lines.
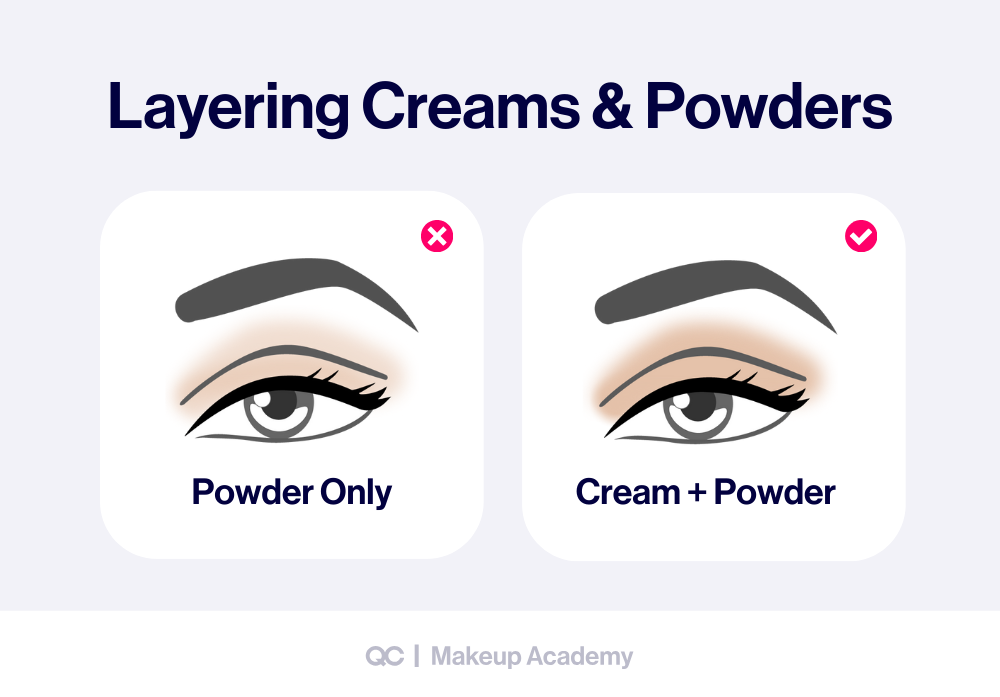
Tip 2: Layer Creams and Powders
Using a cream shadow base under powder can make the color more intense and longer-lasting.
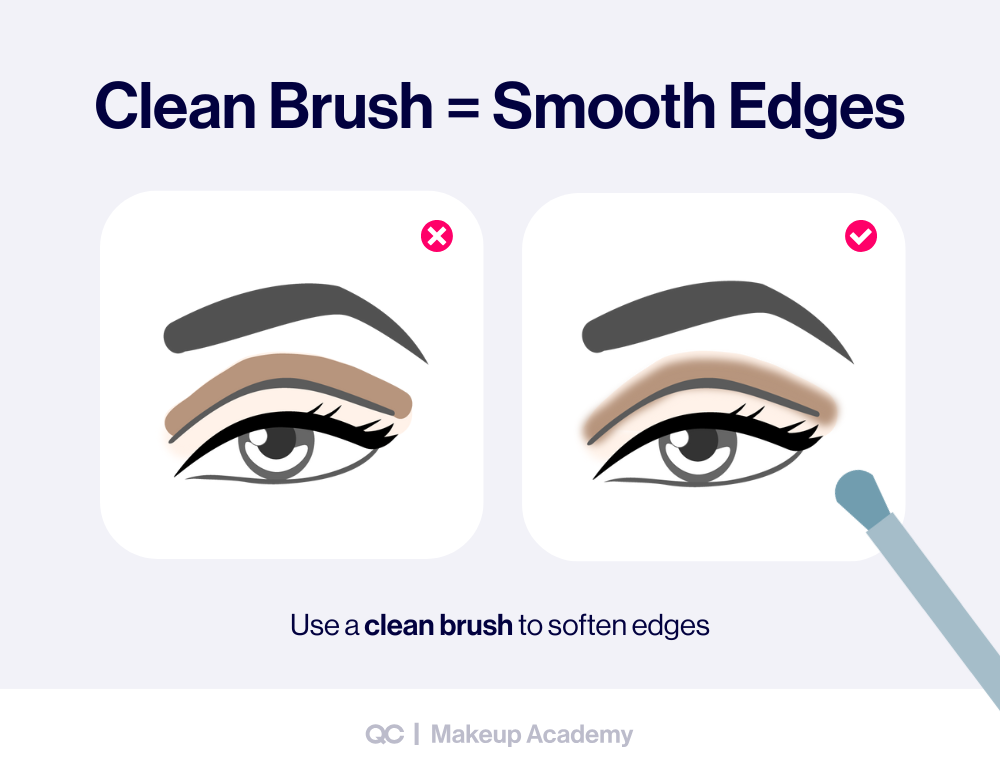
Tip 3: Blend with a Clean Brush
After applying shadow, use a separate clean fluffy brush to diffuse edges. This softens transitions without muddying colors.
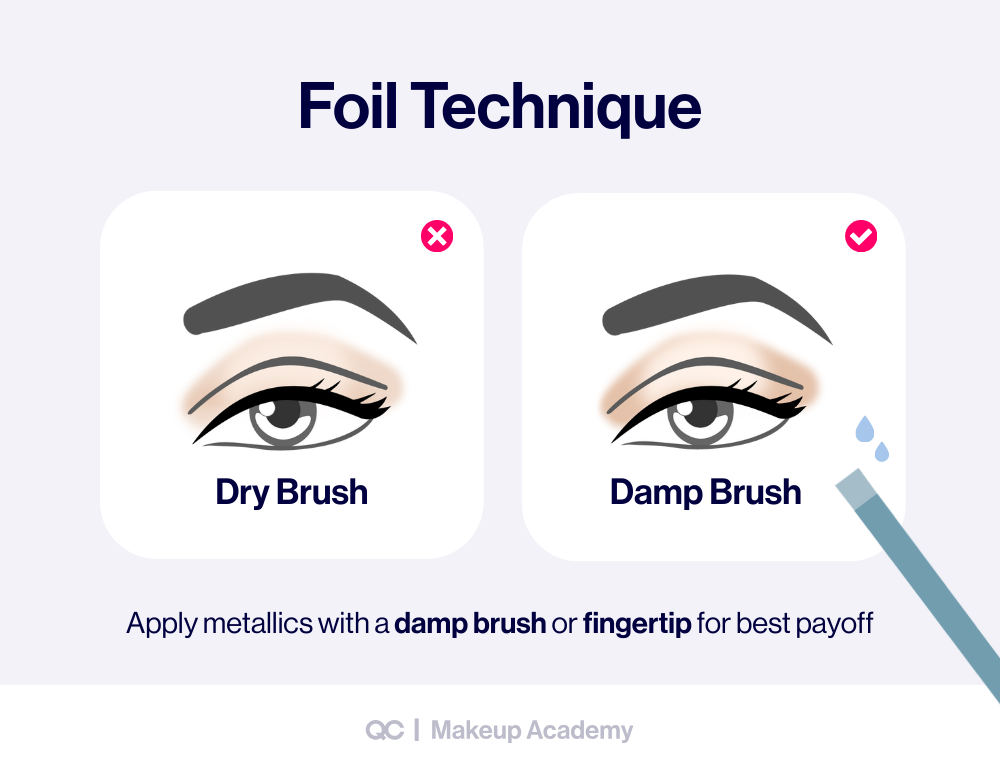
Tip 4: Use Metallics and Foils Correctly
Apply metallics/foiled shadows with a damp flat brush or your fingertip for best payoff.
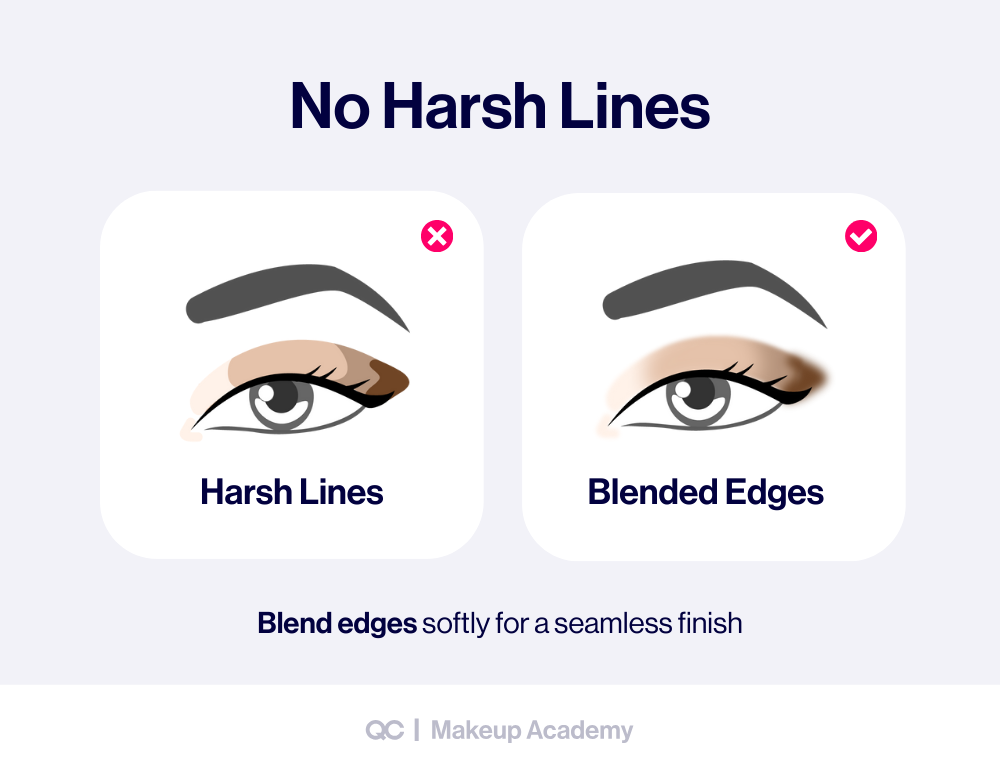
Tip 5: Avoid Harsh Lines
Harsh cutoffs make shadows look unblended. Always extend edges softly outward with blending motions.
Common Eyeshadow Mistakes to Avoid
Even if you follow a step by step eyeshadow tutorial, small mistakes can make your look less polished. Below are 15 of the most common eye shadow mistakes—and how to fix them. Avoiding these mistakes will instantly elevate your eye makeup looks, whether you’re creating a natural style or going full glam.
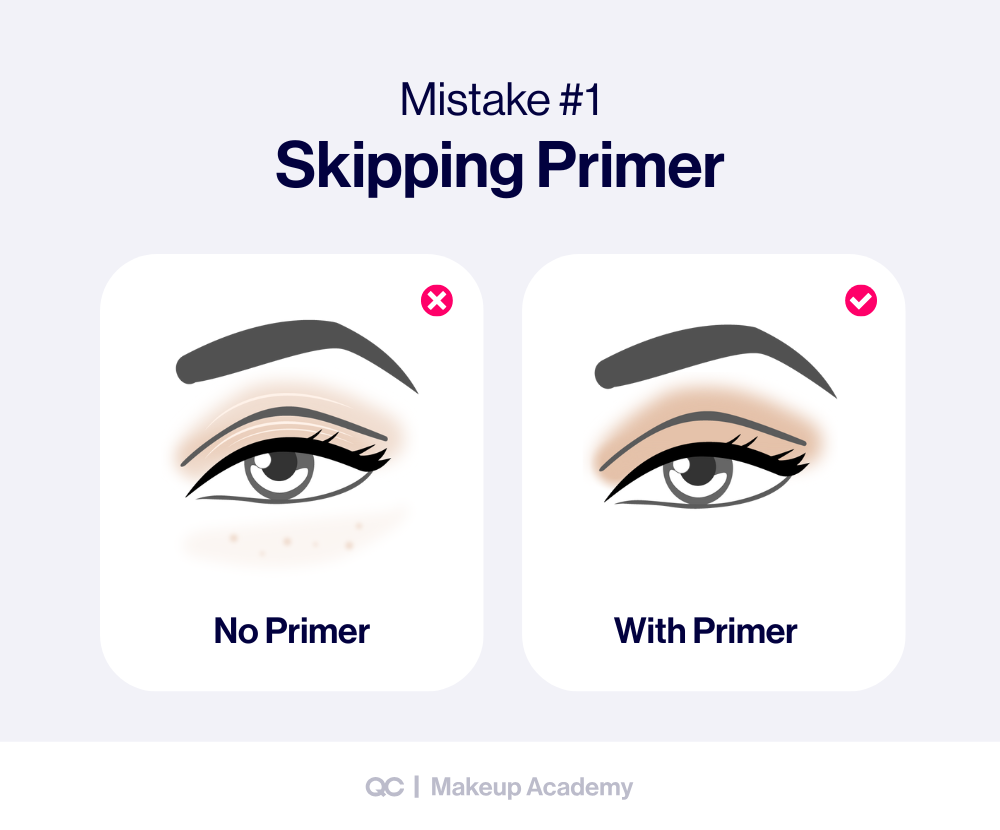
Mistake #1: Skipping Primer
Skipping primer is one of the fastest ways to ruin even the best eye shadow looks. Without it, oils from your skin break down the shadow, causing creasing and fading within hours. Furthermore, primer also evens out skin tone and grabs onto pigment so your colors appear brighter.
Always apply a thin, even layer of eyeshadow primer from lash line to brow bone BEFORE your first shade.
Mistake #2: Using Concealer Instead of Primer
Concealer is made to cover blemishes, not prep your eyelids. When used as a base, it tends to cake, crack, and change the color of your shadows. It also doesn’t control oil the way a primer does.
For smooth, long-lasting results, stick to an actual eyeshadow primer or a product made specifically for lids.
Mistake #3: Overloading the Brush with Product
Dipping too heavily into your palette leads to fallout, harsh application, and wasted product. A good rule: pick up a little at a time. Gently dip the tip of your brush, then tap off the excess before applying. It’s easier to build color than to erase it!
Become a Professional Makeup Artist
Earn your certification + book your first client in just 2 months!
Mistake #4: Not Tapping Off Excess
Similarly, this goes hand-in-hand with overloading your brush. If you don’t tap off the extra powder, it falls onto your cheeks and under-eye area, essentially ruining your base makeup (if you did the skin first).
Instead, get in the habit of giving your brush a light tap after each dip into shadow—it makes cleanup much easier.
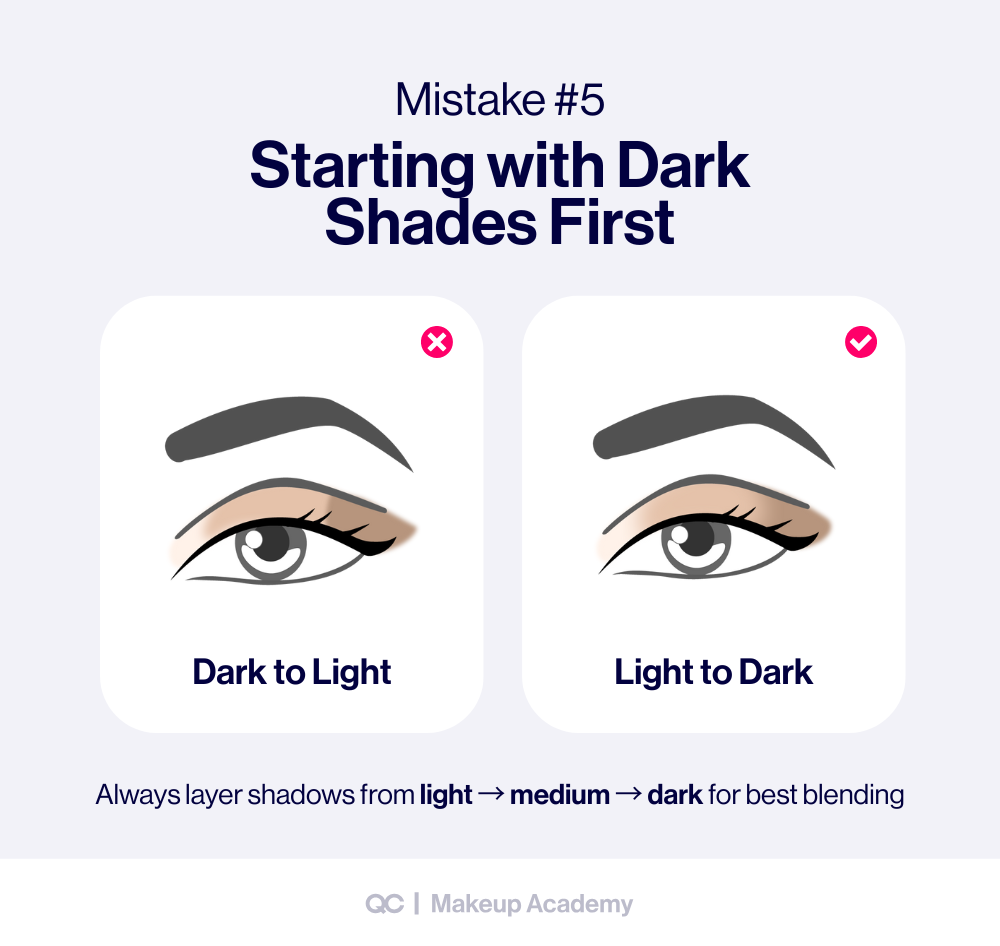
Mistake #5: Starting with Dark Shades First
If you start with your darkest shade, you’ll have a tough time blending it out. Dark pigments are harder to soften and can leave patchy spots. Thus, always follow the “light to dark” rule: apply lighter transition shades first, then layer darker tones gradually to build depth. This makes your blending smoother and your eye makeup look more professional.
Mistake #6: Applying Shadow Too High Toward Brow Bone
Unless you’re going for a bold editorial look, shadow shouldn’t reach all the way up to your brows. This makes eyes look heavy and messy. Instead, keep your darkest shades in the crease and outer corner, then apply a subtle highlight just under the brow bone to lift and open the eyes.
Mistake #7: Ignoring Eye Shape
Not every eyeshadow technique works for every eye shape! What flatters almond eyes may not work for hooded or monolid eyes. To create balanced eye makeup looks, adjust your placement. For example, hooded eyes often need color placed slightly above the crease, whereas monolids look best with gradient shading across the lid.
Mistake #8: Using the Wrong Brush
Each brush has a purpose. A flat shader is meant to pack color, while a fluffy brush blends it out. If you try to blend with a dense shader or apply detail with a huge blending brush, your results won’t look clean.
For this reason, we suggest investing in a few quality brushes and learning their uses. You’ll instantly see an improvement!
Mistake #9: Not Blending Enough (or Over-Blending)
Both under-blending AND over-blending can ruin a look. Not blending leaves visible lines between colors, while over-blending muddies shades together. The trick: blend edges until they’re smooth, but stop before the colors lose their definition. Using a clean brush for final blending can help keep the look crisp.
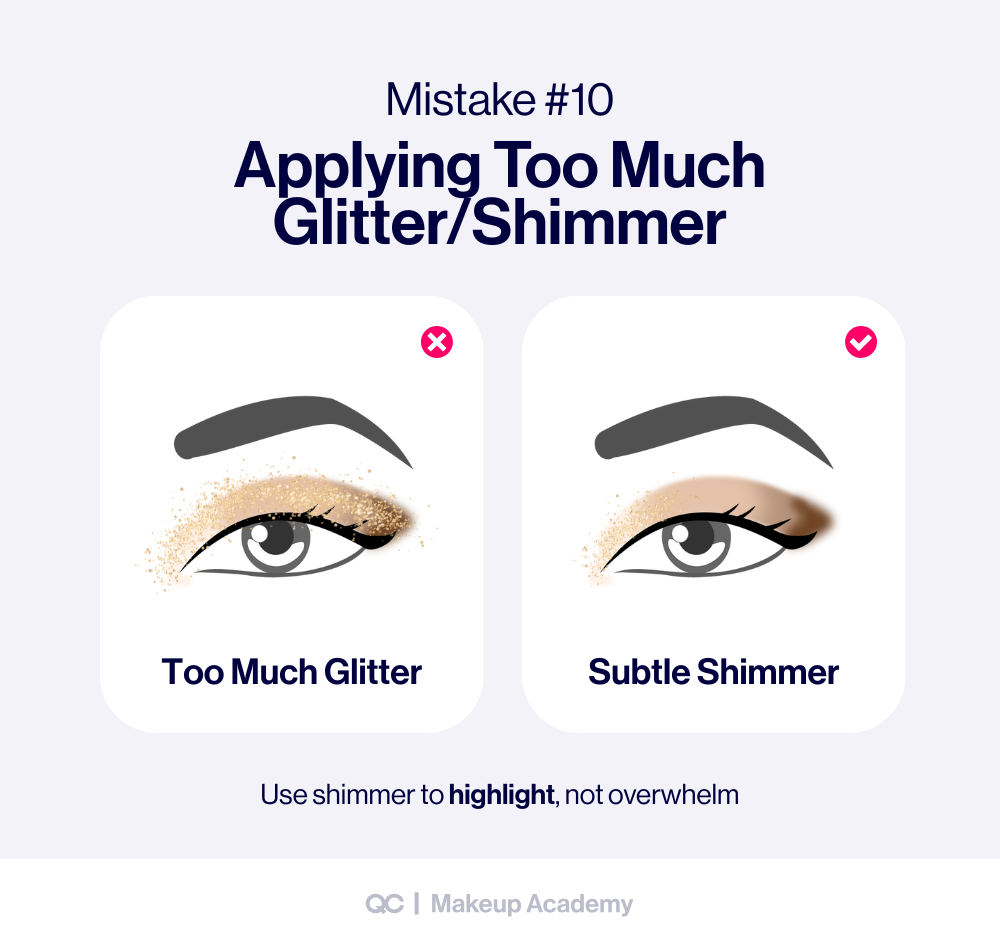
Mistake #10: Applying Too Much Glitter or Shimmer
Shimmer and glitter can be gorgeous, but too much can overpower your look and highlight skin texture. Keep shimmer shades on the inner corner or lid center for brightness. Use matte or satin finishes in the crease and outer corner for balance. This way, shimmer enhances your look instead of overwhelming it.
Mistake #11: Forgetting to Highlight Inner Corner & Brow Bone
These small touches make a BIG difference! A light highlight in the inner corner opens up the eyes and makes them look awake. A subtle highlight under the brow bone lifts the eye area and completes the look. Skipping them can leave your makeup looking unfinished.
Mistake #12: Skipping Shadow on the Lower Lash Line
Only applying shadow on the top lid makes the eyes look unbalanced. On the other hand, adding a touch of shadow under the lower lash line ties the look together and gives depth. The key is to keep it soft! Use a pencil or smudger brush and stop under the pupil for a natural effect.
Mistake #13: Using Only One Shade
A single shade on the lid can look flat. Dimension comes from layering at least three tones: a light base, a mid-tone in the crease, and a darker shade in the outer corner. This creates depth and makes the eyes appear bigger and more defined.
Mistake #14: Heavy Eyeliner Hides Shadow Work
A thick, harsh line of eyeliner will often (and unintentionally) wind up hiding all the blending work you did with your shadows. Instead, try pressing powder liner into the lash line with an angled brush for a softer effect. If you love a bold line, keep it thin and precise so it enhances the shadow rather than covering it!
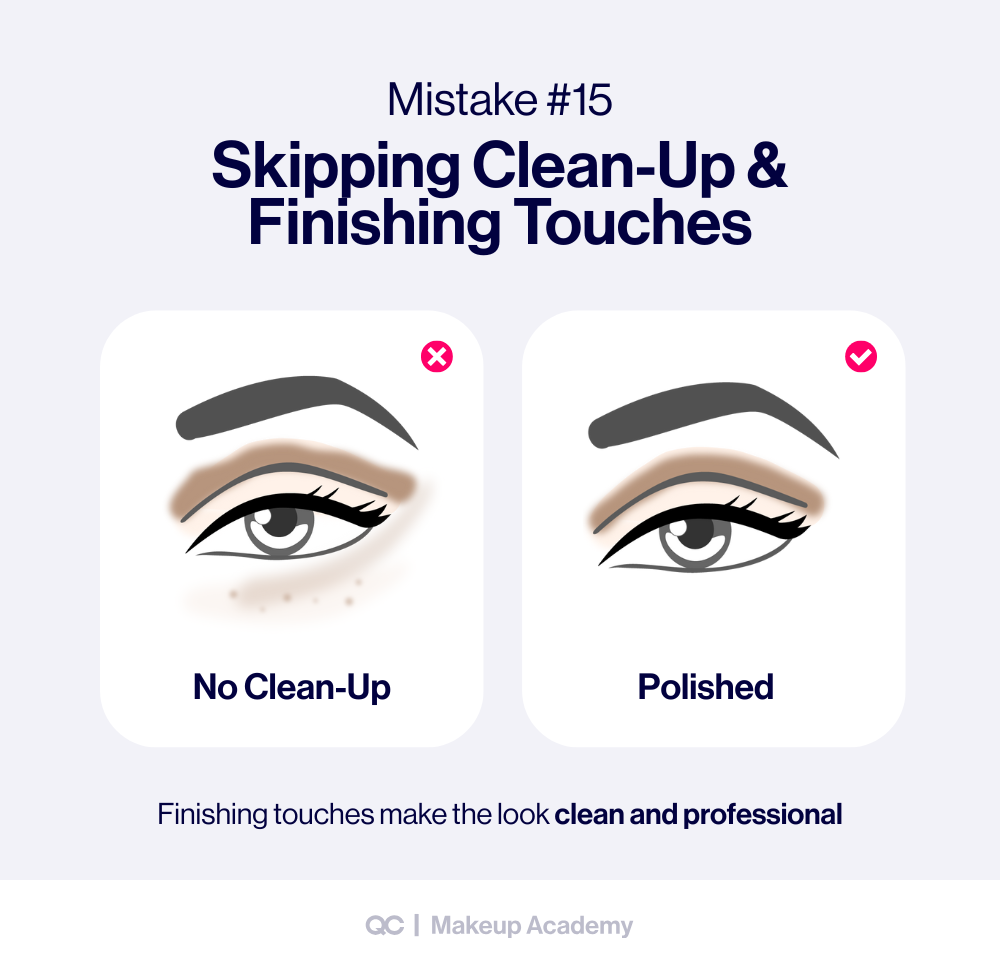
Mistake #15: Skipping Clean-Up & Finishing Touches
Lastly, a beautiful eyeshadow look can easily be ruined by fallout under the eyes or uneven edges. Therefore, always finish with cleanup: use a fluffy brush or a little translucent powder to sweep away fallout. Check that edges are even, and add final touches like inner-corner highlight. These small details make the difference between amateur and polished!
Eye Shadow Looks for Every Occasion
Hands down, the BEST thing about eyeshadow is how versatile it can be. With a few simple changes in shade and technique, you can create eye makeup looks for any occasion—from quick everyday styles to dramatic evening glam. Get inspired by these versatile eye shadow looks below, and you’ll always have the perfect style, whether you’re aiming for soft and subtle or bold and unforgettable!
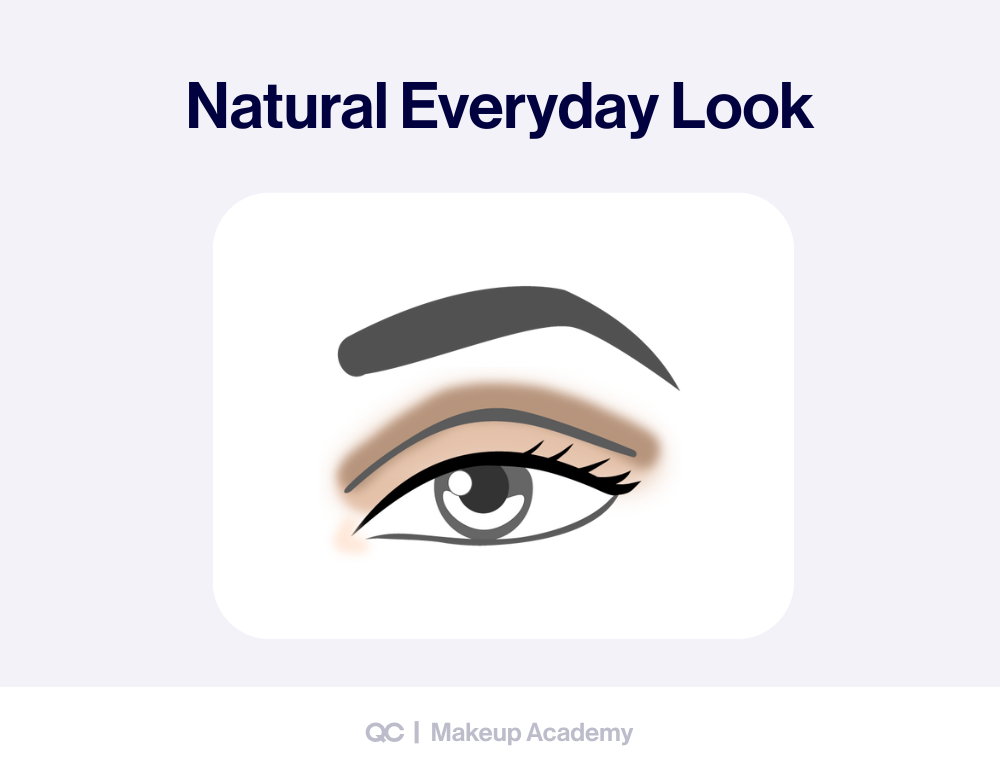
Natural & Everyday Looks
Natural eyeshadow looks are perfect for work, school, or casual days. The goal is to enhance your eyes without making them the center of attention.
TIPS:
—Use soft matte neutrals like beige, taupe, or light brown.
—Apply a light shade on the lid, a mid-tone in the crease, and a touch of highlight in the inner corner.
—Keep eyeliner soft or skip it altogether.
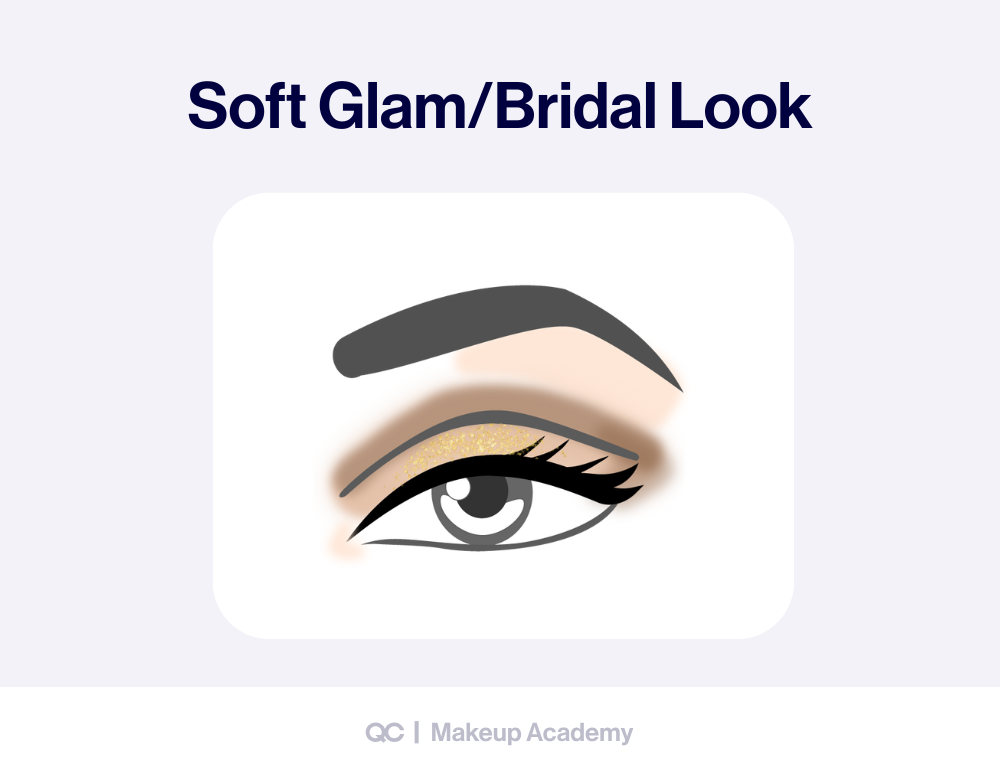
Soft Glam & Bridal Looks
Soft glam is a step up from natural but still wearable. It’s the go-to style for bridal makeup, date nights, or special events.
TIPS:
—Combine neutral mattes with shimmery champagne or rose gold on the lid.
—Blend warm browns into the crease for soft depth.
—Pair with defined lashes or wispy false lashes for a polished finish.
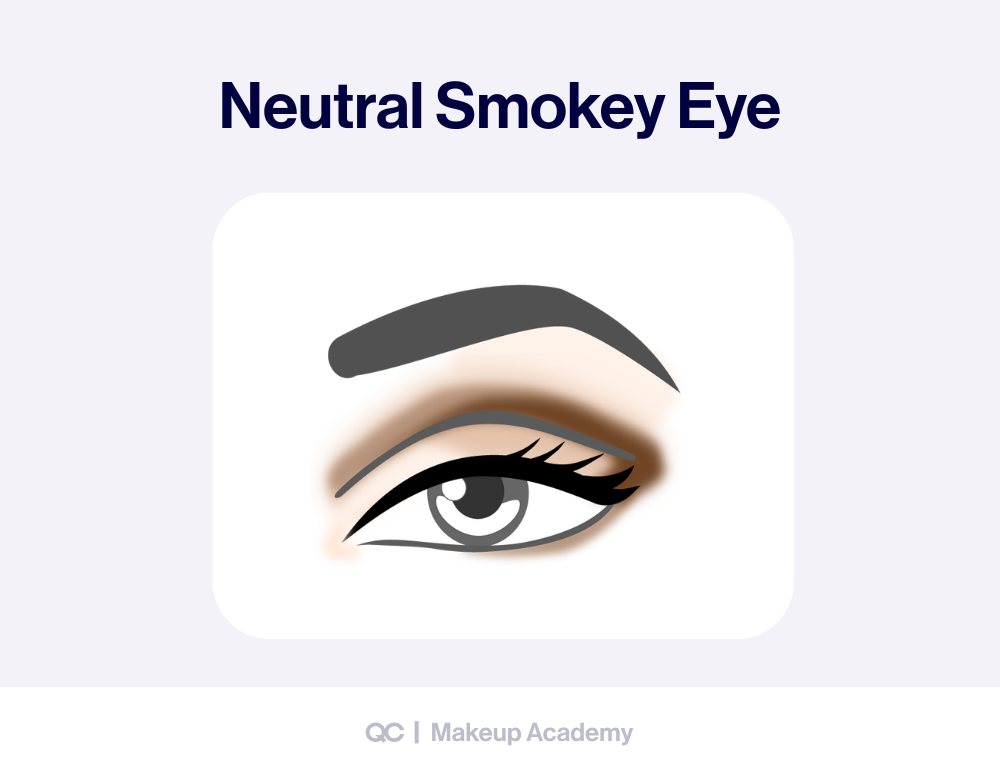
Smokey Eyes in Neutral Tones
The smokey eye is a classic: bold, sultry, and perfect for evenings or photoshoots!
TIPS:
—Use a gradient from medium brown on the lid to dark brown or gray at the outer corner.
—Blend upward and outward to soften edges.
—Add liner smudged along both upper and lower lash lines for intensity.
Trendy Looks (Cut Crease, Halo, Color Pop)
Trendy techniques make your eye shadow looks modern and Instagram-ready.
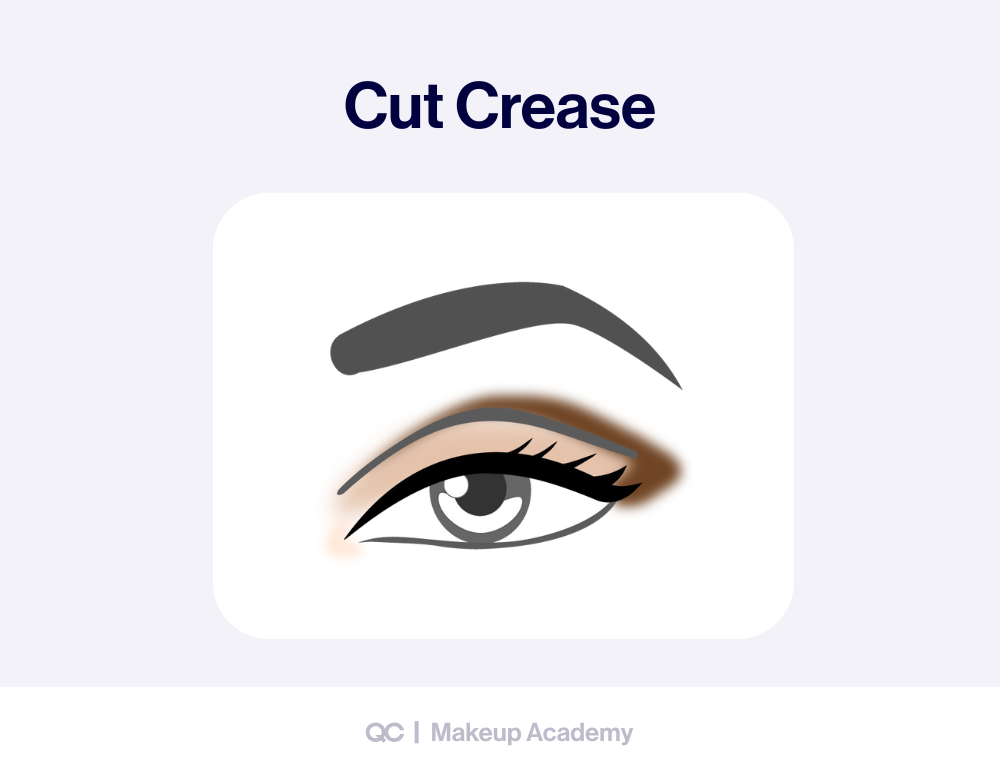
Cut Crease
- Sharp division between lid and crease, usually with a lighter lid shade and darker crease.
- Best for dramatic, defined styles.
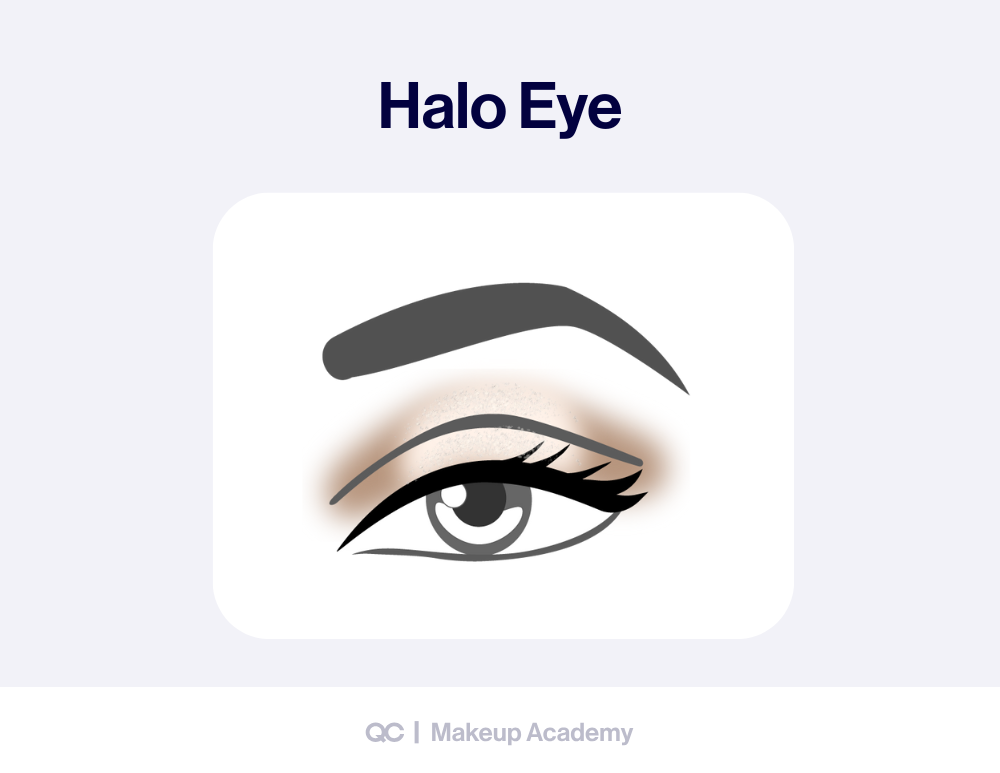
Halo Eye
- Light shimmer shade in the center of the lid, framed by darker shades on both sides.
- Creates a rounded, spotlight effect.
Color Pop / Festival Look
- Bright, bold shades like blue, purple, or neon.
- Can be applied all over the lid or as a liner accent.

Final Thoughts: Take Your Eye Shadow Looks to the Next Level
Eye shadow is more than just color on your lids; it’s one of the most powerful tools in makeup artistry! With the right shades, tools, and techniques, you can create eye makeup looks that suit any occasion, from quick everyday styles to bold and glamorous finishes.
Now that you’ve learned how to apply eyeshadow step by step, seen how to avoid common mistakes, and discovered different looks for every event, it’s time to take things further. Practice is important, but real growth comes from learning with expert guidance…
That’s Where QC Makeup Academy Can Help!
Our online makeup certification courses are taught by professional MUAs (like Nathan Johnson!) who know what it takes to succeed in the industry. You’ll get personalized feedback, step-by-step video training, and certification that proves your skills.
”QC Makeup Academy is worth every penny! The Master Makeup Artistry Course changed me in such a profound way. From matching foundation to creating a beautiful smoky eye, I learned it all!
Erica CanoQC Makeup Academy Multi-Graduate
Ready to elevate your artistry? Explore QC Makeup Academy’s online courses today and start your journey toward mastering eye shadow looks—and SO much more!
FAQs About Eyeshadow Looks
What is the easiest eyeshadow look for beginners?
A simple natural look is best for beginners. Apply a light shade on the lid, a medium shade in the crease, and a touch of highlight in the inner corner. This basic three-shade technique works for almost every eye shape and is a great starting point.
What are the basic rules for applying eyeshadow?
The golden rules are:
- Start with an eyeshadow primer.
- Apply lighter shades first, then build up to darker ones.
- Blend edges with a clean brush.
- Keep shimmer shades on the lid or inner corner.
- Always finish with a touch of shadow on the lower lash line to balance the look.
How do you blend eye shadow perfectly?
Blending takes patience and the right brush. Use a fluffy blending brush and move it in small windshield wiper motions along the crease. Layer colors gradually, and keep a clean brush nearby to soften edges without adding more product.
What’s the difference between everyday eye makeup and glam eye makeup?
Everyday looks use soft neutrals and light blending to enhance the eyes without being dramatic. Glam looks use deeper shades, shimmers, and bolder liner or lashes for a more dramatic, camera-ready effect.
Can I create a full look with just one eye shadow shade?
Yes, a one-shadow look can be chic and simple. Sweep a mid-tone shade across the lid, then use the same shade to lightly define the crease and lower lash line. For extra dimension, you can add shimmer to the center of the lid.
And remember: makeup is supposed to be fun, so experiment and play around with your colors! For instance, you don’t have to stick to traditional dark or black shades for dramatic looks like a smoky eye. ANY color can be used to create beautiful, bold effects. The fun of eye shadow looks is in experimenting, so try new colors and see which ones make your eyes stand out most!