Spring is finally here, which means it’s that time of the year again for a good ole’ spring cleaning! Today, let’s focus on your professional makeup kit. Given that so many of us are hanging out at home anyways, this is the perfect opportunity to do something productive.
After all, when life eventually goes back to normal, you’re not going to want to waste any time! You’ll want to hit the ground running and start booking clients again. Spring cleaning your makeup kit now means you won’t need to do it from the ground up later.
And hey, if nothing else, it’ll give you a good project to work on, and keep you busy for at least an hour or two!
When it comes to decluttering and sanitizing your products, we just so happen to have a handy guide for your reference:
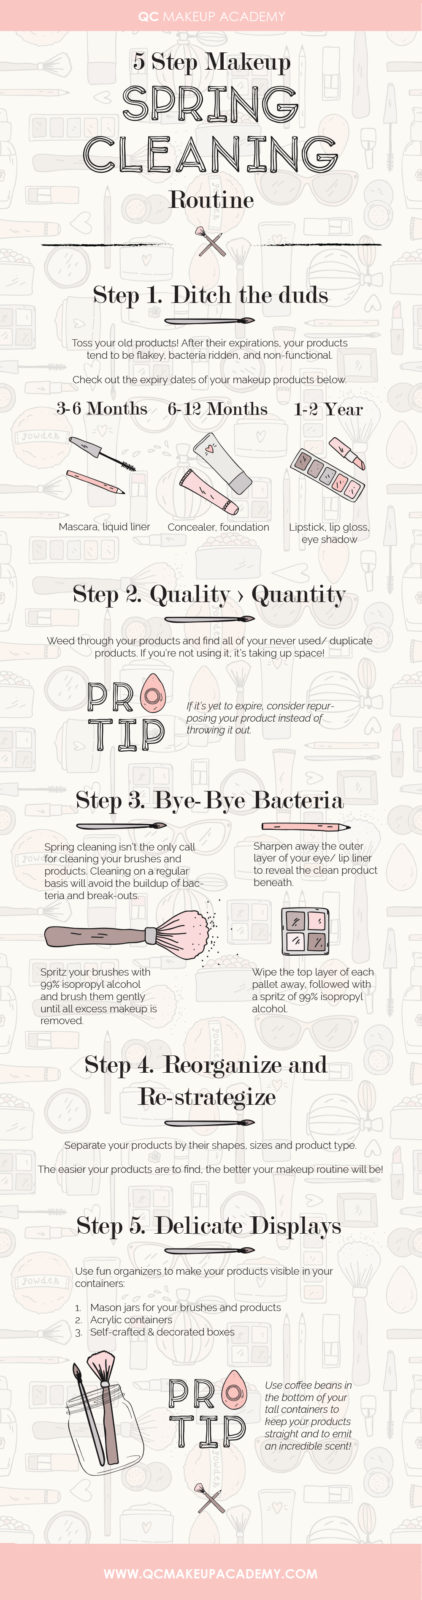
Let’s take a closer look at each individual step, shall we?
It’s important that you always pay attention to the expiration date on your makeup products. Once it’s expired, it absolutely should NOT be used anymore!
Expired makeup products can become a breeding ground for bacteria and other unwanted germs. The last thing you want to do is give yourself (or your client) an infection. It’s always better to be safe than sorry.
As a general rule of thumb, certain products tend to have a specific shelf-life. For instance:
- Mascara and liquid eyeliner are typically good for up to 3-6 months
- Concealer and foundation are typically good for up to 6-12 months
- Lipstick, lip gloss, and eyeshadow are typically good for up to 1-2 years
That being said, there are always exceptions to every rule. So, make sure to check each of your product’s expiration dates. Once that deadline arrives, toss it out!
Step 2: Quality over quantity
Plenty of us are guilty of going a little over the top sometimes when it comes to makeup. By that I mean, getting overly excited when stocking up, and buying way more products than we realistically need!
Chances are, there’s at least 1 product in your professional makeup kit that you rarely (or never) use. If that’s the case, all it’s doing is taking up unnecessary room. So, go through all of your products, and objectively ask yourself: “Do I need this in my kit?”
If you know the answer is truly no, it’s probably safe for you to remove it. Your professional makeup kit should be orderly, and filled only with products relevant to your job.
This doesn’t mean you need to throw the product out altogether, though! After all, you did pay valuable money for it. But maybe it would be better off in your personal makeup kit. Perhaps you can even refurbish it into a makeup product you’ll be more likely to use in the future!
Step 3: Bye-bye bacteria
Now that you’ve narrowed down which makeup products you want to keep, it’s time to clean them! As a makeup artist, you probably already do this on a regular basis (and if you aren’t, you should be). But since you’re spring cleaning, now’s a great time to do it again.
Sanitary makeup products are absolutely mandatory for your career. It’s never an option to use dirty products on your client’s skin! Doing so can risk infection, allergic reactions, sickness, and all sorts of other bad surprises that can really tank your reputation as an artist.
Here are a few quick tips for cleaning your products:
- Spray 99% isopropyl alcohol onto your brushes, and then brush them gently until all makeup residue has been removed.
- Sharpen all eyeliner pencils, lip liners, and other pencil products until the outer layer has been completely removed.
- Wipe away the top layer of your eye shadow – as well as all other powders / palettes – and then spritz with the 99% isopropyl alcohol
For a more in-depth look at proper cleaning techniques for your makeup tools, you can keep reading here!
Step 4: Re-organize and re-strategize
Sometimes, it can become easy for your professional makeup kit to get a little messy. Especially when working on a client, you’re naturally focused on the job. It’s understandable that keeping your kit neat and orderly can sometimes be a second priority.
However, a clean kit is a happy kit – and it definitely makes your job much easier!
Sort through your makeup products, and group together everything that falls under similar categories (i.e. lip products, eyeshadows, liners, mascaras and lashes, etc.). Alternately, you can group your products together by brand, by size, etc. It’s YOUR kit, so find whichever way works best for you!
Once everything is grouped together the way you want, then you can assign them their proper spots within the kit itself. Keeping things organized like this will save you time during a job, and increase your overall efficiency!
Plus, organization is always aesthetically pleasing, so it’ll definitely impress the client and make you look super professional!
Step 5: Delicate displays
When on the job, you may wish to pull out all the tools you intend to use for the client’s look, rather than grabbing them from the kit one-by-one. Instead of laying them out on a table, why not group them together in something practical and cute?
Mason jars, acrylic containers, and self-made boxes are great ways to not only organize your products, but showcase your high-quality tools for others to see! Not to mention, you can get really creative with decorating these displays by adding your business logo in plain sight. (Hello, branding!)
If you’re not a professional MUA, and are using these tips to spring clean your personal makeup kit, these delicate displays can be used throughout your room, or on your makeup vanity! If you happen to be a beauty vlogger and/or a YouTuber, you can always subtly slip them into your videos, too.
A little positive self-publicity can go a long way!
Pro tip: You can always sprinkle coffee beans into the bottom of your containers. In addition to keeping your makeup products straight and upright, it’ll also emit a deliciously inviting smell! Seriously, who doesn’t love the smell of coffee?
Spread the word!
Now more than ever, it’s important to keep things clean and safe! You may have friends, family, or even clients who might benefit from the knowledge shared QC’s spring cleaning guide.
So why not share it, raise awareness, and motivate others to spring clean their own makeup kits?
Here’s the link you can use to share the image on your own website:
</p>
<p><strong>Please include attribution to htpp://qcmakeupacademy.com with this graphic.</strong></p>
<p><a href=’https://www.qcmakeupacademy.com/2020/04/5-steps-for-spri…keup-kit-in-2020/’><img src=’https://www.qcmakeupacademy.com/wp-content/uploads/2020/04/spring_cleaninginfographic-1.jpg’ alt=’5 Step Makeup Spring Cleaning Routine’ width=’1000px’ border=’0′ /></a></p>
<p>
Got any more useful tips for spring cleaning your professional makeup kit? Let us know in the comments!