Brittany Hall, Author at QC Makeup Academy - Page 4 of 4
All Posts By

Brittany Hall

Cat Eye Makeup Tutorial, Part I

By Makeup Tutorial No Comments

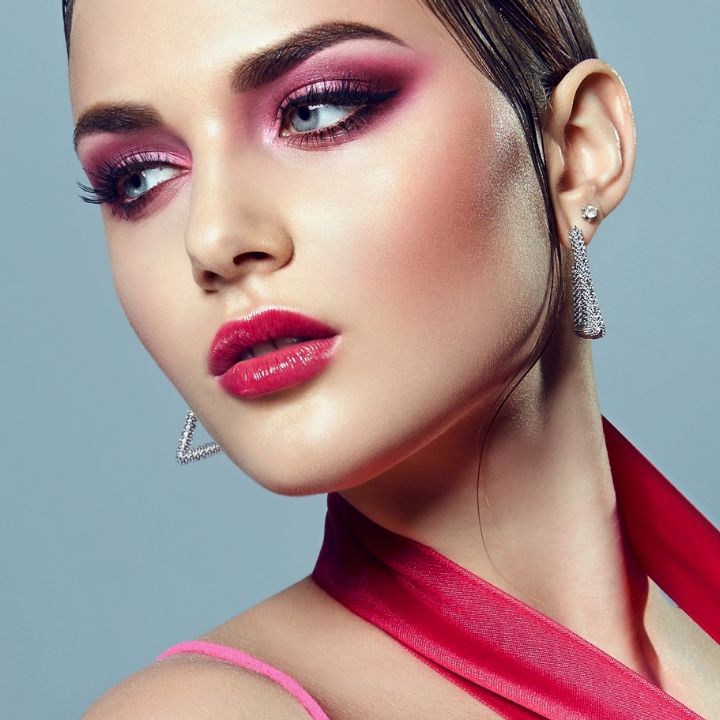
Recently, the nine looks below were posted on the QC Facebook page. Everyone seemed to absolutely love look #5 so I decided to recreate it for you! As the lower lashes aren’t quite visible in the photo, I decided to create what I think works well with this look.

Here’s my version of the look, step-by-step. Follow along with me!

Step 1

Start with some creamy neutrals as your base. Use cream or white on the lid and brow to highlight, and a soft pink or brown in the crease.

Step 2

Apply a liquid liner across the lid at your desired thickness.

Step 3

Create an extension of your lower lash line into the beginnings of your winged liner.

Step 4

Connect the tip of the wing to the top of the line you have created on your upper lash line.

Step 5

Fill in the gap and apply mascara and false lashes.

Step 6

Apply a white liner on the lower waterline. Be sure to avoid smudging it onto your lashes as we want to apply a clean line along them afterward.

Step 7

Use a flat, thin liner brush to apply a brown eyeshadow along the root of the lower lash line. This will give the illusion of bigger eyes!

Step 8

Apply a light coat of mascara along the lower lashes, keeping it clump-free and clean-looking.

Step 9

Apply a red lip and away you go! This is a great look for this time of year, whether it be for a Christmas party or a night out with the girls!

Hope you all enjoyed this step-by-step tutorial and were able to create the look yourself with ease. Make sure you check back in tomorrow! We’ll take the drama up a notch with a dark and sultry cat-eye look.

How to: Cranberry Glitter Makeup Tutorial

By Makeup Tips and Tricks No Comments

So as most of you probably know, QC Makeup Academy is running an awesome contest. Check the details out here! You need to create a makeup look using glitter. I’ve created another look to inspire you to get creative with glitter. If you’d like to check out a previous glitter-inspired post by me, click here. This time around I used the beautiful model Marie. I also decided to incorporate more than just the eye in my step-by-step instructions so I can show you how we achieved her complexion as well. For a glitter look or any type of bolder eye look, I find it’s easier to start with the eyes. That way you can just wipe clean any fallout from the glitter or dark shadows with a makeup wipe.

Here is a look at the shadows used to create this eye look!

Products I Used

  • A matte black shadow
  • A cranberry shadow
  • A brow highlight
  • A glitter (this look can be done with any type of glitter you have in your kit!)

Step-by-Step

  1. Start with a clean, primed eyelid
  2. Since this is very finely milled glitter, I did not need to use glitter glue. The primer was enough to hold the glitter. Apply the glitter to the high point of the eye, just in the center of the lid. The glitter I used is a limited edition from Make Up For Ever, but check out their glitters and diamond powders. They are amazing! This one has a reddish undertone with a blue/green glitter. It reminds me of mermaid skin!
  3. Take a cranberry shadow (MAC has a great one called “cranberry”), and blend it into the outer crease
  4. Take that same cranberry hue and blend it up around the top of the glitter into the crease and down into the inner corner of the eye
  5. Deepen the outer corner of the crease with a matte black shadow
  6. Clean up any fallout and sharpen up the edge of the shadow using a makeup wipe
  7. Apply a brow highlight and a tear duct highlight
  8. Apply liquid liner and mascara
  9. Apply a nice, full set of false lashes!

Next up: Complexion

Prime the face and apply medium to full coverage foundation. In Marie’s case, I wanted to do some color correction as there is a bit of redness in the skin. I used a color-correcting primer and I used a slightly yellow foundation to counteract the pinkness in her skin.

Next up, I applied an under-eye concealer to brighten up the look. I chose to keep the under-eye clean of any shadow or liner, so I brought the concealer right up along the lash line. This will give us a very clean look. Then I contoured her face using a liquid foundation in a dark color. I applied this contour along her hairline, under her cheekbone, and under her jaw line.

Then, I softened the liquid contour using a fluffy brush. With that same brush (as shown in the first picture below), I applied a matte bronzer to set the liquid contour, blending into the center of the face to soften any edges. Next, I applied a blush along her jawbone right on top of the contour.

Lastly, I set the whole look using a translucent powder and applied a powder highlight along the tops of her cheekbones (right above the blush), and down the center of her nose. Pop on some lipstick and away you go! I chose to stick with a super neutral lip as the eyes are the focus of this look.

Hope you all enjoyed this tutorial! The best of luck to those who are entering the All That Glitter’s contest! Not only is this an inspiration for that contest but it’s also a great look for holiday parties or any night out!

How to: Sultry Smokey Eye for Fall

By Makeup Tutorial No Comments

Recently QC Makeup Academy posted a picture on Facebook of a lovely fall-inspired smokey eye. Everyone was swooning over it so I was asked to recreate it for you guys in my own way. I hope you like it!

Here are the steps to re-create it yourself…

Step 1

Start with a clean, primed eyelid. Apply your primer from the root of your lash line all the way up to the brow.

Step 2

Take your desired green shade (I mixed the dark and light green you saw above) and apply it to the center of the lid. You’re applying at the roundest part, or the “peak”, of the lid.

Step 3

Apply a bronzy gold into the inner corner of the lid and along the top of the green. Blend it into the first half of the crease.

Step 4

Pick up the cranberry color on a blending brush and apply it to the outer corner of the crease, blending into the green and bronzy hues.

Step 5

Apply a brow highlight underneath the brow and into the inner tear duct. This will add a little pop!

Step 6

Add liquid liner and lashes.

Step 7

Smudge the cranberry shade along the outer lower lash line.

Step 8

Smudge the bronzy shade along the inner lower lash line.

That’s all she wrote, folks! I hope you found these instructions comprehensive and are able to recreate this look with ease. If you have any questions, leave them for me in a comment below!

Brittany’s Daily Summer Makeup Routine

By Makeup Tutorial No Comments

With the weather finally changing and summer fast approaching, it’s always good to take a look at our makeup routine and adapt it to the warm weather.

Today I’m going to share with you my summer makeup routine, as well as some, must-have products!

Going into summer with a tan feels great. Invest in an amazing self-tanner and you will have everyone fooled. A self-tanner is always a safer way to achieve a beautiful sun-kissed glow. Plus, once the shorts and skirts come out of the closet it’s nice to feel extra confident by adding a bronzed glow to your legs!

I recently tried a new self-tanner called Vita Liberata sold at Sephora.

I am absolutely loving the color this self-tanner provides. The mousse pumps out and has a reddish undertone which really helps you avoid looking orange and appears so naturally sun-kissed. I find a mousse self-tanner to be extremely foolproof when used with a tanning mitt like this…

You can see where you are applying the product with each swipe, allowing you to create a streak-free glowing tan from head to toe!

Once you have created a nice base tan with a self-tanner of your choice, it is important to keep your skin hydrated. For summer, I am absolutely loving dry oil for my skin. It’s fast-absorbing and still super hydrating, leaving a beautiful glow on the skin. I’m currently loving this head-to-toe body oil from The Body Shop called Beautifying Oil. It’s safe for the body, face, and hair!

Now that we’ve achieved glowing, hydrated skin from head to toe, let’s move on to a beautiful summery fresh daily makeup routine. This is great for the office or for a girl on the go!

Step 1

After cleansing and moisturizing your skin, apply a tinted moisturizer all over, blending in with your fingers or a brush. Right now I’m loving the Stila Illuminating Tinted moisturizer. It takes down any redness and naturally blends out minor imperfections while adding a dewy glow to the skin.

Step 2

If you tend to be oily, gently dust a translucent powder all over to set the tinted moisturizer. If not, let the tinted moisturizer dry for just a few moments before moving on to the next step…bronzer! Apply a bronzer along the top of your forehead, almost brushing the bronzer into your hairline. Then apply into the hollows of the cheeks, under the jaw line and anywhere else you wish to look bronzed! Personally, I love a matte bronzer. I find you don’t have to worry about looking like a disco ball if you like to apply your bronzer with a heavy hand. My personal fave is Chocolate Soleil by Too Faced.

Step 3

Blush! I absolutely love a rosy glow for summer. Blush complements bronzer and a beautiful tan so well. I like to get playful with my blush for summer, using brighter shades that pop. Apply a blush of your choice to the apples of the cheek or just above where you applied the bronzer (more to the side of your face). Both application techniques are great, it’s just a matter of choosing one you feel works best for you. For a bright pop of pretty pink try the NARS blush in Gaiety.

Step 4

On to the eyes! A summer look to me is about low maintenance and easy wear. As always, give your brow some definition by brushing a brow powder (in the appropriate color) through your brow. This look can be all about the brows. After creating your summer glow and supple dewy skin, apply a strong brow and you’re out the door! It’s a very chic summer look. If a strong brow isn’t for you, a waterproof cream shadow can be your best friend. Using your fingertip, blend a cream shadow across your lid, softening it into the crease. Choose a color you love or one that complements your eye and skin color! I love the Stila Smudge Pots; a great universal color is “Kitten.” It’s a pinky nude and can also double as a highlighter! Add some mascara and eyeliner (if you choose) and ta-da! A fresh summery eye look.

There you have it, a fresh summery look that will wear great on a hot summer day!