October is the time to hone your special effects makeup skills and start thinking about what you want to be for Halloween. But remember, not all special effects looks need to be gory! Adding your own unique spin on a regular makeup look can show off your creativity.
Follow along with Stephanie Wyatt as she shows us how to create a gorgeous SFX look using faux autumn leaves and glam eye makeup!
Let’s Recap…
To start off, Stephanie primes her face using the L’Oréal Paris Magic Lumi Primer. She uses a separate primer for her eyes to ensure that her makeup stays put. Try out the Urban Decay Eyeshadow Primer Potion – QC students get a 40% discount on Urban Decay products!
Grab a full coverage concealer to cover any under-eye circles and brighten the eyes, and use a lighter coverage formula to cover other blemishes or discoloration on the skin. Next, use your favorite foundation to even out your skin and blend well using your tool of choice. Stephanie uses the Real Techniques Miracle Complexion Sponge.
To set her under-eye area, Stephanie uses the baking method to make sure no creases form in her makeup. Her product of choice: Laura Mercier’s Translucent Powder. Allow the powder to sit, or “bake”, while you complete the rest of your face.
Using the QC Makeup Academy contour palette, Stephanie chooses a shade suitable for her skin tone and lightly contours her cheeks to add dimension. To further warm up the face, Stephanie adds Benefit’s Hoola Bronzer to her cheeks and the high points of her forehead. For a touch more color, add some blush.
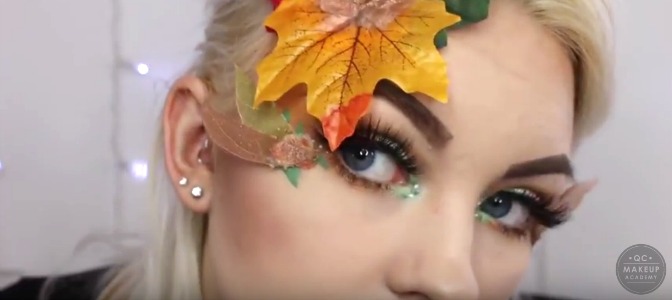
For her eyes, Stephanie is using the QC Makeup Academy eyeshadow palette. Using a mix of gold, orange, brown, and bronze tones, fill in the crease of the eye. If you’d like, you can sweep the shadow out and up towards the hairline to create a dramatic effect. Start with the lighter gold and yellow shades in the crease, and focus your darker browns or bronze colors on the outer V of the eye.
To make her lids pop, Stephanie adds a small amount of concealer over two-thirds of her eyelid, and packs on a light beige eyeshadow to set it. Next, she goes in with a light green shadow and applies the color directly over top to make it pop.
For an extra pop of color on the eye, Stephanie adds an orange liquid liner by NYX. Create a gradient effect by using green liquid liner on the inner part of your eye. To make the color stand out, add gold liquid liner directly above your colorful liner.
To finish off the eyes, Stephanie adds false lashes for more drama, buffs orange shadow under her lower lash line, and fills in her brows. Complete the look by adding small dots of green and white liquid liner on the inner corner of the eye.
Apply highlighter to the high points of your face, including the top of the cheekbones, the bridge of the nose, and the Cupid’s bow.
Use black lipstick on the lips, carefully lining the lips with a precise lip brush, and drawing the corners of the lips out to create a dramatic wing. For an extra touch of color, use various colors of liquid liner to create dots around the lips. If you’d like, you can use simple black liner instead.
To start the special effects step, Stephanie separates tissue to create thin pieces and then rips them into small strips. Using liquid latex, she carefully applies it to the skin, adds tissue, and applies liquid latex over the tissue. Lightly push your faux leaves on top, and set by adding latex and more tissue. Allow to dry before carefully tearing away the excess tissue.
Repeat this step wherever you would like to place more leaves.
In order to blend the leaves into the skin, Stephanie adds eyeshadow (the same orange color used on the eyes) on top of the dried tissue and adhesive.
Optional step: draw stems with green liquid liner where the leaves sit on the skin.
Want to learn how to do special effects makeup? Find out what you’ll learn in QC’s Special FX Makeup course!