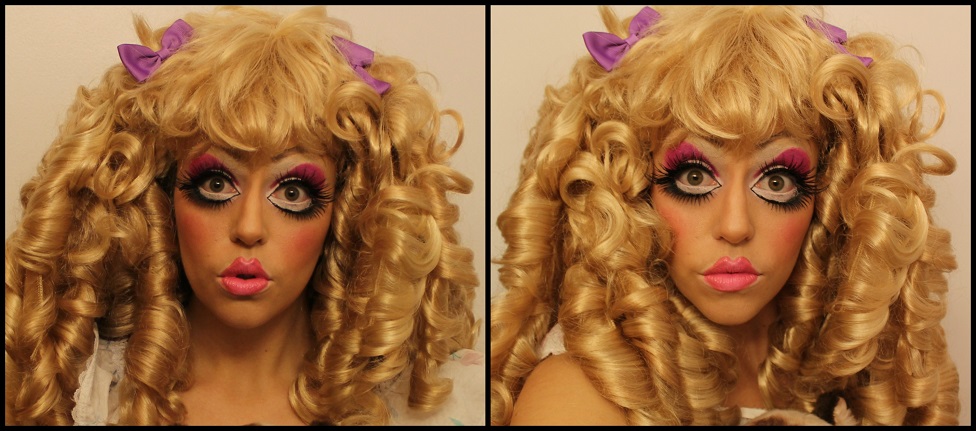
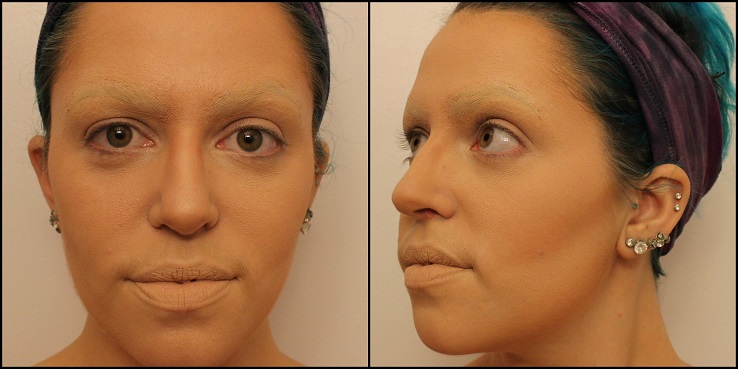
Exaggerating your features for stage makeup helps the audience see your face clearly! This tutorial outlines a theatrical cartoon doll look that can also be altered for a subtler version. A cartoon doll makes a great costume for a party, but you might prefer less dramatic features for close encounters! As I explain the theatrical makeup, I also make notes for a softer appearance. Here are some ways to make your facial expressions stand out even at the back of the audience!
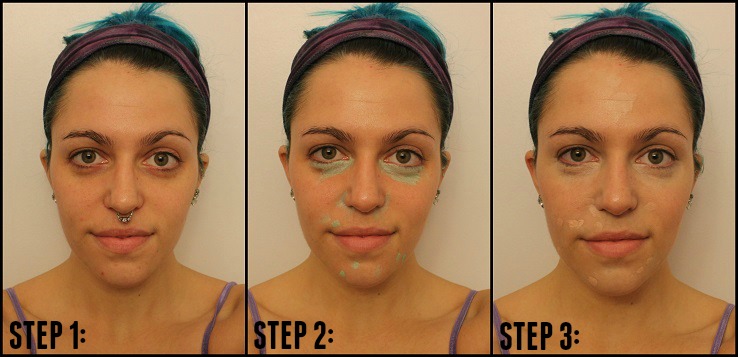
Step 1: Preparing your face
Clean and moisturize your face. Use a foundation primer for longer wear. This stops natural oils from creasing your makeup. I used Smashbox Photo Finish Foundation Primer.
Step 2: Cover redness
My skin is prone to redness around my nose and eyes. Neutralize redness with a green concealer. I used L’Oreal Paris Studio Secrets, Secret No. 2 Anti-Redness Primer. If the area under your eyes is purple, use a yellow concealer instead. Blend using a small brush or a sponge.
Step 3: Cover flaws
Cover inconsistencies in your skin for an even tone. Apply a concealer that matches your skin tone under your eyes, around your nose, or where you have a breakout. I used Benefit Erase Paste. Blend with a small brush or a sponge until the color is even.
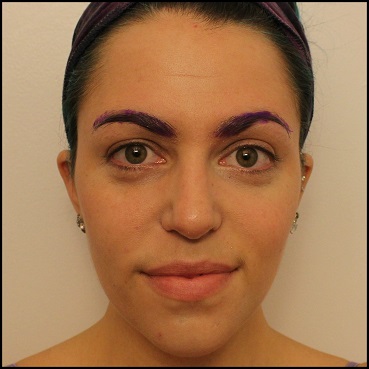
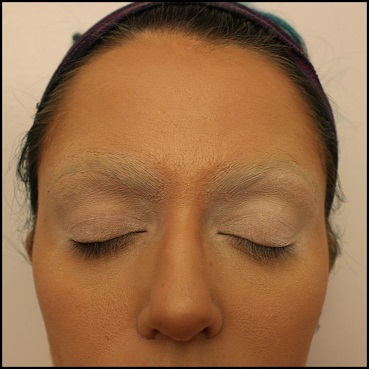
Step 4: Gluing down eyebrows (Optional!)
Covering your eyebrows allows you to create the illusion of much larger eyes. You’ll draw new ones later! This makes your features more visible to your audience. Use a glue stick and a spooley (a brush that looks like your mascara wand), or an eyebrow brush/comb. I used a purple Elmer’s glue stick so I could tell when the glue dried!
Brush your brows against their normal growth pattern so they stick up. Apply the glue in that same direction and comb your brows back down. Apply more glue. Wait until it turns clear and dries.
Take a palette knife, scrape some glue from the stick, and spread it smoothly across your whole brow. Let it dry fully before moving on!
Step 5: Cream foundation
Use two cream foundations; one matching your skin tone and one slightly darker. Cream foundation works better for contouring than liquid foundation, so your audience will see your features better. For a subtler look, simply apply your regular foundation.
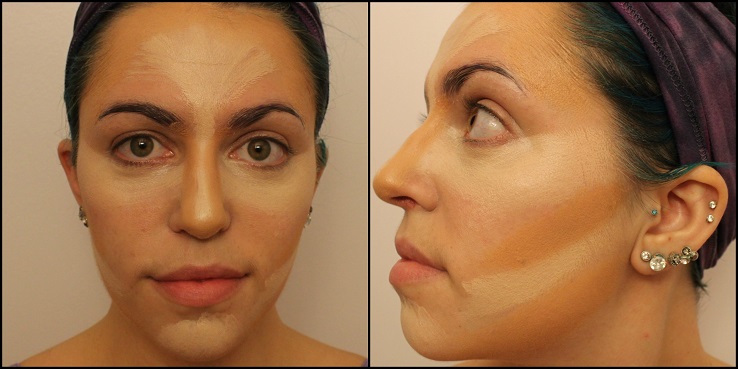
Using a medium sized brush apply your lighter foundation in strokes that resemble war paint. Concentrate on your T-zone (the bridge of your nose up to your forehead), under your eyes and out toward your hair, and in the area between your jawline and the hollows of your cheeks. I used Cover FX cream foundation in N10.
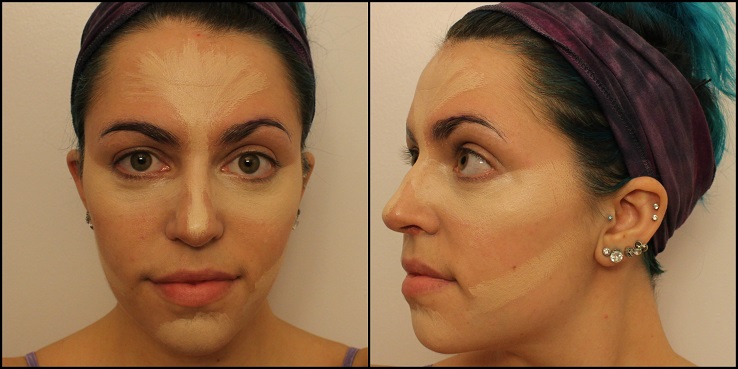
Using the same brush stroke, apply your darker foundation in a line under your cheekbones angling up toward your hairline, along your jawline on each side, lightly around the top edges of your forehead near your hairline, and thinly down each side of your nose. I used Cover FX cream foundation in N50.
Step 6: Cover your eyebrows and lips
For a theatrical look, use a medium brush and lighter cream foundation to cover your brows. Apply enough to cover the hairs and blend the edges with your brush so they’re less obvious. Don’t rub, or the glue will flake off!
Cover your lips with light cream foundation. Later, you’ll draw lips shaped like a doll’s! Covering your lips lets you play with the shape of your mouth.
Step 7: Blending foundation
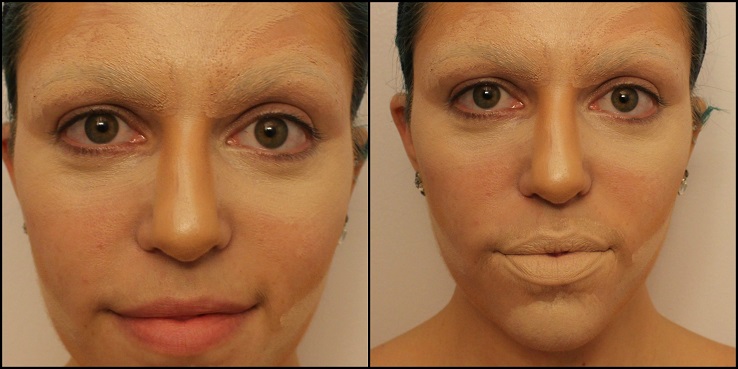
Blend your entire face using a blending brush or a makeup sponge. I used an Original Beauty Blender sponge. Avoid heavy strokes or smearing; you put those colors on those lines for a reason! Use a light circular motion with a brush, or a patting motion with your sponge.

Step 8: Set your foundation
Setting foundation with powder stops it from creasing. If your skin is even and fully corrected by this point, use a colorless, translucent powder. If you still need additional coverage, use a light powder matching your skin tone and apply it where your lighter foundation is. I used MAC Studio Fix NC20.
Use a darker powder to set the places where you contoured with darker foundation. Apply enough to emphasize your contour, but not so much that it looks unblended. I used the matte bronzer side of the Avon Smooth Minerals Blush Duo.
Step 9: Highlighting for emphasis
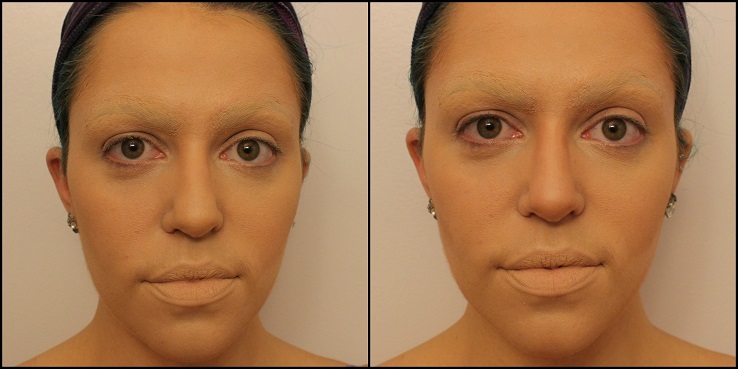
Highlight the areas where you applied your lighter cream foundation; your T-zone, under your eyes, under the hollows of your cheeks, and your chin. For a subtler look, use a matte powder highlighter. I used Avon Smooth Minerals Transparent Glow foundation in M01. For theatrical drama, try a powder highlighter with light shimmer, or a pearly liquid highlighter. Be careful with these products, they’re easy to overdo! I wanted a dewy finish like a doll, so I used MAC Soft and Gentle Mineralize Skin Finish on my T-Zone, under my eyes, and on my chin. I also used Temptu S/B liquid highlighter in Pink Pearl to lightly emphasize the bridge of my nose and under my eyes.
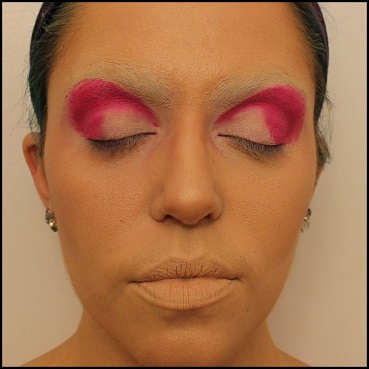
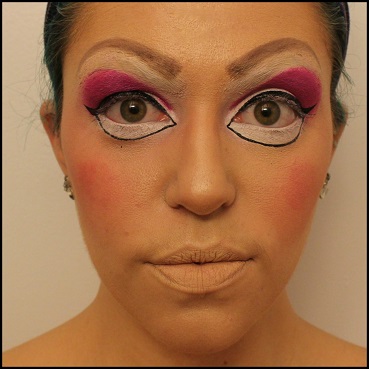
Step 10: Eye shadow
I used face paints for a theatrical style, but for a subtler look, use eye shadow in the same colors.
Prime your lids to avoid creasing. I used Urban Decay Eye Shadow Primer Potion.
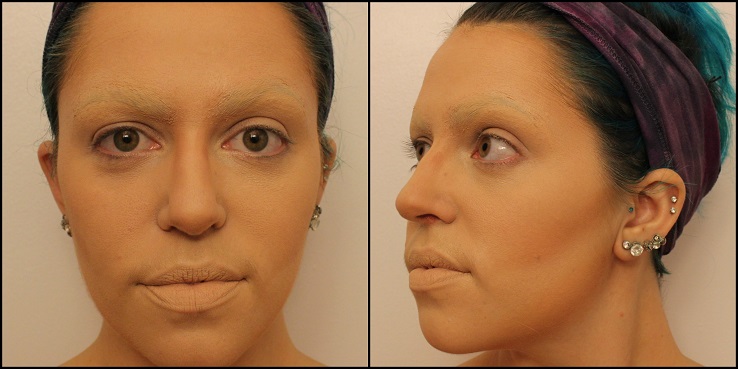
For a theatrical look, apply a neutral matte shadow across your lids and up past your crease over your eyebrow. For a subtler look, apply it from your lid up under your brow. I used M4 from the Smashbox Full Exposure Palette. Cover that same area white a matte white shadow. I used MAC Gesso Matte. Laying a base helps colors pop.
For a subtler style, use any shade of pink shadow. For theatre, consider bright face paint so the colors can be seen from stage. You’re covering a small area, so dilute the paint with a spray of 99% isopropyl alcohol. I used Fuchsia 025 from the Makeup Forever Professional Flash palette. With a small eye shadow brush, apply this in the outer corner of your eye and past your natural crease to where you want your new exaggerated crease to be. I place this near the top arch of my brow. Set the paint with pink shadow. I used Urban Decay shadow in Fishnet.
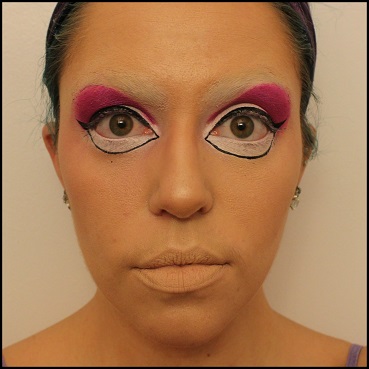
Underneath your eyes, use white to create the illusion that they are big like a cartoon or doll. Whether you’re aiming for dramatic or subtle, paint is better than shadow because it makes your eyes pop more effectively. I used White 010 in the Makeup Forever Professional Flash Palette, but any white face paint will do. Create a semi-circle under your eye from corner to corner using a small brush. Set this with white shadow. You can also brighten the white on your lid so it stands out against the pink.

Step 11: Eyeliner
I winged my eyeliner because this widens the eyes, but kept the wings small. Use a black liquid liner along your top lash line, winging from the outer corners of your lid. I used Avon Extra-Lasting in black.
To give the illusion that it’s a part of your eye, carefully outline the lower white semi-circle from the outer corner of your eye as far around the white as you like.
Line your lower water line with a white eyeliner pencil to blend the semi-circle with your eye. I used Gosh Kohl in white.
I used Avon Always on Point K01 pencil in black to line my upper waterline for a more intense look.
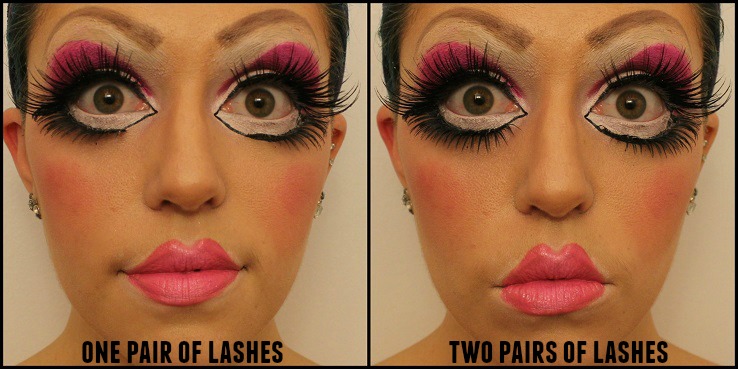
Step 12: Drawing Eyebrows
If you covered your brows to make your eyes appear larger, draw a new pair! Use a brow pencil or an angled brush and eye shadow. I chose a lighter color than my brows to match the wig I’ll be wearing. Start with the bottom arch to get the shape and give yourself an expression. I chose a rounded arch for a surprised doll look. I used Benefit Brows-a-go-go in the lighter Brow Zings shaping powder.
Highlight under your drawn brows to help them stand out. Use a highlighting pencil or white shadow along the bottom arch. I used Benefit Highbrow Glow luminous pencil.

Step 13: Cheeks
Concentrate blush on the apples of your cheeks, and try a circular shape for a cartoon look. For long wear, use a cream blush set with powder blush in a similar shade. I used Bombshell cream blush stick in Sunset and layered Anna Sui Face Color Accent in 400.
Step 14: Lips
For a subtler look, use pink lipstick in whatever shade you choose. If you covered your lips, draw some in a different shape! I drew a small pucker with an exaggerated top V, like a doll. First, draw the shape with lip liner. I used Starlooks liner pencil in K314 Tickle Me Pink.
Fill the outline with a bright pink lipstick. I used .em by Michelle Phan in Don’t tell Mom.
Add gloss for shine! I used MAC Lipglass from the Viva Glam Gaga collection in B70.
For theatricality, accent parts of your lips to make them appear fuller. Using white eyeliner, trace the edge of each lip inward from the corner, as well as the V of your top lip, and blend.
Using your finger or a small lip brush, dot matte white shadow in the center of your top and bottom lip as a highlight.

Step 15: Eyelashes
For a dainty look, use mascara on your top lashes and a small pair of fake eyelashes along the edge of your white semi-circle under your eyes. This makes your eyes appear larger without looking too dramatic.
For theatricality, use large lashes or more than one pair of lashes stacked on top of one another! I stacked two pairs of lashes on the top and bottom of each eye for the most dramatic effect.
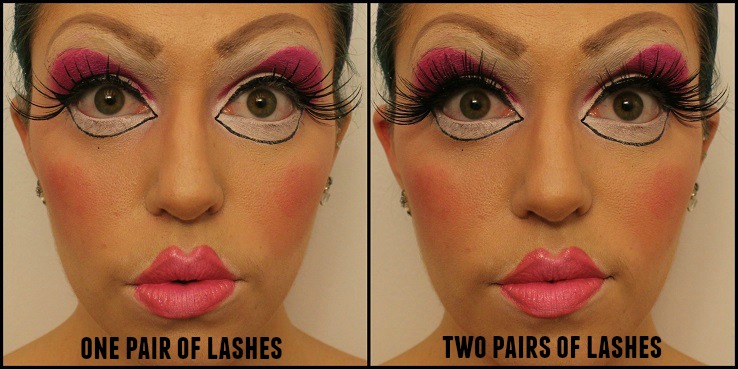
I used Duo Eyelash Adhesive in clear/white. Wait for the glue to get tacky before applying the lash, so it sticks better. Glue the bottom lashes following the outline of your white semi-circle.
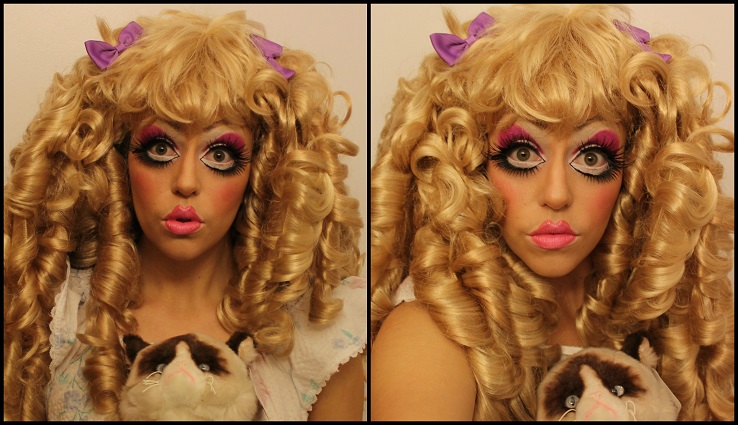
Step 16: Hair, outfit, voila!
Put in pigtails or a big bow and pick a dress! I chose a wig because I have very short hair.
Don’t let dramatic looks scare you! Learning exaggerated theatre benefits your other skills as well. Get creative!
It is so crazy to me how realistic you can make this makeup look. This kind of thing is awesome for the stage and can help you to be more in character. I generally like to do my own stage makeup, but I don’t have much experience with this type of thing. This tutorial has a lot of ideas that I can totally apply to my character for the show I am in right now!